


Summary
| Operation Stoneage | |||||||
|---|---|---|---|---|---|---|---|
| Part of The Battle of the Mediterranean of the Second World War | |||||||
 View from HMS Manxman during Operation Stoneage, November 1942 | |||||||
| |||||||
| Belligerents | |||||||
|
|
| ||||||
| Strength | |||||||
|
3 light cruisers 10 destroyers 4 cargo ships | Air & naval forces | ||||||
| Casualties and losses | |||||||
|
156 men light cruiser seriously damaged 5 aircraft lost | |||||||
Operation Stoneage or Operation Stone Age (16–20 November 1942) was an Allied convoy operation to the Mediterranean island of Malta in the Second World War. To disguise the destination of the ships, some took on their cargo at Port Sudan in the Red Sea. The four ships of Convoy MW 13 sailed from Alexandria on 16 November, escorted by cruisers, destroyers and round-the-clock air cover from captured airfields in Egypt and Cyrenaica (eastern Libya).
A complementary convoy from Gibraltar was cancelled when the British and Allied First Army, landed in Morocco and Algeria in Operation Torch (8–16 November) and made less progress along the Algerian coast than expected. MW 13 sailed about 40 nmi (46 mi; 74 km) from the African coast as far west as Benghazi, then turned north for Malta. The Axis retreat along the Libyan coast was monitored by the Bletchley Park code-breakers of the German Enigma coding machine, which revealed the inability of Panzerarmee Afrika to counter-attack the Allies.
At dusk on 18 November, an attack by Axis torpedo-bombers hit the 6 in (150 mm) cruiser HMS Arethusa forward of the bridge and killed 156 members of the crew. Arethusa made a slow voyage back to Alexandria, being towed backwards at first and then continuing backwards on one engine. MW 13 arrived at Malta at 1:30 a.m. on 20 November, breaking the Axis Siege of Malta (11 June 1940 – 20 November 1942).
Background edit
Battle of the Mediterranean edit
Despite many naval losses and the Axis gaining control over the central Mediterranean in the summer of 1942, the British had held on to Malta. The surviving ships of Operation Pedestal (3–15 August) including the tanker SS Ohio, had delivered sufficient fuel, stores and military equipment to revive British submarine and aircraft operations from the island. Submarines and Bristol Beaufort torpedo-bombers escorted by Bristol Beaufighters, regularly attacked Axis supply ships, concentrating on tankers known to the Allies through Ultra intercepts from Bletchley Park. In September, the Axis Panzerarmee Afrika in Egypt was denied 100,000 short tons (90,718 t) of supplies, including 24,000 long tons (24,385 t) of fuel.[1]

Axis shipping losses contributed to the decline of mobility that constrained Panzerarmee Afrika at the Battle of Alam Halfa (30 August – 5 September) and the Second Battle of El Alamein (23 October – 11 November).[1] As the Panzerarmee retreated, the Axis air forces had to keep pace by changing airfields frequently.[2][3] The Regia Marina (Italian Royal Navy) was expected to be the most serious threat to another Malta convoy, with six battleships, three of them the modern Littorio class, available, with two heavy-, five light-cruisers and at least twenty destroyers. The three Littorio class battleships moved to Naples on 11 November but this still left them close enough to sortie against a Malta convoy; five of the cruisers were at Messina in Sicily.[3]
Malta edit

In October, the submarines Parthian and Clyde from Gibraltar and Rorqual, in two trips from Beirut in the eastern Mediterranean, carried aircraft fuel, food, oils and torpedoes to Malta; Operation Train delivered 27 Supermarine Spitfire fighters to Malta (28–30 October). From 1 to 3 November, Parthian and Clyde delivered more stores and two attempts were made to get unescorted ships to Malta by ruse. Empire Patrol departed Alexandria on 1 November, loaded with fuel and food, escorted by to destroyers, to be disguised as a Turkish ship when east of Cyprus, then under an Italian flag when heading for Malta. Around noon on 2 November, when sailing alone, a Dornier Do 217 bomber circled the ship, a submarine periscope was seen and the commander ordered a return to Famagusta.[4]
Operation Crupper began when two ships in civilian guise sailed from Britain, with Convoy KMS 1 to Gibraltar, then detached for Malta in the hope that the Vichy French authorities would be incapable of preventing their passage. The ships were fired on by coastal artillery at Cap Bon and boarded; both captains tried to bluff their way through but the ships were interned at Bizerta. After the ruse failed, the fast Abdiel-class minelayer HMS Manxman sailed from Alexandria on 10 November and arrived two days later with powdered milk, cereals and meat, leaving for Gibraltar the same day, to collect mines and lay them off Cape Bon. HMS Welshman left from a convoy bringing supplies to North Africa for Operation Torch and arrived at Malta on 18 November.[5]
Prelude edit
Allied air forces edit
A combined Navy and RAF operations room was set up at the HQ of 201 Naval Co-operation Group, which had three reconnaissance squadrons, three squadrons of anti-submarine aircraft, four of torpedo-bombers and a long-range squadron with twin-engined fighters. AHQ Egypt and the Desert Air Force (DAF) were to contribute single-engined fighters to a north–south line 40 nmi (46 mi; 74 km) west of Benghazi, where they would hand over to aircraft from Malta; US B-24 heavy bombers were also ready at Gambut in support. At Malta, the RAF maintained a composite photographic, reconnaissance and Air to Surface Vessel (ASV) reconnaissance squadron, just under two squadrons of torpedo-bombers, three long-range twin-engined and five single-engined fighter squadrons for convoy protection and a night bomber squadron, which was due to raid Axis airfields on Sicily during the night of 19/20 October.[6] Air defence of the convoy had to contend with threats from Crete and then Sicily but the threat of attack from Cyrenaica was much reduced after the Second Battle of El Alamein. As Panzerarmee Afrika withdrew westward, the DAF was to take over the Axis air bases from which the Luftwaffe and Regia Aeronautica had attacked Malta convoys. Before sunrise on the third day of the voyage, the convoy was expected to be in range of Malta-based fighters.[2][4]
Axis command edit
The Axis command structure in the Mediterranean was centralised at the top and fragmented at the lower levels. Benito Mussolini had monopolised authority over the Italian armed forces since 1933, by taking the offices of Minister of War, Minister of the Navy and Minister of the Air Force. Feldmarschall Albert Kesselring of the Luftwaffe commanded German ground forces in the theatre as Commander-in-Chief South (Oberbeehlshaber Süd, OB Süd) but had no authority over Axis operations in North Africa or the organisation of convoys to Libya. Fliegerkorps II and Fliegerkorps X were subordinate to the usual Luftwaffe chain of command. Since November 1941, Kesselring had exercised some influence over the conduct of the German naval operations in the Mediterranean as the nominal head of Naval Command Italy (Marinekommando Italien) but this was subordinate to the Kriegsmarine chain of command. German service rivalries obstructed co-operation and there was little unity of effort between German and the Italian forces in the Mediterranean. Kesselring had the authority only to co-ordinate plans for combined operations by German and Italian forces and some influence on the use of the Regia Aeronautica for the protection of convoys to North Africa. The Italian Navy resisted all German attempts to integrate its operations; ships in different squadrons never trained together and Supermarina (Italian Navy High Command) constantly over-ruled lower-level commanders.[7]
Convoy plan edit
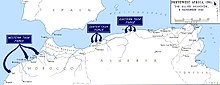
Convoy MW 13 consisted of the British Denbighshire (8,393 Gross register tonnage [grt]), Dutch Bantam (9,312 grt), the US Robin Locksley (7,000 grt) and Mormacmoon (7,939 grt). The escort was provided by the 15th Cruiser Squadron (Rear-Admiral Arthur Power) with the Arethusa-class (6 in (15 cm)) cruisers HMS Arethusa and Orion, with the Dido-class (5.25 in (13.3 cm)) cruisers HMS Cleopatra, Euryalus and Dido. The cruisers were accompanied by the 14th Destroyer Flotilla with HMS Jervis, Javelin, Kelvin, Nubian, Pakenham, Paladin and Petard. The ten Hunt-class destroyers of the 12th Destroyer Flotilla, comprising HMS Aldenham, Beaufort, Belvoir, Croome, Dulverton, Exmoor, Hurworth, Hursley, Tetcott and the Greek Pindos provided support.[8] For security reasons, Bantam and Denbighshire loaded cargo at Port Sudan and their bridges and gun positions were given extra sandbag protection. The ships met at Suez Bay and entered the Suez Canal on 15 November, touched at Port Said on 16 November to embark more ammunition and entered the Mediterranean at 4:00 p.m. The ships were to follow the Cyrenaican shore, about 40 nmi (46 mi; 74 km) out, within the range of Allied single-engined fighters for two days after leaving Port Said, until north of Benghazi at dusk for a turn north and a run for Malta.[4]
Land campaign edit

The Eighth Army recaptured Mersa Matruh on 8 November, the day that Torch began; a convoy set sail from Alexandria to Matruh the same day.[9] Convoy MW 13 was not due to sail until the landing grounds at Tobruk had been recaptured and it was hoped that Martuba Air Base, near Derna, would be operational by 17 November.[4] On 11 November, DAF reconnaissance aircraft uncovered Axis evacuations of Bardia and Tobruk, which were captured on 12 and 13 November; the first Allied convoy reached Tobruk on 19 November.[9] Axis fuel shortages and the stocks available at Benghazi made it likely that the retreat would continue along the coast road (Via Balbia) north of the Jebel Akhdar and Ultra intercepts of Axis Enigma machine cyphers by 11 November revealed that the Axis forces had only four or five days' fuel left. There was considerable apprehension among the Axis of a British outflanking move south of the Jebel Akhdar, made worse by the loss of a fuel tanker en route to Benghazi. The landing grounds at Gazala were open to the DAF by 17 November and Martuba was operational on 19 November, from which land-based aircraft escorted the convoy.[10][4][11]
Convoy MW 13 edit
16–18 November edit

MW 13 began passage through the Suez Canal and on 16 November reached Port Said in the afternoon. During the evening, the convoy left Port Said with the 15th Cruiser Squadron and the 14th Destroyer Flotilla. Off Alexandria on 17 November, the ten Hunt-class destroyers of the 12th Destroyer Flotilla joined the convoy and the cruisers and fleet destroyers refuelled at Alexandria.[12] Anti-submarine sorties were flown around-the-clock by Bristol Bisleys of 15 Squadron South African Air Force, Lockheed Hudsons of 439 Squadron Royal Australian Air Force (RAAF) and the Fairey Swordfish of 815 Squadron Fleet Air Arm. The twin-engined Beaufighters of 252 Squadron Royal Air Force patrolled nearby at dawn and twilight.[13]
Just before noon, a formation of Junkers Ju 88 bombers attacked the convoy but was seen off by the Curtiss Kittyhawks of 450 Squadron RAAF; no more attacks were made on the convoy for the rest of the day.[14] As dark fell and the cruisers and fleet destroyers, except for Euryalus, separated from the convoy for the night, both groups of ships were attacked by torpedo-bombers. No damage was done to the convoy but the cruiser Arethusa was torpedoed forward of the bridge and took a list to port under a plume of smoke. The crew suffered 156 men killed and more wounded, many badly burned. Petard took the ship in tow from the stern, watched over by Jervis and Javelin and began the voyage back to Alexandria.[14][a]
19–20 November edit

At dawn the cruisers and fleet destroyers rejoined the convoy, which received air cover from Malta Beaufighters and Spitfires; six Martin Baltimore reconnaissance bombers from 203 Squadron RAF from Kambut (Gambut) in Libya, flew ahead of the convoy as it made its way northwards. Co-ordination between the ships and aircraft was much improved by better training and the availability of VHF radiotelephones, which gave longer range and better reception between sea and air. At 2:00 p.m., when 80 nmi (92 mi; 150 km) from Malta, the 15th Cruiser Squadron and the fleet destroyers detached and turned for Alexandria. Euryalus and the 12th Destroyer Flotilla were escorted by the minesweeper HMS Speedy and other local boats into Grand Harbour at 1:30 a.m. on 20 November, to the cheers of the population and garrison. Unloading began at 3:00 a.m. and the siege of Malta had been considerably alleviated by 26 November. Axis aircraft had attempted to bomb the ships but a petrol vapour fire on Denbighshire was more dangerous.[16]
Aftermath edit
Analysis edit
Stephen Roskill, the official historian of the Royal Navy, wrote in 1962 that the arrival of Stoneage ended the two-year siege of Malta. Submarines were transferred from Magic Carpet rides to offensive operations and at the end of November, 821 Naval Air Squadron (Fairey Albacores) transferred to Malta, as did Force K with the cruisers Dido and Euryalus and four fleet destroyers; a Motor Torpedo Boat flotilla arrived soon after. Another cruiser and destroyer force began to operate from Bône in Algeria, which from 1 December, enabled the Navy to attack Axis convoys to Tunisia from both directions.[17] In 2003, Richard Woodman wrote that Stoneage delivered 35,000 short tons (31,751 t) of supplies, which advanced the deadline at which Malta would be compelled to surrender for lack of supplies to mid-December. The Eighth Army had expelled the Axis forces from Egypt and Cyrenaica, having entered Benghazi on 20 November. In Tunisia, the First Army was about 40 mi (64 km) from Bizerta, preparing for its next advance. Allied success on land made convoy operations much safer and Operation Portcullis, the next Malta convoy, arrived safely on 5 December.[12]
Casualties edit
The torpedoing of Arethusa killed 156 men and more were seriously injured, many by burns. The RAF lost five aircraft, three of them Spitfires.[18]
See also edit
Notes edit
- ^ Arethusa was steaming at 18 kn (33 km/h; 21 mph) when the torpedo hit the port side below B turret, blowing a hole 53 by 35 ft (16 by 11 m) in the side. The ship caught fire from A turret back to the bridge and flooded to the waterline for 100 ft (30 m) back from the bow. The ship listed to port by 15° and fuel oil was transferred to the starboard tanks to compensate; power failed except to the rear of the forward boiler room and the telephones failed. Despite the damage and occasional air attacks, Arethusa was towed backwards to Alexandria by Petard. After shifting the anchor chains astern, the crew managed to the starboard propeller under water and sail backwards at slow astern, arriving during the evening of 21 November; the ship was under repair for more than a year in the US.[15][16]
Footnotes edit
- ^ a b Roskill 1962, pp. 341–346.
- ^ a b Woodman 2003, p. 455.
- ^ a b Playfair 2004, pp. 196–197.
- ^ a b c d e Playfair 2004, p. 196.
- ^ Woodman 2003, pp. 457–458.
- ^ Playfair 2004, pp. 197–198.
- ^ Vego 2010, pp. 127–128.
- ^ Woodman 2003, pp. 505, 459.
- ^ a b Roskill 1962, p. 340.
- ^ Hinsley 1994, p. 248.
- ^ Stevens 1962, p. 14.
- ^ a b Woodman 2003, pp. 459–461.
- ^ Playfair 2004, p. 198.
- ^ a b Woodman 2003, pp. 459–460.
- ^ DNC 1952, p. 88.
- ^ a b Woodman 2003, p. 460.
- ^ Roskill 1962, pp. 341–343.
- ^ Playfair 2004, p. 199.
References edit
Books
- Hinsley, F. H. (1994) [1993]. British Intelligence in the Second World War. Its influence on Strategy and Operations (abridged). History of the Second World War (2nd rev. ed.). London: HMSO. ISBN 978-0-11-630961-7.
- H. M. Ships Damaged or Sunk by Enemy Action, 3rd September, 1939 to 2nd September, 1945 (PDF). London: Admiralty: Director of Naval Construction. 1952. OCLC 38570200. Retrieved 24 April 2020.
- Playfair, Major-General I. S. O.; et al. (2004) [1966]. Butler, J. R. M. (ed.). The Mediterranean and Middle East: The Destruction of the Axis Forces in Africa. History of the Second World War United Kingdom Military Series. Vol. IV (pbk. facs. repr. Naval & Military Press, Uckfield ed.). London: HMSO. ISBN 978-1-84574-068-9.
- Roskill, S. W. (1962) [1956]. The Period of Balance. History of the Second World War: The War at Sea 1939–1945. Vol. II (3rd impression ed.). London: HMSO. OCLC 174453986. Retrieved 25 November 2016.
- Stevens, W. G. (1962). "Chapter 2: Squaring Up to the Agheila Position". Bardia to Enfidaville. The Official History of New Zealand in the Second World War 1939–1945 (New Zealand Electronic Text Collection, 2003 ed.). Wellington, NZ: Department of Internal Affairs, War History Branch. pp. 11–31. OCLC 226971028. Retrieved 16 September 2017.
- Woodman, Richard (2003). Malta Convoys 1940–1943. London: John Murray. ISBN 978-0-7195-6408-6.
Journals
- Vego, M. (Winter 2010). "Major Convoy Operation To Malta, 10–15 August 1942 (Operation Pedestal)". Naval War College Review. 63 (1). ISSN 0028-1484. Archived from the original on 12 August 2014. Retrieved 5 June 2018.
Further reading edit
- Hague, Lt Cdr Arnold (1995). "The Supply of Malta 1940–1942, Part 1 of 3". naval-history.com. Retrieved 7 June 2018.
External links edit
- Chronology of the siege of Malta, 1940–43: Merlins over Malta