


Summary
| Operation Donnerkeil | |||||||
|---|---|---|---|---|---|---|---|
| Part of the Western Front of World War II | |||||||
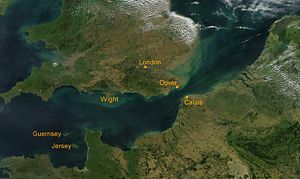 Satellite view of the English Channel | |||||||
| |||||||
| Belligerents | |||||||
|
|
| ||||||
| Commanders and leaders | |||||||
|
|
| ||||||
| Strength | |||||||
| ~450 aircraft |
252 Bf 109 and Fw 190 fighters[1][2] 30 Bf 110 Heavy fighters[2] 32 Dornier Do 217s | ||||||
| Casualties and losses | |||||||
|
41 aircraft[3] |
17 fighters 5 bombers 23 airmen killed[3] | ||||||
Unternehmen Donnerkeil (Operation Thunderbolt)[4][5] was the codename for a German military operation of the Second World War. Donnerkeil was an air superiority operation in support of Operation Cerberus, also known as the Channel Dash by the Kriegsmarine (German Navy).
In 1941 Kriegsmarine surface vessels had carried out commerce raiding in support of the German U-boats in the Battle of the Atlantic. In January 1941 Operation Berlin was launched followed by Operation Rheinübung in May 1941. The dominance of the Royal Navy's surface fleet prevented the German units returning to ports in the Baltic Sea or Germany. The surviving ships, the battleships Scharnhorst and Gneisenau and the cruiser Prinz Eugen, docked in the port of Brest, France. Throughout 1941 RAF Bomber Command attacked the ships in dock. The proximity of the ports to Royal Air Force (RAF) airfields allowed a large number of sorties to be flown against the targets in quick succession. Oberkommando der Marine (the Naval High Command), and Adolf Hitler desired to move the ships out of range of potential air raids.
In December 1941, Oberkommando der Luftwaffe (High Command of the Air Force) was ordered to plan an operation to protect the three German capital ships to escape from Brest to Germany through the English Channel. General der Jagdflieger (General of the Fighter Force) Adolf Galland prepared the aircraft for the operation. Cerberus and its supporting operation, Donnerkeil, began on 11 February 1942. During the first phase of the operation the Germans achieved surprise. The German ships reached Germany on 13 February 1942, two days after the start of Cerberus and Donnerkeil.
During the Channel Dash the Luftwaffe defeated British air attacks on the German ships, allowing them to reach German waters. In the air battles that took place over the Channel the British suffered many losses for no return; German losses were modest and the operation achieved its objective.
Background edit
The first German Capital ships to dock at Brest were Scharnhorst and Gneisenau, on 22 March 1941. In the previous eight weeks they had participated in the German Operation Berlin against Allied shipping in the Atlantic Ocean. The heavy cruiser Prinz Eugen also sought refuge in the harbor on 1 June 1941, after the failed Operation Rheinübung (Operation Rhine Exercise). Whilst in port, the ships were in easy range of British air power and suffered frequent attacks and some damage. A ten-month offensive by the RAF from 29 March 1941 comprised 2,928 sorties against the Brest harbour and 171 in daylight. A raid on 24 July lost 12 percent of its strength. Night bombing was safer as the Germans lacked night-fighters and the 18 losses to enemy action were claimed by anti-aircraft guns. During their campaign the RAF used more sophisticated navigation aids; on the night of the 7/8 December 1941 the Oboe navigation aid was employed for the first time.[4]
Concerned after the loss of Bismarck, Adolf Hitler ordered the Kriegsmarine to move the ships to Germany for overhauls in preparation for their deployment to Norway. There they were to serve as a fleet in being and as the premier naval defense for German-occupied Norway. After lengthy discussions the Oberkommando der Marine opted for the shorter but arguably more dangerous route, through the English Channel.[2][4][6][7]
On 12 January 1942 Hitler met with the commanders of the operation at his Headquarters in East Prussia (the Wolf's Lair). Present were Wilhelm Keitel, Commander-in-Chief of the Wehrmacht (German Armed Forces), Hans Jeschonnek (Chief of the Luftwaffe General Staff), Alfred Jodl (Chief of Staff for Military Operations) and Adolf Galland, General der Jagdflieger (General of the Fighter Forces), Erich Raeder (Commander-in-Chief of the Navy) and Vice-Admiral Otto Ciliax, who was to lead the battle group (Kampfgruppe).[6] During the course of the meeting Hitler likened the German fleet to "a patient with cancer which is doomed unless they submit to an operation. An operation, on the other hand, even though it may have to be drastic, will at least offer some hope that the patient's life may yet be saved. The passage of our ships is such an operation. It must be attempted".[6] Not much operational detail was discussed. The Luftwaffe was ordered to provide air cover and diversion raids against British targets. Jeschonnek promised around 250 aircraft.[6]
Preparations edit
Luftwaffe plan edit

OKL was not happy about Cerberus; Jeschonnek remarked to Galland that if Cerberus failed then the Luftwaffe would be made a scapegoat. Jeschnonnek was to be proved right. During the 12 January 1942 meeting, the Navy demanded maximum fighter cover and won Hitler's support. During the meeting Jeschonnek stood his ground against Galland and refused to guarantee reinforcements to the Western fighter forces from other theatres. Galland was given executive power for the air operation which was given the code name Unternehmen Donnerkeil (Operation Thunderbolt). The existence of the operation was so secret that both Jeschonnek and Galland had to sign secrecy pledges as they left Hitler's Headquarters in East Prussia.[4]
The details of the plan were worked out with Oberst (Colonel) Karl Koller, the chief of staff of Luftflotte 3 (Air Fleet 3, Generalfeldmarschall Hugo Sperrle).[8] To assemble sufficient strength some training units had to be mobilized (the bulk of the Jagdwaffe was in the Soviet Union owing to Operation Barbarossa).[4]
The route was divided into three sectors based upon the Jafü (Fighter Sector) boundaries but to ensure local control Max Ibel, former Geschwaderkommodore (Wing Commander) of Jagdgeschwader 27 (Fighter Wing 27) was appointed Jagdfliegerführer Schiff, shortened to Jafü Schiff (Fighter Controller Ship) and embarked on Scharnhorst as a signals officer to communicate with Luftwaffe units during the operation. Eight dummy operations, involving around 450 sorties, were made from 22 January to 10 February to train for the mission. It is unclear whether the British were aware of these training missions.[4]
To disrupt British radio transmissions, the Funkhorchdienst (Radio Monitoring Service, Signals intelligence, commanded by Wolfgang Martini) attempted to jam radio-telephone frequencies. They created a subtle jamming technique which increased atmospheric interference which degraded the performance of British coastal radars. Dornier Do 217s of Kampfgeschwader 2 (Bomber Wing 2) was ordered to fly electronic deception missions over the western channel to divert enemy aircraft. Fliegerkorps IX ( Joachim Coeler) prepared to strike at RAF bases in south-western England and to engage and slow down British naval forces that might attempt an interception. Fernaufklärungsgruppe 123 (strategic or long-range reconnaissance) was responsible for maintaining reconnaissance in the east and west ends of the Channel and was to support Fliegerkorps IX.[9]
To ensure constant air support, Jagdgeschwader (Fighter Wings) and Nachtjagdgeschwader 1 (Night Fighter Wing 1) were ordered to achieve a frantic pace in servicing and preparing aircraft for their next mission. To keep a constant aerial vigil over the task force, the 'black men' (mechanics) had to rearm and refuel aircraft in 30 minutes or less.[9] Galland insisted that the aircraft should be split between high and low altitude to provide sound cover. The low altitude groups would be able to evade detection by British coastal radar. Galland demanded an umbrella of at least 16 fighters over the ships at any one time along the whole length of the channel. The fighters would be split into formations of eight aircraft for their respective patrol altitudes. Each formation was split into two Schwärme of four aircraft. The Schwärme tactics involved one formation flying to sea and one to land in a zigzag pattern. All Schwärme were ordered to fly back and forth along the line of ships in wide figures of eight while maintaining radio silence. Every sortie was meticulously timed to allow the fighters 30 minutes over the ships, enough to maintain cover and allow the relieved units to refuel, rearm and return to start the cycle again. However, during Donnerkeil, the relieving sortie arrived after only 20 minutes which increased the fighter cover to 32 fighters for half of the operation.[10]
Galland made it clear to fighter pilots the ships must be protected at all costs. They were expected to fly at least four sorties on the day of the operation. Success would not be measured by numbers of enemy aircraft shot down. RAF aircraft leaving the target area were to be avoided but attacking aircraft were to be engaged at all costs – if necessary, through ramming.[11]
British preparations edit
Operation Fuller was the code-name for the RAF plan against a German breakout. The RAF predicted the Germans might opt for the English Channel as their route. Captain Norman Dening, head of the Admiralty Operational Intelligence Centre was not certain that the Germans would attempt it, though he regarded as a possibility. At the end of January he had warned that the German warships were preparing to put to sea and a major operation should be expected. Dening sent a message to First Sea Lord Dudley Pound,
The short cut of the German ships is via the English Channel. It is 240 miles from Brest to Cherbourg and another 120 miles from Cherbourg to the Dover straits. While ships could make the passage from Brest to Cherbourg or from Cherbourg to the Dover straits in the same dark period, they could not make the complete passage from Brest to Dover in one dark period. At first sight this passage from up the Channel seems hazardous for the Germans. It is probable, however, that as their heavy ships are not fully efficient, they would prefer such a passage, relying for their security on the destroyers and aircraft which are efficient, and knowing full well that we have no heavy ships to oppose them in the Channel.... Taking all factors into consideration, it appears that the Germans can pass east up the Channel with much less risk than they will incur if they attempt an ocean passage.[12]
Air Marshal Philip Joubert de la Ferté, commander-in-chief of RAF Coastal Command agreed this was the probable route. He expected the Germans to make an attempt any time after 10 February. Unfortunately for the British, the Air Ministry and the three RAF commands, RAF Coastal Command, RAF Bomber Command and RAF Fighter Command, believed the Germans would use the darkness for the longest and most dangerous part of the journey through the straits and would leave in daylight. The far from adequate forces at their disposal, they believed, would be best used at night. Most of RAF Bomber Command was ordered to stand down accordingly. Such an order made it unready to operate in daylight on 12 February.[12]
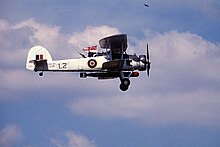
Coastal Command had agreed to provide three squadrons of Bristol Beaufort torpedo bombers. The Fleet Air Arm (FAA) contributed one squadron of Fairey Swordfish torpedo bombers. RAF Bomber Command had some 300 bombers on standby for an operation. The Swordfish were very slow and escorting them was difficult. The Beaufort squadrons were spread out and it was difficult to bring them together. One squadron was based at Leuchars, Scotland, one at Thorney Island, Portsmouth and one near St Eval, Cornwall.[12]
Forces involved edit
Luftwaffe edit
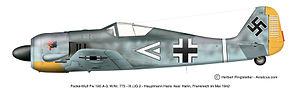
The Luftwaffe contributed five wings to the operation. Jagdgeschwader 1 (Fighter Wing 1 or JG 1), Jagdgeschwader 2 (JG 2), Jagdgeschwader 26 (JG 26) equipped with day fighters, mostly the Messerschmitt Bf 109 and Focke-Wulf Fw 190. JG 2 and JG 26 operated the FW 190, while JG 1 operated the Bf 109. Nachtjagdgeschwader 1 was also pressed into service. Its Messerschmitt Bf 110s operated in much smaller numbers. Kampfgeschwader 2 operated in a support role, mainly maritime interdiction and air raids on enemy airfields in southern England, to distract the RAF from the Channel. The Germans had 252 fighters, 30 heavy fighters and 32 bombers.[1][2][13] JG 1 and JG 2 operated the Bf 109, while JG 26 maintained a "monopoly" on the FW 190.[14]
RAF and FAA edit
Confidence in the British bomber force was low. Having had no anti-shipping attack training, their ability to inflict damage to the ships was poor. The main hope was placed in the torpedo bomber force made up mainly of the Beaufort and Swordfish aircraft of Coastal Command and the Fleet Air Arm. Beauforts of No. 42 Squadron RAF, No. 86 Squadron RAF and No. 217 Squadron RAF were made available from Coastal Command for the mission but were short of torpedoes.[15] The three torpedo squadrons were the only ones available on 12 February 1942; about 57 Beauforts had been diverted to other theatres, leaving a chronic shortage of torpedo bombers in Britain at a time when a major enemy naval operation was expected. No. 415 and No. 489 Squadron RAF had been withdrawn to convert to Handley Page Hampdens. No. 22 Squadron RAF was in the midst of a transfer to the Middle East.[16]
No. 825 Squadron FAA and their Fairey Swordfish were also made available. Lockheed Hudsons of No. 224 Squadron RAF and No. 233 Squadron RAF were also committed for reconnaissance operations. No. 22 Squadron RAF was recalled from leave to take part in an operation over the Channel. Hudsons from No. 407 Squadron RCAF were also available, were placed on high alert and took part in the fighting. RAF Bomber Command contributed No. 5 Group RAF, containing some 242 of the 300 aircraft available to the service.[17] Fighter Command committed No. 1, 19, 91, 41, 118, 129, 137, 234, 401, 403, 607, 316, 411, 452, 485, 137, 128, 64, 65, 72, and 11 squadrons.[18][19]
Channel Dash edit
Contact edit
During the evening of the 10 February 1942 the German flotilla prepared to undertake their operation. As they slipped anchor RAF bombers appeared overhead. The German ships conducted a U-turn and sped back to the dock. The RAF bombers released their bombs but did little damage. Fortunately for the German ships the British did not notice anything untoward.[20]
Ultra intercepts had put the British on alert.[9] Mistakes and bad luck enabled the Germans to evade detection. Three Hudsons of Coastal Command conducted a patrol at three positions. The first, named "Stopper", maintained surveillance between sunset and first light off the port of Brest. The Second, "Line SE" watched due north of the port and the third, "Habo", covered the area between Le Havre and Boulogne. The patrols lasted between 01:00 hours to dawn on 11 February. At 19:25 on 11 February, "Stopper" took off as usual but was intercepted by a Bf 110 night fighter of NJG 1. The Hudson evaded the Bf 110 but its ASV radar equipment was unserviceable. The aircraft headed back to St. Eval, landing at 20:40. Its replacement headed over the same area, reaching the location at 22:38. During the interlude, Ciliax and his ships had slipped their moorings. The "Line SE" Hudson should have picked up the German fleet but its ASV failed at 20:55. At 21:50 attempts to repair it failed and the Hudson returned to base. No replacement took its place. Everything now depended on "Habo" but Ciliax's luck held. At dawn, mist began to form over the airfield at Thorney Island. The mist was threatening to deny a clear landing run for the Hudson, so it was recalled an hour early, just as the German ships were approaching "Habo".[20] II./NJG 1 flew 19 sorties, protecting the ships during the night, until replaced by JG 2 at 08:00.[4][21]
For 11 hours the German fleet sailed from Brest towards the Dover Straits. By chance, a mechanic on the radar station at Fairlight, East Sussex had just finished repairing the equipment when he picked up 27 echoes at 10:15 on 12 February, south of Cap Gris Nez. The information was relayed to Ramsay, who ordered his Air Officer liaison to contact No. 11 Group RAF to ask for armed reconnaissance. Ramsay also warned No. 16 Group RAF and the FAA squadron from RAF Manston that possible targets were in the Channel, though he did not know the exact number or size of the enemy vessels. The performance of the radar was suppressed because of jamming measures (Ballstöranlage) undertaken by two Heinkel He 111s which had been flying off the south coast from their airfield near Paris. The flights ceased at 09:00 when installations along the French coast had taken over. The detection by Fairlight was a piece of good fortune, the Germans had assumed it to be out of action.[20] Ten Do 217s from III./KG 2 flew missions against Plymouth harbor and airfield, while 15 flew diversions to keep RAF fighters clear of the He 111s.[22]
Ramsay's request arrived at RAF Kenley. Two experienced pilots, Group Captain Victor Beamish (10 victories) and Wing Commander Finlay Boyd (14 victories), were sent on patrol to investigate. Flying over the channel in Spitfires, they ran into large numbers of Bf 109s protecting a large fleet of warships and dived away. Holding radio silence they kept their discovery until they landed. They sighted the ships at 10:42 and landed at 11:09. It was another 16 minutes before Bomber Command was alerted and Ramsay did not know of the situation until 11:30.[10][20] At around 12:16 GMT, the first naval actions began between escorting Schnellboots and British Motor Torpedo Boats (MTBs) and the British commands were finally alerted.[23] Galland ordered all low flying to cease and allowed Max Ibel and his team aboard Scharnhorst to break radio silence. Ibel then began directing Fw 190 and Bf 109s towards RAF units heading to the area. As the first outnumbered British units arrived over the ships, the German vessels were now at their closest point to German airfields. It allowed the Luftwaffe to offer maximum protection.[24]
Main assaults edit
Lieutenant Commander Eugene Esmonde, acting as Squadron Leader, No. 825 Squadron FAA, took off with his Swordfish formation at 12:25 to attack the ships. No. 411 and 64 Squadrons were to escort the FAA but arrived over Manston 15 minutes late and missed the rendezvous. The only unit to keep to mission orders was No. 72 Squadron (Squadron Leader Brian Kingcome). Unaware of the Swordfish squadron's location, they ran into each other by accident. Owing to low cloud, they dropped to between 50 and 100 feet. The German fighter cover put an end to the protection the Spitfire's could provide as the RAF fighters now had to look after themselves. The Spitfires and Swordfish were engaged by Fw 190s of 8. Staffel and 9. Staffel of JG 26 led by Gruppenkommandeur (Group Commander) Gerhard Schöpfel of III./JG 26. The Fw 190s were just relieving fighters of JG 2. Frail and slow, the Swordfish forced German pilots to lower their undercarriages to prevent overshooting the biplanes. In the event all six Swordfish were shot down. The Spitfires destroyed three Fw 190s in return. Several Swordfish managed to drop torpedoes but none found their mark. Esmonde was shot down and killed by a FW 190.[25] He was awarded the Victoria Cross. Only five of the original eighteen Swordfish crew survived. No. 41 Squadron RAF claimed three Bf 109s (most likely from JG 1) destroyed and one damaged off the Belgian coast. No. 72 Squadron claimed three Fw 190s destroyed and four damaged in the battles around 13:00. No. 410 Squadron claimed two Bf 109s destroyed and two damaged in the same dogfights.[9][20][25][26][27][28] The German ships consumed very little ammunition, as the action had been carried out largely by the Luftwaffe.[29]
The stand down order had meant RAF Bomber Command's contribution to the proceedings came relatively late in the day. It dispatched 73 bombers from 13:55 to 14:50 GMT. None of the attackers hit their targets. At 14:35 nine Beauforts from No. 42 Squadron led by W.H Cliff took off. Arriving over Manston at 14:50 they found other aircraft from No. 407 Squadron RCAF orbiting. It took nearly 30 minutes to form a proper formation. With several other squadrons they attacked the Gneisenau and Prinz Eugen at heights of between 60 and 100 feet but their torpedoes missed. No losses were suffered by No. 42 Squadron. The Hudsons struck at between 400 and 900 feet. Two RCAF bombers were lost without success. No. 217 Squadron nearly achieved a hit on Gneisenau but the ship turned away, just avoiding the salvo. Later, a wave of 134 to 137 bombers intercepted the ships between 16:00 and 17:05. Only 20 crews managed to attack owing to poor training (Bomber Command crews were not trained for naval targets), a low cloud base [2,300 ft (700 m)] and poor visibility [visibility at sea level was between 1,000–2,000 yd (910–1,830 m)]. Nine bombers were lost. Another formation of 35 Vickers Wellington aircraft attempted a strike between 17:50 and 18:15, losing two of their number. The most notable raid in this action was by six Beauforts from No. 86, three from No. 217 and three from No. 22 Squadron. Wing Commander C. Flood, No. 86 Squadron led the attack in the only ASV-equipped aircraft. Locating the German ships in the darkness they attacked but anti-aircraft fire scattered the bombers and no successes were achieved. Of the 242 bombers that took part in the missions, it is likely only 39 conducted attacks, with a possible that a 16, suggesting a total of 54 aircraft released bombs against the ships, of which 15 were shot down. RAF Fighter Command also threw in fighter-bombers to try and inflict damage, operating Hawker Hurricanes over the Dover area.[17][30][31][32]
The British managed to damage both the Gneisenau and Scharnhorst (the latter seriously). Scharnhorst hit two mines, one at 14:31 GMT and a further one at 21:34 GMT. Gneisenau also struck a mine at 18:55 GMT.[33] Both ships recovered and steamed on. Scharnhorst had been stopped dead in the water with engine damage after the first hit. The failure to alert Bomber Command earlier meant a chance was missed to deliver an attack on Scharnhorst when it was most vulnerable. The second and third mine hits came after nightfall, which enabled both vessels to avoid further attacks. The last RAF sighting of the ships had occurred at 18:00 GMT.[34] It is unclear who was responsible for the damage on the German ships. It is possible that the mines were dropped by Hampden bombers. Should this be the case, the bombers achieved far more damage than the Royal Navy and the rest of the RAF combined.[35]
Losses and overclaiming edit
In protecting the RAF bombers, Fighter Command lost 20 fighters, 14 pilots killed and three captured. Only eight of the RAF fighters were shot down by the Luftwaffe. A further eight were shot down by anti-aircraft fire, two collided and two were lost to unknown causes. Ten of the fighters were Spitfires, six were Hawker Hurricanes and four were Westland Whirlwinds.[36] During the air battles, mutual overclaiming took place, though the Luftwaffe was significantly worse. RAF Fighters claimed 16 Bf 109s destroyed and 13 damaged. Four Fw 190s were also claimed destroyed and six damaged. German losses were 17 fighters, along with five Do 217s. Human casualties amounted to 23 killed. German fighter units claimed 60 RAF aircraft shot down, with JG 26 awarded seven kills and six probables. British losses were 41, a number of which were lost to anti-aircraft fire.[3][37][38] The bomber unit III./KG 2 had participated in raids against RAF airfields.[9] The Luftwaffe had flown 300 fighter and 40 bomber missions during 11–12 February.[3]
Attacks in port edit
The German flotilla had reached home ports on the evening of 12 February. The threat from RAF bombers in daylight had gone but Bomber Command was soon making night attacks on Kiel harbour. Gneisenau was moved into an inner basin alongside her depot ship, Monte Olivia. The hatches were left open and her tanks, still containing a large amount of fuel, were left unattended. RAF Bomber Command made its first attack on the night of 25/26 February, when 61 bombers flew over Kiel. Monte Olivia was destroyed but Gneisenau escaped. On 26/27 February another 61 RAF bombers returned. A bomb penetrated Gneisenau's foredeck and exploded. The oil fumes from the tanks ignited and the ship was engulfed in fire from her bow to turret Anton. The forward part of the bow needed to be replaced. She steamed to Gdynia, in Poland on 4 April where she was decommissioned out of range of RAF bombers. Gneisenau did not put to sea again.[39] The raid cost three aircraft, one Hampden and two Wellingtons. German casualties amounted to 16 civilians and 116 sailors dead.[40]
On 27/28 February 1942 33 bombers flew over Wilhelmshaven looking for Scharnhorst. Cloud obscured the area and German reports noted only three explosions. Three Armstrong Whitworth Whitley bombers were lost to unstated causes.[41] In 1942 Scharnhorst had evaded the worst attacks from RAF Bomber Command. It was ready for redeployment by the summer but accidents, such as striking a mine and running aground meant this was delayed until the turn of the year. It took three attempts to sail to Norway; on 10 January 1943 she was spotted by RAF aircraft and turned back after reaching the Skagerrak. Another attempt was in January failed. On 3 March 1943 Scharnhorst finally made it to Norway.[42] She would survive another eight months before being sent on her last wartime mission, Operation Ostfront. During her sortie Scharnhorst was sunk at the Battle of the North Cape.[43][44]
Aftermath edit
British failures edit
The failure to coordinate the FAA, RAF and Navy dispersed any counterstrike. Confusion owing to the weather and the lack of central control of British sea and air forces caused each element to work independently. Several friendly fire incidents occurred, such as the attack by No. 217 Squadron on HMS Mackay. The most serious failure was Fighter Command's failure to protect bomber and naval forces. Although the weather also prevented greater German fighter activity by the time the target area was reached, valuable time had been lost by bomber formations searching for their fighter escorts over the rendezvouses which either never arrived or were given incorrect orders or direction too late to be acted upon. Little communication was enabled between fighter and bomber units but also between the strike units. Compounding the problems, RAF Bomber Command's crews, which made up the majority of the attacking aircraft, were not trained for attacks against naval targets. The only anti-shipping torpedo-bomber squadrons were No. 42 and 217 Squadrons of Coastal Command, which owing to supply difficulties, were five torpedoes short.[15]
Joubert de la Ferté blamed the failure of Operation Fuller on the neglect of anti-shipping aviation, not to those directing the forces during the operation or intelligence services. Joubert called for all anti-shipping units to be handed over to the service. Better training, more aircraft and a higher quality of equipment would allow the RAF to avoid a repeat of the Channel Dash. The Air Ministry refused his request and instead put No. 2 Group RAF Bomber Command in support of Coastal units against enemy shipping between Cherbourg and Wilhelmshaven.[45] Production and procurement remained in favour of Bomber Command, producing types for the strategic bombing campaign over Germany, even after the failure of Fuller. Adding to RAF difficulties, most of Coastal Command's anti-shipping units were transferred to the Mediterranean Theatre of Operations (MTO), leaving Coastal Command short of naval strike aircraft in 1942. Air Marshal Charles Portal agreed this needed to change arguing, "We agree on the importance of torpedo bomber aircraft, and this was proved completely during the passage of the Scharnhorst and Gneisenau [and Prinz Eugen] up the channel".[46] In May 1942 Joubert succeeded in procuring the new Bristol Beaufighter, which entered service in November 1942 but only one squadron was made operational. Despite the need for anti-shipping strike aircraft, the service continued to struggle until 1943, when Portal fulfilled his promise and more of these aircraft, including the de Havilland Mosquito, became available.[46]
Donnerkeil was a watershed in electronic warfare, by jamming, Martini removed British inhibitions concerning the use of ECM against the Kammhuber line on the Continent and paved the way for the debut of Window (Chaff) in June 1943, which had a devastating effect on the ability of German night-fighter radar defences to locate and intercept RAF bombers during the Defence of the Reich. The first step in this campaign was a British Army operation, Operation Biting, to steal a Würzburg radar set on 27/28 February 1942. The British removed components and developed counter-measures. The Germans responded by fortifying all radar sets, which only made them more visible to RAF reconnaissance. The British also began the occasional jamming of Freya radar sets. The Germans did not realise this was happening until September 1942. German forces also jammed British radar, to enable fighter-bomber operations over England. The British described them as a "real menace". Radar-jamming, counter-measures and other innovations escalated from that point onward.[3]
German perspective edit
Donnerkeil had been an outstanding success for the Luftwaffe.[3] The measure of success lay not in the ratio of losses, which amounted to 2:1 in the German favour but the failure of the RAF, FAA and Royal Navy to intercept or at least inflict severe damage to the German warships. The meagre forces committed by the Navy had been repulsed easily by the German warships and their escorts. Anti-aircraft fire had offered a helpful defence against air attack but the German aircraft had succeeded, along with poor weather, in breaking up RAF attacks on the ships. Galland, responsible for the plan, called it the high point of his career.[5]
For the Kriegsmarine, Cerberus had been operational success and a strategic reverse. The situation had forced them into a strategic withdrawal from the Atlantic. From that point onwards, the German campaign in the Atlantic was to be carried by the U-boats, unsupported by a surface fleet. With the German ships removed from the French Atlantic ports, the British fleets could contain them much more effectively in Norway and the North Sea. Scharnhorst and Gneisenau had been damaged by mines and required extensive repairs. Prinz Eugen was torpedoed and her stern collapsed just weeks after Cerberus. All three ships were out of action for extended periods. More bad luck followed, with Gneisenau being knocked out for good in February 1942 and the sinking of the Scharnhorst in December 1943. None of the ships sailed in the Atlantic again, leaving the Battle of the Atlantic to be carried on by U-boat forces.[3][5][47]
References edit
Citations edit
- ^ a b Caldwell 1996, p. 204.
- ^ a b c d Weal 1996, p. 15.
- ^ a b c d e f g Hooton 1994, p. 116.
- ^ a b c d e f g Hooton 1994, p. 114.
- ^ a b c Baker 1996, p. 190.
- ^ a b c d Garrett 1978, p. 89.
- ^ Blair 1996, pp. 482–483, 487.
- ^ Hooton 2010, p. 121.
- ^ a b c d e Hooton 1994, p. 115.
- ^ a b Weal 1996, p. 16.
- ^ Executive Fuller! - The Royal Air Force and the Channel Dash By Group Captain Alistair Byford, Air Power Review, Volume 12, Number 3, Autumn 2009, p. 50
- ^ a b c Garrett 1978, p. 93.
- ^ de Zeng, Stanket & Creek 2007, p. 33.
- ^ Caygill 2002, p. 41.
- ^ a b Goulter 1995, p. 164.
- ^ Buckley 1995, p. 198.
- ^ a b Ashworth 1992, pp. 52–55.
- ^ Franks 1998, pp. 12–14.
- ^ Hawes, Richard, Worth, Richard and Elrod, John. "Operation Cerberus/Operation Fuller, The Channel Dash, 11–13 February 1942." Channel Dash. Retrieved: 12 September 2010.
- ^ a b c d e Garrett 1978, pp. 102–103.
- ^ Treadwell 2003, pp. 92–93.
- ^ Hooton 2010, p. 122.
- ^ Garrett 1978, pp. 99–100.
- ^ Kaplan 2007, p. 34.
- ^ a b Weal 1996, p. 17.
- ^ Foreman 2005, pp. 127–128.
- ^ Caldwell 1996, p. 207.
- ^ Jackson 2002, pp. 56–57.
- ^ Garrett 1978, p. 104.
- ^ Baker 1996, p. 189.
- ^ Garrett 1978, p. 107.
- ^ Goulter 1995, p. 163.
- ^ Garrett 1978, p. 95.
- ^ Garrett 1978, p. 111.
- ^ Garrett 1978, p. 119.
- ^ Franks 1998, pp. 13–14.
- ^ Foreman 2005, pp. 127–130.
- ^ Weal 1996, p. 18.
- ^ Garrett 1978, pp. 119–121.
- ^ "RAF Campaign Diary, 26/27 February 1942." Archived 7 June 2007 at the Wayback Machine Ministry of Defence 2004. Retrieved: 20 September 2010.
- ^ "RAF Campaign Diary, 27/28 February 1942." Archived 7 June 2007 at the Wayback Machine Ministry of Defence 2004. Retrieved: 20 September 2010.
- ^ Garrett 1978, pp. 126–127.
- ^ Garrett 1978, pp. 138–163.
- ^ Winton 2003, pp. 130–160.
- ^ Goulter 1995, p. 165.
- ^ a b Goulter 1995, pp. 166–167.
- ^ Jackson 2002, p. 59.
Bibliography edit
- Ashworth, Chris (1992). RAF Coastal Command: 1936–1969. Patrick Stephens Ltd. ISBN 978-1-85260-345-8.
- Baker, David (1996). Adolf Galland: The Authorised Biography. London: Windrow & Green. ISBN 978-1-85915-017-7.
- Blair, Clay Jr. (1996). Hitler's U-Boat War: The Hunters 1939–1942. Vol. I. Cassell. ISBN 978-0-304-35260-9.
- Buckley, John (1995). The RAF and Trade Defence, 1919–1945: Constant Endeavour. Ryburn Publishing. ISBN 978-1-85331-069-0.
- Caldwell, Donald L. (1996). The JG 26 War Diary: Volume One 1939–1942. London, UK: Grubstreet. ISBN 978-1-898697-52-7.
- Caygill, Peter (2002). Focke-Wulf Fw 190. London: Crowood Press. ISBN 978-1-84037-366-0.
- de Zeng, H. L.; Stanket, D. G.; Creek, E. J. (2007). Bomber Units of the Luftwaffe 1933–1945: A Reference Source, Volume 2. London: Ian Allan Publishing. ISBN 978-1-903223-87-1.
- Foreman, John (2005). RAF Fighter Command Victory Claims of World War Two: Part Two, 1 January 1941 – 30 June 1943. Red Kite. ISBN 978-0-9538061-8-8.
- Franks, Norman (1998). Royal Air Force Fighter Command Losses of the Second World War Volume 2, Operational Losses: Aircraft and Crews, 1942–1943. Leicester: Midland. ISBN 978-1-85780-075-3.
- Garrett, Richard (1978). Scharnhorst and Gneisenau: The Elusive Sisters. New York: Hippocrene Books. ISBN 978-0-7153-7628-7.
- Goulter, Christina J. M. (1995). A Forgotten Offensive: Royal Air Force Coastal Command's Anti-shipping Campaign, 1940–1945. London: Frank Cass. ISBN 978-0-7146-4147-8.
- Hooton, E.R. (1994). Phoenix Triumphant: The Rise and Rise of the Luftwaffe. London: Arms & Armour Press. ISBN 978-1-85409-181-9.
- Hooton, E.R. (2010). The Luftwaffe: A Study in Air Power, 1933–1945. London: Classic Publications. ISBN 978-1-906537-18-0.
- Jackson, Robert (2002). The Bismarck. London: Weapons of War. ISBN 978-1-86227-173-9.
- Kaplan, Philip (2007). Fighter Aces of the Luftwaffe in World War WWII. Auldgirth, Dumfriesshire, UK: Pen & Sword Aviation. ISBN 978-1-84415-460-9.
- Treadwell, Terry C. (2003). Messerschmitt Bf 110. Classic World War II Aviation. Bristol, Avon, UK: Cerberus Publishing Ltd. ISBN 978-1-84145-107-7.
- Weal, John (1996). Focke-Wulf Fw 190 Aces of the Western Front. Oxford, UK: Osprey Publishing. ISBN 978-1-85532-595-1.
- Winton, John (2003). Death of the Scharnhorst. Cassel. ISBN 978-0-304-35697-3.
Further reading edit
- Caldwell, Donald L. (1994). JG 26 Photographic History of the Luftwaffe's Top Gun. Motorbooks International Publishers & Wholesalers. ISBN 0-87938-845-5.
- Caldwell, Donald; Muller Richard (2007). The Luftwaffe Over Germany: Defense of the Reich. Greenhill books. ISBN 978-1-85367-712-0.
- de la Ferté, Philiip Joubert. The Birds and the Fishes: The Story of Coastal Command. Hutchinson. 1960. (No ISBN)
- Galland, Adolf. The First and the Last: Germany's Fighter Force in WWII (Fortunes of War). South Miami, Florida: Cerberus Press, 2005. ISBN 1-84145-020-0
- Nauroth, Holger and Held, Werner. The defence of the Reich: Hitler's nightfighter planes and pilots. Arms and Armour. London. 1982. ISBN 978-0-85368-414-5