


Summary
| Landings at Cape Torokina | |||||||
|---|---|---|---|---|---|---|---|
| Part of the Bougainville campaign of the Pacific Theater (World War II) | |||||||
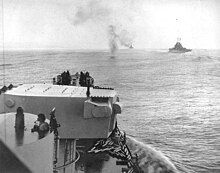
 1st Battalion, 3rd Marines engaged during the landing at Cape Torokina. | |||||||
| |||||||
| Belligerents | |||||||
|
|
| ||||||
| Commanders and leaders | |||||||
|
|
| ||||||
| Strength | |||||||
| 14,000 Marines |
270 soldiers 1 x 75 mm field gun | ||||||
| Casualties and losses | |||||||
|
78 killed 104 wounded[1] | 192 killed[1] | ||||||
The Landings at Cape Torokina (1–3 November 1943), also known as Operation Cherryblossom, took place at the beginning of the Bougainville campaign in World War II. The amphibious landings were carried out by elements of the United States Marine Corps in November 1943 on Bougainville Island in the South Pacific, as part of Allied efforts to advance towards the main Japanese base around Rabaul under Operation Cartwheel. Coming in the wake of Allied successes at Guadalcanal and in the central Solomons, the landings were intended to secure a beachhead with the purpose of establishing several bases from which to project air and naval power closer towards Rabaul, in an effort to neutralize the large Japanese force that had been established there.
In the months leading up to the operation, Japanese airpower on Bougainville was degraded by Allied air strikes, while small parties of Allied reconnaissance forces landed around Bougainville and the surrounding islands to gather intelligence. On 1 November, a landing force based around the US 3rd Marine Division, reinforced with various supporting elements, landed at Empress Augusta Bay, on the western side of Bougainville. Situated well away from the main Japanese troop concentrations, the landing was met with only limited resistance on the ground. Japanese aircraft from Rabaul attempted to interdict the landing force, but their attacks proved ineffective and they were largely fought off by US and New Zealand fighters. By the end of the first day, a small perimeter had been established and the majority of the first wave of transports had unloaded their stores over the beachhead.
A strong Japanese naval force was dispatched in response from Rabaul in an effort to disrupt the landing operations and, overnight on 1/2 November, clashed with a force of US cruisers and destroyers during the Battle of Empress Augusta Bay. Heavy losses resulted for the Japanese and the force eventually returned to Rabaul. Meanwhile, on the second day, the remaining stores and equipment were unloaded from the transports. Over the course of the two days following the landing, the US troops ashore consolidated their beachhead and began patrolling operations as they worked to secure the perimeter. This was firmly established by 3 November, when Torokina Island was occupied.
In the aftermath, the US perimeter was slowly expanded and further echelons arrived to unload stores as base development operations began. By late November, an airstrip had been established inside the perimeter. This became fully operational in early December. Throughout the remainder of 1943, the perimeter was expanded further, allowing the establishment of several more airfields. These later played a key role in the neutralization of Rabaul from the air. Throughout 1944 and 1945, follow-on forces from the US Army and then the Australian Army arrived as the Allies conducted operations to secure the rest of the island. This was only partially completed by the time the war came to an end in August 1945.
Background edit
Geographically part of the Solomon Islands, but administratively part of the Territory of New Guinea at the time of the battle,[2] Bougainville lies at the northwestern end of the Solomon Islands chain. Roughly shaped like a fiddle, the island is 125 miles (201 km) long and, at its widest point, 38 miles (61 km) across.[3] It is dominated by thick jungle and large mountain peaks in its interior, with narrow beaches around the west coast.[4] Situated south-east of New Britain, Bougainville offered the Allies another step in their advance through the Solomons towards the main Japanese base that had been established around Rabaul. The reduction and isolation of this base was a key Allied objective of the Operation Cartwheel.[5] Seizure of Bougainville offered the Allies the ability to establish forward airfields from which to launch attacks against Rabaul, as well as anchorages around Empress Augusta Bay and Soraken, which could be utilized for Allied shipping.[6]

The Japanese had invaded Bougainville in early 1942, and had established several airfields on the island, with key bases being constructed around Buka, at Kahili and Kieta, and on the Bonis Peninsula. From these bases, the Japanese had struck south towards Guadalcanal, in an effort to sever sea lanes of communication between the United States and Australia.[7] Japanese air and naval movements around Bougainville had been monitored by a small group of Allied Coastwatchers, who were able to gain considerable intelligence through the native population of the island. However, by early 1943, with the conclusion of the Guadalcanal Campaign in the Allies' favor, and a string of defeats in the central Solomons, the Japanese had sought to consolidate their hold on Bougainville. They had slowly cleared the Coastwatchers from Bougainville, with the remaining personnel being withdrawn by the US submarine USS Gato in March 1943.[2]
Initially, Allied planners had intended to capture Choiseul Island, at the northern end of New Georgia Sound; the Shortland Islands, off the southern coast of Bougainville; and, the Japanese airbase at Kahili, at the southern end of Bougainville. The fierce Japanese defense of the airfields at Munda Point forced them to reconsider. Leading up to the battle for Vella Lavella, a strategic decision, ultimately successful, had been made to bypass a large concentration of Japanese troops on the island of Kolombangara, between Guadalcanal and Vella Lavella. This caused the Allies to consider and adopt an indirect approach towards Rabaul. It was decided to bypass the Shortland Islands and Kahili, and to seize a lodgment on Bougainville, with the view to establishing an airbase from which to project airpower towards Rabaul.[8] Under this plan Choiseul would not be captured, but would instead be raided as part of a diversion to draw Japanese attention away from Bougainville.[9] The operation to secure a beachhead on Bougainville was codenamed "Cherryblossom" by the Allies.[10]
Intelligence gathered by Coastwatchers and landing parties had determined that there were few suitable landing beaches. The only viable options were located in Empress Augusta Bay, around Cape Torokina on the western coast of Bougainville. However, the area around Cape Torokina was less than ideal for airfield construction, as it was largely swamp and it would require significant development to make construction viable.[11] The bay was also open to the sea and was considered a "poor anchorage".[12] It would be exposed during the coming monsoon.[13] The location though, did have the advantage of isolation from the main Japanese concentrations around Buka and Buin in the north and south of the island, which would help Allied troops avoid a protracted battle while still enabling the neutralization of the Japanese airfields.[14] US planning staff predicted that it would take the Japanese three months to launch a counterattack on Torokina due to the terrain and the distance from their main troop concentrations. If they did, the Torokina area formed an excellent defensive position that could be held by the forces available. It was bordered by natural obstacles: the Laruna and Torokina Rivers, and the mountains.[15]
Opposing forces edit

Japanese edit
The Japanese forces defending Bougainville were part of General Harukichi Hyakutake's 17th Army, with the main infantry forces being drawn from the experienced 6th Division, under Lieutenant General Masatane Kanda. This formation had previously fought in China, including the Battle of Nanking.[11] It was supported by the 4th South Seas Garrison Unit. In addition, elements of the 17th Division were scheduled to reinforce northern Bougainville in mid-November,[16] and ultimately they played no part in repelling the landings at Cape Torokina on 1–3 November. The forces on Bougainville reported to the Eighth Area Army, under General Hitoshi Imamura, at Rabaul.[17]
According to US Army historian John Miller, Allied intelligence estimated the strength of Japanese forces on Bougainville and the nearby islands were "37,500 soldiers and 20,000 sailors",[18] while US Marine historians Henry Shaw, Douglas Kane and John Rentz, variously provide estimates of between 35,000 and 44,000 Japanese troops on Bougainville.[19] The main concentrations of Japanese troops were estimated as follows: 17,000 in the southern part of the island; 5,000 around Buka, in northern Bougainville; 5,000 around Kieta on the eastern coast; 5,000 to 6,000 on the Shortland Islands; 3,000 in the vicinity of Ballale; and about 1,000 at Mosigetta,[19] which was about 12 miles (19 km) inland from the southern end of Empress Augusta Bay.[20] The 20,000 naval personnel were based in southern Bougainville where they formed part of Vice Admiral Tomoshige Samejima's 8th Fleet.[21] These estimates were based on Ultra, augmented by documents captured in the Central Solomons, and by interrogation of prisoners of war. Post war, Japanese sources have indicated that Allied estimates of Japanese strength were close.[22]
There were eighteen pillboxes concealed in the vicinity of the eventual landing area, but these were not fully manned.[23] Troops in the immediate area of Cape Torokina numbered around 270 men, drawn mainly from a single company of the 1st Battalion, 23rd Infantry Regiment. They were supported by a single 75 mm field gun emplaced inside a log bunker, positioned in depth and surrounded smaller supporting bunkers and trenches.[24] In addition, each bunker had two machine guns positioned to provide mutual support,[25] and there were several mortars.[26] The total strength included smaller positions on Torokina Island (held by a squad) and Puruata Island (held by a platoon).[27] These troops had occupied Cape Torokina a few weeks prior to the landing.[28]
There were six airfields on Bougainville located in the north, the south, and along the eastern coast.[29] Allied air operations had heavily degraded Japanese air operations and air bases around Bougainville. Consequently, aircraft of the 11th Air Fleet were withdrawn from southern Bougainville to Rabaul in October.[30] About 200 aircraft from the 11th Air Fleet were located around Rabaul at the time of the landings at Cape Torokina. A further 173 carrier aircraft were planned to arrive in late October, in preparation for a planned air offensive as part of Operation RO. This operation envisaged severing Allied lines of communication to inflict delay on the forces advancing towards Rabaul, while the Japanese reduced and consolidated their defensive perimeter in the Southwest and Central Pacific, in consequence of a decision made in September 1943.[31] The carrier aircraft arrived at Rabaul over the course of 1 and 2 November,[32] arriving too late to be employed by the Japanese around Cape Torokina in the first few days of the landing. On the first day only 120 aircraft of the 11th Air Fleet were used over the landing area.[33] The attention of the carrier aircraft at Rabaul was largely diverted away from Empress Augusta Bay on 2 November, by heavy US air attacks on Rabaul, which continued into mid-November.[34]
American edit
The Bougainville invasion was the ultimate responsibility of Admiral William F. Halsey, commander South Pacific Area, at his headquarters at Nouméa, New Caledonia. The landings were under the personal direction of Rear Admiral Theodore S. Wilkinson, commander III Amphibious Force, aboard his flagship, attack transport USS George Clymer. Also aboard was Lieutenant General Alexander A. Vandegrift, commander I Marine Amphibious Corps.[35] Loaded aboard eight attack transports (APAs) and four attack cargo transports (AKAs), organized into three transport divisions, were the men of the 3rd Marine Division (reinforced), Major General Allen H. Turnage commanding.[36] The fighting on Bougainville would be the division's first action of the war.[37]
With Turnage aboard the USS Hunter Liggett was Commodore Lawrence F. Reifsnider, who had responsibility for the transports and attack cargo ships. The transport divisions were escorted by a screen consisting of 11 destroyers and were supported by various fleet tugs, minesweepers and minelayers.[36] Anti-aircraft guns from the 3rd Marine Defense Battalion under Lieutenant Colonel Edward H. Forney and several field artillery batteries from the 12th Marine Regiment under Colonel John B. Wilson were assigned to the operation to provide support to ground troops once ashore.[38]
Direct air cover for the landing was provided by Major General Nathan Twining's AirSols command, which included aircraft from the US Army Air Forces (USAAF), the United States Navy, the United States Marine Corps, and the Royal New Zealand Air Force (RNZAF). Lieutenant General George Kenney's Fifth Air Force was also tasked with supporting operations around Bougainville by conducting raids on Japanese air and naval assets around Rabaul.[39]
Prelude edit

Beginning in August 1943, Allied intelligence gathering activities began working to identify the disposition of Japanese troops as well as gathering key geographic and hydrographic information. Several parties of US and Australian personnel were landed around Bougainville and the surrounding areas throughout the months preceding the operation. These parties were inserted by a variety of means (motor boat, submarine, or seaplane) to carry out patrols, study the terrain, and gather intelligence from locals, while aerial reconnaissance was also undertaken to the north and south of Bougainville. Submarines were employed to survey coastal areas and collect hydrographic information.[40]
In the month prior to the landings, Allied aircraft assigned to AirSols launched over 3,200 sorties against Japanese airfields surrounding the proposed landing site and the wider Bougainville area in an effort to reduce the ability of the Japanese to interfere with the landings from the air. On the day of the landing, a naval task force, Task Force 39 under Rear Admiral Aaron S. Merrill, including several cruisers and destroyers, bombarded the airfields around Buka and the Bonis Peninsula. Proceeding south, a fire mission on the Shortlands followed, as part of a diversionary plan to take Japanese attention away from Cape Torokina.[41]
Elsewhere, the Treasury Islands were secured by New Zealand and US forces in the days prior to the landings at Cape Torokina, to secure anchorages around Blanche Harbor and establish a radar station to support air operations over Bougainville.[42] A battalion of Paramarines also launched a raid on Choiseul to divert Japanese attention from Bougainville.[43] In response, the Japanese sent thousands of reinforcements to Choiseul.[23]
Battle edit
The three transport divisions began forming at different locations throughout late October: Transdiv "A" at Espiritu Santo, Transdiv "B" at Guadalcanal and Transdiv "C" at Efate. Troops were embarked at each location between 28 and 30 October, and in an effort to hide their intentions different approach routes were taken by each division. On the morning of 31 October the three divisions rendezvoused at sea and began their approach to Bougainville from southwest of the Solomons.[35] To confuse Japanese reconnaissance aircraft, the convoy conducted a feint towards the Shortland Islands until night fell.[44] Pre-war charts of Bougainville proved to be quite inaccurate, and although aerial reconnaissance and information gathered from submarine patrols had been used to update these, they remained imperfect, particularly with respect to longitude. The charts were also missing details of underwater obstructions and, as a result, the escorting minesweepers hit several uncharted shoals during the approach, while the APA American Legion later ran aground on an uncharted shoal.[45]

After the transports arrived at the transport area off Empress August Bay at 07:10 on 1 November, the first wave disembarked and went ashore aboard a large number of LCVPs. The landing was at 12 pre-designated beaches along an 8,000-yard (7,300 m) front northwest of and including Cape Torokina and Puruata Island, extending as far as Koromokina Lagoon. As the Marines came ashore, a force of 31 US Marine aircraft, staging out of Munda, attacked Japanese positions on the landing beaches.[46] Meanwhile, overhead a force of 40 USAAF and RNZAF fighters provided cover, while bombers attacked the Japanese airfields at Kahili and Kara.[47] Heavy but ultimately ineffective naval gunfire was also brought down ahead of the assault. The 9th Marines assaulted the northwestern beaches while the 3rd Marines took the southeastern beaches and the cape. The 3rd Marine Raider Battalion, under Lieutenant Colonel Fred D. Beans, captured Puruata Island, about 1,000 yards (910 m) northwest of the cape, against a well entrenched Japanese force. After being ejected from their pillboxes and trenches, the survivors escaped into the interior of the island. Mopping up operations began on 2 November.[46]
Because of the possibility of an immediate Japanese counterattack by air units, the assault was planned to ensure a smooth landing that would allow the transports to withdraw quickly. Some difficulty was experienced in landing southeast of the cape, while the three beaches directly to its northeast were found to be unsuitable for landing craft to get ashore.[48] Heavier than expected seas also hampered the initial waves, resulting in the loss of a large number of landing craft.[49] Nevertheless, the initial assault wave, which consisted of 7,500 Marines, proceeded relatively smoothly and landed successfully by 07:30.[50] These troops pushed ashore through small dry corridors of land and began clearing defenders from the dense scrub. The 2nd Marine Raider Battalion used search dogs to locate Japanese troops hiding in the undergrowth,[51] and by 11:00 the Marines had seized the lightly defended area. Some resistance continued until nightfall, by which time the beachhead was firmly secured.[1]
During the landing, fire from the Japanese mortars and artillery briefly held up the Marines and resulted in some disorganization amongst those coming ashore.[26] Shelling from the Japanese 75 mm gun destroyed four landing craft and damaged ten others until a lone effort from a Marine restored the situation for the Americans. At the cost of his life, Sergeant Robert A. Owens from Company A, 1st Battalion, 3rd Marines, approached the gun emplacement, entered it through the fire port, and drove the crew out the back door. Owens was posthumously awarded the Medal of Honor for this action.[52]
In response to the landing, a large force of Japanese aircraft (44 fighters and 9 dive bombers) was scrambled from Rabaul, arriving over Empress Augusta Bay at 07:35. These were intercepted by New Zealand and US Marine fighter aircraft from Munda and Vella Lavella. They also met with heavy anti-aircraft fire from the escorting US destroyers. The overall result was 26 Japanese aircraft shot down.[53] During the attack, unloading was halted and the transports began defensive maneuvers for two hours. After this first effort was repulsed, unloading on the beaches resumed. A second attack of 100 aircraft was launched from New Britain in the early afternoon. These were met by 34 AirSols fighters under direction from the destroyer USS Conway. Only 12 Japanese aircraft managed to penetrate the AirSols fighter screen. Arriving over the transport area, their attack proved largely ineffective, though they did manage to inflict a near miss on the destroyer USS Wadsworth, resulting in two killed and five wounded.[54]
By 17:30, despite the earlier interruptions, 8 of the 12 transports had completed unloading. In the space of 8 hours, Wilkinson's flotilla unloaded about 14,000 men and 6,200 tons of supplies. This was achieved largely by short-loading each vessel—each vessel was loaded to between one quarter to a half of its capacity to reduce unloading times. Utilizing some of the combat troops ashore also assisted unloading over the beach. Experience in earlier campaigns had shown that it was preferable to completely unload partially loaded ships than to partially unload completely loaded ships. The supplies landed would then be properly balanced, and there would be no shortages of certain critical items.[55]
The process was further expedited by employing cargo nets to move cargo unbroken from the ships to the beach. Once unloading was completed, Wilkinson then took his ships out of the area for fear of an overnight attack by Japanese surface ships.[55] The unloading continued the following day under air attack and ground fire from Japanese in the beachhead area. The Japanese airbases at Kahili, Kieta, Buka, and Balalae had been knocked out before the invasion but were quickly repaired and used for night bombing attacks. The shallow water prevented LSTs from beaching closer than 75 feet (23 m) from the shore. Ramps had to be constructed to allow them to unload.[56]
Meanwhile, the aircraft carriers USS Saratoga and Princeton of Rear Admiral Frederick C. Sherman's Task Force 38 launched further airstrikes against the airfields around the Buka Passage on 1–2 November.[57] A Japanese naval response to the landings was expected by the Allies. On the night of 1/2 November an American force of four light cruisers and eight destroyers from Merrill's task force, having been alerted by reconnaissance aircraft, intercepted a Japanese force of two heavy cruisers, two light cruisers and six destroyers under the command of Rear Admiral Sentaro Omori. This force had been dispatched from Rabaul along with five destroyer transports carrying 1,000 reinforcements for a counterlanding.[58] The two naval forces clashed in the Battle of Empress Augusta Bay that night (morning of 2 November), resulting in the Japanese force being turned back. The counterlanding was delayed for several days, allowing the forces ashore to consolidate their position.[59] Throughout 2 and 3 November, the Marines began patrolling the area around their beachhead and secured Torokina Island without loss on 3 November. This completed the establishment of the US beachhead.[1]
Aftermath edit
For the Allies, the landings were successful. The primary objective of securing a beachhead to establish an airfield were achieved in the weeks following the landing. Several secondary objectives were also achieved, including the 3rd Marine Division receiving its first engagement in the war, and the incremental reduction of Japanese air power around Rabaul. Throughout November, the balance of power at sea also began to shift in favor of the Allies, after the actions around Empress Augusta Bay and Cape St. George, as they began to successfully combine improved tactics, technology and resources.[60] Losses during the landings amounted to 78 killed in action and 104 wounded for the assaulting US troops. Against this, most of the 270 Japanese troops opposing the beachhead were killed. During the first three days of the landing, 192 bodies were located.[1]
In the air, the Japanese carried out three separate air attacks, employing 16 dive bombers and 104 fighters. Of these, 19 were destroyed and 10 were damaged.[33] A further 30 aircraft were claimed by Sherman's Task Force 38.[61] In the days following the landings, the Japanese carrier aircraft were eventually able to reinforce the 11th Air Fleet, and several attacks were carried out on 5, 8, 11 and 17 November. These achieved some successes against reinforcement convoys but suffered sustained losses to anti-aircraft fire and defending Allied fighter aircraft. This ultimately degraded future Japanese naval air operations, depriving them of precious air assets to respond to Allied operations around Makin and Tarawa.[62]
Following the landings, the Japanese dispatched a sizeable naval force from Truk, reinforcing the surface elements already at Rabaul in preparation for another attack on the Allied landing forces at Bougainville.[63] Although several tankers and transports were interdicted by Allied aircraft on 4 November, the bulk of these reinforcements arrived safely at Rabaul. This included at least seven heavy cruisers, a light cruiser and several destroyers. These posed a significant threat to the lodgment around Cape Torokina. They arrived at a time when the US Navy's capital ships were unavailable to respond, having been called back to Pearl Harbor to prepare for the Gilbert and Marshall Islands campaign.[64] As a result, it was decided to neutralize the threat from the air. Throughout November, Allied land-based and carrier-based aircraft launched a series of bombing raids against Rabaul. The main blow fell on 5 November, when aircraft from Saratoga and Princeton heavily damaged four heavy cruisers. The damaged cruisers had to withdraw to Truk. This ended the threat posed to the Allied forces around Cape Torokina by the Japanese surface fleet.[65]
Throughout November, as part of several subsequent echelons, the remainder of the 3rd Marine Division, the US 37th Infantry Division (under Major General Robert S. Beightler) and Advance Naval Base Unit No. 7, landed at Cape Torokina. They arrived aboard high-speed transports (APDs) and the slower LSTs, which had been held back initially due to fears of air attack.[66] On 13 November, Major General Roy Geiger assumed command of Allied forces on Bougainville from Wilkinson. As late as 25 November, the beachhead was still under hostile fire. As the sixth echelon of the invasion force was unloading, Japanese artillery fired on the landing ships, inflicting casualties. The Marines silenced these guns the following day.[67] On 15 December responsibility for Bougainville passed from I Marine Amphibious Corps to the Army's XIV Corps.[68]
Base development edit
Throughout November, US forces established a perimeter around Cape Torokina, during which significant base development work was undertaken with eight naval construction battalions (Seabees) and a brigade of New Zealand engineers being deployed. This work included the construction of three airfields and an advanced PT boat base on Puruata Island.[69] Advance parties of the 25th, 53rd, 71st and 75th Naval Construction Battalions arrived on 1 November. The construction of Torokina Airfield, a fighter airstrip, was assigned to the 71st Naval Construction Battalion. Work began on 3 November. Owing to the limited size of the beachhead, the choice of sites was limited, and the area was still under sniper fire.[70] The swampy nature of the terrain required significant drainage work before construction could begin.[71] The 200-by-5,150-foot (61 by 1,570 m) airstrip was completed on 10 December, allowing 18 Vought F4U Corsairs to land, although a Douglas SBD Dauntless had already made an emergency landing on 24 November. Intended to handle 35 fighters or light bombers, Torokina eventually accommodated several times that number.[70] These aircraft would subsequently play an important role, along with forces based in New Guinea, in neutralizing Rabaul as an air and sea base.[72]

Construction of the larger Piva Airfield for bombers was commenced on 29 November by the 36th Naval Construction Battalion, which had arrived three days before. The 300-by-8,000-foot (91 by 2,438 m) was carved out of dense jungle. The first aircraft landed on 19 December, and the airbase became operational on 30 December with the arrival of 10 Army transport aircraft. The runway was found to be too short and had to be extended by another 2,000 feet (610 m). Construction of 35 hardstands, 7 hangars, and 26 other buildings was undertaken by the 71st Naval Construction Battalion. The 77th Naval Construction Battalion built a 5,000-man camp for the Marine Aircraft Group 24, and the 36th added another 2,000-man camp.
The 77th Battalion arrived on Bougainville on 10 December and began constructing a fighter airfield parallel to the bomber field. This was completed on 3 January, and the first aircraft landed on 9 January. Several weeks later, the 77th Battalion was instructed to extend the strip by 2,000 feet (610 m). The two airfields were connected by taxiways and shared fuel tank farms and other facilities. The fuel tank farm consisted of a 10,000-barrel (1,600 m3) tank and 18 1,000-barrel (160 m3) tanks, fed from a tanker mooring by a submarine pipeline and 5 miles (8.0 km) of overland pipe. The 75th Naval Construction Battalion had the task of repairing breaks in the pipeline caused by Japanese shellfire.[73]
Construction of a PT-boat base on Puruata Island was undertaken by the 75th Naval Construction Battalion, with help from the 71st and 77th Naval Construction Battalions. A wooden pile pier was built, along with crash boat and fueling piers, and 18 small-boat moorings. Base facilities included sleeping quarters, mess halls, five steel-framed warehouses and an emergency hospital. The main medical facility was on Bougainville, built by the 36th Naval Construction Battalion. It consisted of 70 Quonset huts and a 40-by-100-foot (12 by 30 m) mess hall, with accommodation for 500 patients.[74]
The inland road network was the responsibility of the US Army engineers, particularly the 117th Combat Engineer Battalion. They cut supply roads through the jungle. It was found that underneath the 1-foot (0.30 m) deep top soil was volcanic sand, which was suitable for road surfacing. A three-span bridge was built over the Koromokina River.[68] Base development work was completed by July 1944, and the last naval construction battalion, the 36th, departed in August. Construction Battalion Maintenance Units 582 and 586 arrived in May 1944, and took over maintenance of the base facilities.[74]
Expanding the beachhead edit

Meanwhile, several engagements were fought on the periphery throughout the remainder of 1943 as the beachhead was secured. In the first of these, the Battle of Koromokina Lagoon, a Japanese counterlanding by elements of the 17th Division, was repelled.[75] An overland thrust by 6th Division elements from southern Bougainville was defeated at the Battle for Piva Trail shortly afterwards. US forces slowly expanded their perimeter, systematically advancing to several inland defense lines throughout mid- to late-November.[76] At the end of November, they launched an unsuccessful raid on Koiari, to the south of the beachhead.[77]
Beginning on 15 December, the Japanese began an effort to move ground troops from southern Bougainville to the Torokina perimeter by barge. The effort amounted to little gain, with many of the barges losing their way or being intercepted by PT boats. Those troops that did manage to get ashore were attacked by Marine patrols. The last group of troops, having landed on the Magine Islands in Empress Augusta Bay, was destroyed with artillery on 20 December. Japanese nighttime bombing operations began on 15 December and continued for 10 days.[78] Japanese artillery continued firing into the beachhead until they were forced off Hellzapoppin Ridge in mid-December.[79]
The Americal Division started arriving in December to relieve the Marines. On 15 December responsibility for command of the Torokina perimeter was assumed by Major General Oscar Griswold's XIV Corps,[80] inheriting a perimeter 15 miles (24 km) long and 5 miles (8 km) deep.[26] Units of the 3rd Marine Division began to withdraw from the line on 27–28 December and by 16 January 1944 had withdrawn to Guadalcanal.[81]
Believing that the landing at Torokina was a ruse and would be followed by a further landing around Buka, Imamura reinforced the northern part of Bougainville instead of launching a concerted counterattack with the 15,000 (or more) troops that were stationed in southern Bougainville.[82] By the time it became apparent that this assessment was wrong, the conditions required for a successful counterattack had passed and Hyakutake was ordered to delay his plans.[83] In March 1944, the Japanese launched a counterattack on the US perimeter around Cape Torokina, which was defeated with heavy casualties to their forces.[84]
A lull in the fighting on Bougainville followed until the later part of 1944, when Australian forces took over responsibility for the lodgment at Cape Torokina. Throughout 1944 and into 1945, the Australians worked to secure control of the island from the Japanese. They launched a series of drives to clear the northern, central and southern sectors. Ultimately, these were only partially completed by the time the war came to an end in August 1945. The Australians had advanced to the Bonis Peninsula in the north and had reached a position just short of Buin in the south.[85]
Notes edit
- ^ a b c d e Rentz 1946, p. 38
- ^ a b Morison 1975, p. 280
- ^ Rottman 2002, pp. 135–136
- ^ Costello 2009, pp. 421–422
- ^ Miller 1959, pp. 222–225
- ^ Morison 1975, p. 281; Keogh 1965, p. 413
- ^ Keogh 1965, p. 414
- ^ Morison 1975, p. 283
- ^ Morison 1975, pp. 295–296; Klobuchar 2012, p. 168
- ^ Gailey 1991, p. 38; Newell 2012, p. 6
- ^ a b Costello 2009, p. 422
- ^ Miller 1958, p. 234
- ^ Morison 1958, p. 283
- ^ Costello 2009, p. 422; Rentz 1946, pp. 14–18
- ^ Shaw & Kane 1963, pp. 175–176
- ^ Miller 1959, p. 238
- ^ Tanaka 1980, pp. 71–73
- ^ Miller 1959, p. 235
- ^ a b Rentz 1946, p. 18; Shaw & Kane 1963, p. 172
- ^ Long 1963, Map p. 91
- ^ Morison 1975, p. 426
- ^ Shaw & Kane 1963, p. 172
- ^ a b Costello 2009, p. 423
- ^ Miller 1959, p. 246; Morison 1975, pp. 300 & 302
- ^ Miller 1959, p. 246
- ^ a b c Long 1973, p. 344
- ^ Rentz 1946, p. 25
- ^ Bowser 1947, p. 28
- ^ Gailey 1991, pp. 2 & 20
- ^ Rohfleisch 1951, p. 255
- ^ Miller 1959, pp. 212–213 & 233–234; Rohfleisch 1951, p. 259
- ^ Rohfleisch 1951, p. 259
- ^ a b Miller 1959, p. 248
- ^ Miller 1959, pp. 252–253; Rohfleisch 1951, p. 259
- ^ a b Morison 1975, p. 298
- ^ a b Morison 1975, p. 297
- ^ Rentz 1946, p. 161; Bowser 1947, p. 25
- ^ Chapin 1997, p. 4
- ^ Rohfleisch 1951, pp. 250 & 255
- ^ Rentz 1946, pp. 14–18
- ^ Morison 1975, pp. 291–292
- ^ Shaw & Kane 1963, p. 188
- ^ Miller 1959, p. 241
- ^ Bowser 1947, p. 27
- ^ Morison 1975, pp. 298–299 & 303
- ^ a b Rentz 1946, pp. 24, 32–33 & 48; Chapin 1997, pp. 1–2; Shaw & Kane 1963, pp. 180 & 210
- ^ Rohfleisch 1951, pp. 255 & 257
- ^ Morison 1975, p. 300
- ^ Rohfleisch 1951, p. 256
- ^ Rentz 1946, pp. 24–25
- ^ Morison 1975, p. 302
- ^ Gailey 1991, p. 74; Chapin 1997, p. 3
- ^ Chapin 1997, p. 4; Morison 1975, p. 303
- ^ Morison 1975, p. 303
- ^ a b Morison 1975, pp. 303–304
- ^ Bureau of Yards and Docks 1947, p. 268
- ^ Morison 1975, pp. 292–293
- ^ Spence 2009, p. 70; Bowser 1947, p. 29; Morison 1975, pp. 305–306
- ^ Morison 1975, pp. 305–322; Costello 2009, pp. 423–424
- ^ Bowser 1947, pp. 26 & 30; Costello 2009, pp. 426–427; Spence 2009, p. 68
- ^ Miller 1959, p. 242
- ^ Miller 1959, pp. 252–253; Rohfleisch 1951, p. 259; Tanaka 1980, p. 72
- ^ Marriott 2005, p. 135
- ^ Morison 1975, pp. 322–324; Costello 2009, p. 424
- ^ Morison 1975, pp. 323–336
- ^ Miller 1959, p. 235; Morison 1975, pp. 337–347
- ^ Morison 1975, pp. 348–352
- ^ a b Dod 1966, p. 255
- ^ Morison 1975, pp. 360–364 & 424
- ^ a b Bureau of Yards and Docks 1947, pp. 268–270
- ^ Costello 2009, p. 425
- ^ Gailey 1991, p. 3; Bowser 1947, p. 30
- ^ Bureau of Yards and Docks 1947, pp. 270–273
- ^ a b Bureau of Yards and Docks 1947, pp. 273–274
- ^ Morison 1975, p. 341; Tanaka 1980, p. 73
- ^ Rentz 1946, pp. 39–40; Shaw & Kane 1963, pp. 247–267
- ^ Rentz 1946, pp. 71–77
- ^ Morison 1975, p. 362
- ^ Costello 2009, p. 427
- ^ Morison 1975, p. 364
- ^ Shaw & Kane 1963, p. 280
- ^ Morison 1975, pp. 348–349; Costello 2009, p. 425
- ^ Tanaka 1980, pp. 73 & 255–275
- ^ James 2012, p. 155
- ^ Keogh 1965, pp. 414–421
References edit
- Bowser, Alpha L. (November 1947). "End Run in the Solomons". Marine Corps Gazette. 31 (11). ISSN 0025-3170.
- Bureau of Yards and Docks (1947). Building the Navy's Bases in World War II: History of the Bureau of Yards and Docks and the Civil Engineer Corps 1940–1946, Volume II. Washington, D.C.: US Government Printing Office. OCLC 816329866. Retrieved 24 August 2017.
- Chapin, John C. (1997). Top of the Ladder: Marine Operations in the Northern Solomons. Washington, D.C.: Marine Corps History and Museums Division. OCLC 231774971. Retrieved 30 August 2006.
{{cite book}}:|work=ignored (help) - Costello, John (2009) [1981]. The Pacific War 1941–1945. New York: Harper Perennial. ISBN 978-0-68-801620-3.
- Dod, Karl (1966). The Corps of Engineers: The War Against Japan. Washington, D.C.: United States Department of the Army. OCLC 929532338.
- Gailey, Harry A. (1991). Bougainville, 1943–1945: The Forgotten Campaign. Lexington, Kentucky: University Press of Kentucky. ISBN 0-8131-9047-9.
- James, Karl (2012). The Hard Slog: Australians in the Bougainville Campaign, 1944–45. Port Melbourne, Victoria: Cambridge University Press. ISBN 978-1-107-01732-0.
- Keogh, Eustace (1965). South West Pacific 1941–45. Melbourne, Victoria: Grayflower Publications. OCLC 7185705.
- Klobuchar, Richard P. (2012). The USS Ward: An Operational History of the Ship That Fired the First American Shot of World War II. Jefferson, North Carolina: McFarland. ISBN 978-1-47660-543-2.
- Long, Gavin (1963). The Final Campaigns. Australia in the War of 1939–1945. Series 1 – Army. Vol. 7. Canberra: Australian War Memorial. OCLC 1297619.
- Long, Gavin (1973). The Six Years' War. A Concise History of Australia in the 1939–1945 War. Canberra: The Australian War Memorial and the Australian Government Printing Service. ISBN 0-642-99375-0.
- Marriott, Leo (2005). Treaty Cruisers: The World's First International Warship Building Competition. Barnsley: Pen & Sword Maritime. ISBN 978-1-84415-188-2.
- Miller, John (1959). "Chapter XII: The Invasion of Bougainville". Cartwheel: The Reduction of Rabaul. U.S. Army in World War II. Washington, D.C.: Office of the Chief of Military History, Department of the Army. pp. 222–250. OCLC 63151382.
- Morison, Samuel Eliot (1975) [1950]. Breaking the Bismarcks Barrier. History of United States Naval Operations in World War II. Vol. 6 (1960 reprinted ed.). Boston: Atlantic Monthly Press Book: Little, Brown and Company. OCLC 1010854539.
- Newell, Reg (2012). Operation Goodtime and the Battle of the Treasury Islands, 1943: The World War II Invasion by United States and New Zealand Forces. Jefferson, North Carolina: McFarland. ISBN 978-0-78646-849-2.
- O'Brien, Cyril J. (1994). Liberation: Marines in the Recapture of Guam. World War II Commemorative Series. Washington, D.C.: Marine Corps History and Museums Division. OCLC 621907689.
- Rentz, John M. (1946). Bougainville and the Northern Solomons. Washington, D.C.: Historical Branch, Headquarters, United States Marine Corps. OCLC 21130914. Retrieved 24 January 2007.
- Rohfleisch, Kramer J. (1951). "Bougainville". In Craven, Wesley Frank; Cate, James Lea (eds.). The Pacific: Guadalcanal to Saipan, August 1942 to July 1944. The Army Air Forces in World War II. Vol. IV. Chicago: University of Chicago Press. pp. 245–280. OCLC 5732980.
- Rottman, Gordon L. (2002). World War II Pacific Island Guide: A Geo-military Study. Westport, Connecticut: Greenwood Press. ISBN 0-313-31395-4.
- Shaw, Henry I.; Douglas T. Kane (1963). Volume II: Isolation of Rabaul. Washington, D.C.: U.S. Marine Corps Government Printing Office. OCLC 432730347. Retrieved 18 October 2006.
{{cite book}}:|work=ignored (help) - Spence, Johnny H. (August 2009). South Pacific Destroyers: The United States Navy and the Challenges of Night Surface Combat in the Solomon Islands During World War II (Thesis). OCLC 610595266.
- Tanaka, Kengoro (1980). Operations of the Imperial Japanese Armed Forces in the Papua New Guinea Theater During World War II. Tokyo: Japan Papua New Guinea Goodwill Society. OCLC 9206229.