


Summary
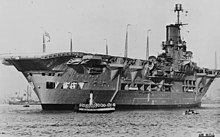
HMS Ark Royal (pennant number 91) was an aircraft carrier of the Royal Navy that was operated during the Second World War.
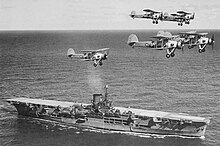
 HMS Ark Royal in 1939, conducting flying operations with Swordfish biplanes
| |
| Class overview | |
|---|---|
| Preceded by | Courageous class |
| Succeeded by | Illustrious class |
| History | |
| Name | Ark Royal |
| Namesake | Ark Royal (1587) |
| Ordered | 1934 build programme |
| Builder | Cammell Laird |
| Laid down | 16 September 1935 |
| Launched | 13 April 1937 |
| Commissioned | 16 December 1938 |
| Identification | Pennant number: 91 |
| Motto | Desire n'a pas Repos – "Zeal Does Not Rest" |
| Honours and awards |
|
| Fate | Sunk by U-81, 14 November 1941 |
| General characteristics | |
| Type | Aircraft carrier |
| Displacement | |
| Length | |
| Beam | 94 ft 9.6 in (28.895 m) |
| Draught | 27 ft 9.6 in (8.473 m) |
| Installed power |
|
| Propulsion | 3 × shafts; 3 × geared steam turbines |
| Speed |
|
| Range | 7,600 nmi (14,100 km; 8,700 mi) at 20 knots (37 km/h; 23 mph) |
| Complement | 1,580 officers and ratings |
| Armament |
|
| Armour | |
| Aircraft carried |
|
| Aviation facilities | 2 × catapults |
Designed in 1934 to fit the restrictions of the Washington Naval Treaty, Ark Royal was built by Cammell Laird at Birkenhead, England, and completed in November 1938. Her design differed from previous aircraft carriers. Ark Royal was the first ship on which the hangars and flight deck were an integral part of the hull, instead of an add-on or part of the superstructure. Designed to carry a large number of aircraft, she had two hangar deck levels. She was used during a period that first saw the extensive use of naval air power; several carrier tactics were developed and refined aboard Ark Royal.
Ark Royal operated in some of the most active naval theatres of the Second World War. She was involved in the first aerial U-boat kills of the war, operations off Norway, the search for the German battleship Bismarck, and the Malta Convoys. Ark Royal survived several near misses and gained a reputation as a 'lucky ship'. She was torpedoed on 13 November 1941 by the German submarine U-81 and sank the following day. One of her 1,488 crew members was killed. Her sinking was the subject of several inquiries, with investigators keen to know how the carrier was lost in spite of efforts to save the ship and tow her to the naval base at Gibraltar. They found that several design flaws contributed to the loss, which were rectified in new British carriers.
The wreck was discovered in December 2002 by an American underwater survey company using sonar mounted on an autonomous underwater vehicle, under contract from the BBC for the filming of a documentary about the ship, at a depth of about 3,300 feet (1,000 m) and approximately 30 nautical miles (56 km; 35 mi) from Gibraltar.
Design edit
In 1923, the Admiralty prepared a 10-year building programme which included an aircraft carrier and 300 aircraft for the Fleet Air Arm.[3] The economic downturn following the First World War caused it to be postponed. In 1930, the Director of Naval Construction, Sir Arthur Johns, began to update the plans for the carrier by incorporating recently developed technology.[3] His aim was to increase the number of aircraft carried by shortening the landing and take-off distances of aircraft using arrestor gear and compressed steam catapults respectively, which would make more deck space available for storage and aircraft preparation.[3][4] Along with the inclusion of two hangar decks, this allowed Ark Royal to carry up to 72 aircraft, although the development of larger and heavier aircraft during the carrier's construction meant that the actual number carried was between 50 and 60.[5] Ark Royal featured an enclosed hangar design[6] where the flight deck was the 'strength deck'[7] and was strongly built with .75in (19mm) thick Ducol steel plating. The two hangar decks were thus enclosed within the hull girder, which also gave splinter protection to the hangars. The machinery spaces were protected by 4.5-inch (11.4 cm) belt armour.[4] Three lifts moved aircraft between the hangars and the flight deck.[4]
Another feature was the length and height of the flight deck. At 800 feet (240 m), the flight deck was 118 feet (36 m) longer than the keel; the latter dictated by the length of Royal Navy drydocks in Gibraltar and Malta.[4] Due to the twin hangar decks, the flight deck rose to 66 feet (20 m) above the waterline.[8]
The Washington and London Naval treaties had restricted warship displacement for a number of nations after the end of the Great War and were both to expire by the end of 1936.[a] With a potential naval arms race developing between Britain, Japan and Italy, the British government sought a second treaty, which included limiting the maximum displacement of an aircraft carrier to 23,000 long tons (23,000 t). Ark Royal would have to fit this anticipated limit; to conserve weight, armour plating was limited to the belt, engine rooms, and magazines, while welding instead of rivetting 65% of the hull saved 500 long tons (510 t).[9] Installation of an armoured flight deck was not possible, as the weight would have placed Ark Royal above the proposed limit, while reducing her endurance and stability.[9] The ship was designed with a three-layer side protection system based upon a void-liquid-void scheme very similar to that used on the King George V-class battleships, and was designed to protect against torpedoes with up to a 750-pound (340 kg) warhead.[10][11]
The ship was fitted with six boilers, which powered three Parsons geared turbines. The turbines were connected via three driveshafts to three propellers 16 feet (4.9 m) in diameter, to produce a maximum theoretical speed of 30 knots (56 km/h; 35 mph).[12][13] Speed was important, as with catapults and arrestor gear, Ark Royal would have to turn into the wind to launch and recover aircraft. To avoid endangering other ships with the frequent course changes associated with flight operations, Ark Royal would have to break away from accompanying ships, and catch up on completion. Additionally, as the carrier was not armed for ship-to-ship combat, speed was her main protection against enemy warships.[3]
Construction edit
The deteriorating international situation by 1933, typified by Germany's rearmament and the expansion of Japan and Italy, convinced the British to announce funds for the carrier's construction in the 1934 budget proposals.[14] The plans were finished by November 1934 and were tendered in February 1935 to Cammell Laird and Company Ltd., which calculated the cost of the hull at £1,496,250 (equivalent to £110,500,000 in 2021)[15] and the main machinery at approximately £500,000 (equivalent to £36,925,826 in 2021).[12][16] The overall cost was estimated to be over £3 million (equivalent to £222 million in 2023), making Ark Royal the most expensive non-battleship ordered by the Royal Navy.[17] Construction began on Job No. 1012 when Ark Royal's keel was laid down on 16 September 1935.[18]

Ark Royal spent nearly two years in the builder's yard before being launched on 13 April 1937 by Lady Maud Hoare, wife of Sir Samuel Hoare, then First Lord of the Admiralty. The bottle of champagne thrown against Ark Royal's bows did not smash until the fourth attempt.[19] The carrier spent a year fitting out, was handed over to her first commander, Captain Arthur Power, on 16 November 1938, and was commissioned on 16 December.[18] Although intended for the Far East, events in Europe during the carrier's construction, including the Italian invasion of Abyssinia in 1935 and the Spanish Civil War in 1936, caused the Admiralty to mark her for deployment with the Home and Mediterranean Fleets.[20] After her crew joined at the end of 1938, Ark Royal underwent sea trials to prepare for service, during which the carrier proved capable of sailing above her theoretical speed, reaching over 31 knots (57 km/h; 36 mph)[8] and in trials during May 1938 Ark Royal achieved 31.2 knots (57.8 km/h; 35.9 mph) with 103,012 shaft horsepower (76,816 kW) at a deep displacement of 27,525 long tons (27,967 t).[21]
Armament and aircraft edit
Ark Royal's armament was designed with anti-aircraft warfare in mind, as aircraft were expected to be the main threat; ships and submarines could be outrun or dealt with by escorts.[22][23] Her main armament was sixteen quick-firing 4.5-inch (110 mm) dual purpose guns in eight double turrets, four on each side of the hull, controlled by four Directors using the High Angle Control System.[4] The original design placed the turrets low on the hull, but was later altered to locate them just below the flight deck, which increased each turret's field of fire.[4] Six[2] 8-barrelled 2-pounder (40-millimetre (1.57 in)) "pom-pom" guns were located on the flight deck, in front of and behind the superstructure island, while eight 4-barrelled .50-inch (12.7 mm) machine guns were installed on small projecting platforms to the front and rear of the flight deck.[24]
Sixteen Fleet Air Arm squadrons were posted aboard Ark Royal during her career; an average of five squadrons at any time. On entering service, most of Ark Royal's squadrons were equipped with either Blackburn Skuas—used as fighters and dive bombers—or Fairey Swordfish, for reconnaissance and torpedo bombing. From April 1940, squadrons equipped with Skuas were upgraded to Fairey Fulmars; like their predecessors, these were used as fighters and bombers. On occasion, the carrier operated Blackburn Roc fighter-bombers (from April 1939 – October 1940) and Fairey Albacore torpedo bombers (during October 1941); these were replacement aircraft used to boost squadron numbers.[25] In June 1940, Ark Royal was host to 701 Naval Air Squadron, a training squadron which operated Supermarine Walrus reconnaissance amphibians.[26]
| Squadron | Aircraft operated | Embarked (from – to) | Notes |
|---|---|---|---|
| 800 | Blackburn Skua Mk. II | January 1939 – April 1941 | Transferred to Victorious |
| 810 | Fairey Swordfish Mk. I | January 1939 – September 1941 | |
| 820 | Fairey Swordfish Mk. I | January 1939 – June 1941 | – |
| 821 | Fairey Swordfish Mk. I | January 1939 – April 1940 | Removed from operational service following losses against Scharnhorst |
| 803 | Blackburn Skua Mk. II Blackburn Roc Mk. I |
April 1939 – October 1940 | – |
| 818 | Fairey Swordfish Mk. I | August–October 1939 June–July 1940 |
Operated from Furious and land bases between October 1939 and June 1940 |
| 801 | Blackburn Skua Mk. II | April–May 1940 | Transferred to Furious |
| 807 | Fairey Fulmar Mk. II | April–November 1941 | Embarked at sinking |
| 701 | Supermarine Walrus Mk. I | June 1940 | Training squadron |
| 808 | Fairey Fulmar Mk. II | September 1940 – November 1941 | Embarked at sinking |
| 821X | Fairey Swordfish Mk. I | December 1940 – January 1941 | Flight assembled from 821 Squadron survivors, later absorbed into 815 Squadron |
| 800Y | Fairey Fulmar Mk. I | June 1941 | Flight from 800 Squadron |
| 825 | Fairey Swordfish Mk. I | June–November 1941 | Embarked at sinking |
| 816 | Fairey Swordfish Mk. I | July–November 1941 | Embarked at sinking |
| 812 | Fairey Swordfish Mk. I | September–November 1941 | Embarked at sinking |
| 828 | Fairey Swordfish Mk. I Fairey Albacore Mk. I |
October 1941 | Redeployed to Malta |
Service history edit
With the hunter-killer groups edit

The outbreak of the Second World War on 1 September 1939 had been presaged by Germany's U-boat fleet taking up positions off the British coast, where they could intercept British shipping.[27] Within hours of the war starting, the passenger ship SS Athenia was torpedoed by U-30, the first of over 65,000 tons of shipping sunk by U-boats during the first week of the war.[27][28] Ark Royal was deployed with the Home Fleet in the North Western Approaches as part of a "hunter-killer" group, consisting of a flotilla of destroyers and other anti-submarine vessels grouped around an aircraft carrier; either Courageous, Hermes or Ark Royal. Carrier-borne aircraft could increase the area searched for U-boats, but made the carriers tempting targets.[28]
On 14 September, Ark Royal received a distress call from SS Fanad Head, which was 200 nautical miles (230 mi; 370 km) away under pursuit from the surfaced U-30.[29] Ark Royal launched aircraft to aid the merchant ship, but was spotted by U-39, which launched two torpedoes.[29][30] Lookouts spotted the torpedo tracks and Ark Royal turned towards the attack, reducing her cross-section and causing the torpedoes to miss and explode harmlessly astern.[28] Three F-class destroyers escorting the carrier began to depth charge U-39, and forced her to the surface.[30] The German crew abandoned ship before U-39 sank—the first U-boat lost during the war.[30] Ark Royal's aircraft reached Fanad Head, which was in the hands of a German boarding party.[29] The Skuas unsuccessfully attacked U-30: two crashed when caught by the blast of their own bombs.[29] The U-boat escaped after rescuing the boarding party and the pilots of the downed aircraft (both observers had drowned), and torpedoing the Fanad Head.[29]
Ark Royal returned to base in Loch Ewe, where she and her crew were inspected by Winston Churchill. The sinking of U-39 was hailed as important to morale. However, the failed attack on Ark Royal, and the successful attack on Courageous on 17 September, convinced the Admiralty it was too dangerous to risk aircraft carriers in this way, and carrier-centred hunter-killer groups were abandoned.[28]
Another near miss edit
On 25 September 1939, Ark Royal helped rescue the submarine Spearfish, which had been damaged by German warships off Horn Reefs, in the Kattegat.[31] While returning to port with Spearfish and the battleships Nelson and Rodney on 26 September, the ships were located by three Luftwaffe Dornier Do 18 seaplanes.[12] Ark Royal launched three Blackburn Skuas to disperse them; one Dornier was shot down in an event propagandised as first British aerial kill of the war (later it was learned that the pilot of a Fairey Battle achieved the first kill.[22]
The air commander aboard Ark Royal—aware that the surviving Dorniers would report the location of the British ships—ordered the aircraft to be secured and the anti-aircraft weapons readied.[32] Four Junkers Ju 88 bombers[33] of the Luftwaffe bomber wing KG 30 soon appeared: three were driven away by anti-aircraft fire, but the fourth launched a 2,200-pound (1,000 kg) bomb at the carrier. Ark Royal turned hard to starboard, heeling over and avoiding the bomb, which landed in the ocean 100 feet (30 m) off her starboard bow and sent a spout of water over the ship. The German pilots did not see if the carrier had been hit, and a reconnaissance flight later located the two battleships, but not Ark Royal. Based on this information, the Germans incorrectly claimed that Ark Royal had sunk.[34] To prove the German propaganda false before it had a negative effect on Britain's allies, Winston Churchill reassured United States President Franklin Delano Roosevelt that the carrier was undamaged and invited the US naval attaché to view Ark Royal in dock.[34] The British naval attaché in Rome was instructed to assure Italian Prime Minister Benito Mussolini that the ship was still in service.[34] This was an embarrassment for Goebbels and Nazi propaganda.[35]
Hunting the Graf Spee edit
In October 1939, Ark Royal was redeployed to Freetown to operate off the African coast in the hunt for the German commerce raider Admiral Graf Spee. The carrier was assigned to Force K, and sailed with the battlecruiser Renown to the South Atlantic.[12] On 9 October, aircraft from Ark Royal spotted the German tanker Altmark, which supplied Graf Spee. The tanker was disguised as the US vessel Delmar, which fooled the British into passing her by.[36] On 5 November, Ark Royal captured the German merchant SS Uhenfels, which was attempting to reach Germany. The ship was later taken into British service as a cargo ship[37] and renamed Empire Ability.[38] Several neutral merchant ships were also spotted by the carrier's aircraft, twice causing crews to believe they were under attack and abandon ship.[39] A note explaining the situation was dropped in a bag to a Norwegian vessel's crew, and they re-boarded; an attempt to repeat this exercise with a Belgian crew failed when the bag was dropped down the ship's funnel.[39]
On December 14, 1939, Graf Spee had put into Montevideo to repair damage received during the battle of the River Plate. Two Royal Navy cruisers followed the raider, and patrolled the harbour entrance while reporting Graf Spee's position to the fleet. Ark Royal and Renown were dispatched to join the British ships outside the harbour, but as they were 36 hours away, the British naval attaché came up with a plan to make the Germans believe that the two capital ships had already arrived. An order for fuel for Ark Royal was placed at Buenos Aires, 140 miles (230 km) west of Montevideo. This was leaked to the press, passed on to the German embassy in Montevideo, and given to Graf Spee's captain, Hans Langsdorff.[40] This contributed to Langsdorff's decision to scuttle his ship.[40]
Return to the fleet edit
With Graf Spee sunk, Ark Royal remained in the Atlantic for a short time before escorting the damaged heavy cruiser Exeter back to Devonport Dockyard, where they arrived in February.[12] Following this, Ark Royal proceeded to Portsmouth to take on supplies and personnel, before sailing to Scapa Flow. On arrival, she transferred her Blackburn Skuas to Naval Air Station Hatston to strengthen the anchorage's defences.[41] Ark Royal was then assigned to the Mediterranean Fleet for exercises, departing Scapa Flow on 31 March 1940 and heading for Alexandria with the aircraft carrier Glorious.[12] The carriers arrived in the Eastern Mediterranean on 8 April, but the exercises were cancelled a day later. The ships sailed to Gibraltar to await orders.[41]
German forces had invaded Norway as part of Operation Weserübung on 9 April, and had secured sections of the coast. Attempts by the Royal Navy to operate in support of British troops were unsuccessful; air attacks had overwhelmed the ships, sinking Gurkha and nearly sinking Suffolk. Realising that the British ships required air cover, but aware that the Norwegian coast was outside the range of British land-based aircraft, the Admiralty recalled Ark Royal and Glorious from the Mediterranean on 16 April.[41]
Norwegian campaign edit
Ark Royal and Glorious arrived at Scapa Flow on 23 April 1940 and were immediately redeployed as part of Operation DX, sailing to Norway with the cruisers Curlew and Berwick and screened by the destroyers Hyperion, Hereward, Hasty, Fearless, Fury and Juno. This was the first time the Royal Navy had deployed carriers with the primary purpose of providing fighter protection for other warships.[12] The ships took up position on 25 April off the coast; Ark Royal positioned 120 nautical miles (220 km; 140 mi) offshore to reduce the chance of air attacks. The carrier's aircraft conducted anti-submarine patrols, provided fighter support for other ships, and carried out strikes against shipping and shore targets.[12][25] Ark Royal returned to Scapa Flow on 27 April to refuel and replace lost and damaged aircraft, before heading back on the same day with the battleship Valiant as escort.[12] During the return, Ark Royal came under air attack from German Junkers Ju 88 and Heinkel He 111 bombers operating from Norway. The carrier was undamaged, and resumed position on 29 April.[42]

By this point, the British high command had realised that they could not hold the Germans in southern Norway. The evacuation of Allied troops from Molde and Åndalsnes began, with Ark Royal providing air cover from 30 April. On 1 May, the Germans tried to sink the carrier, with numerous air attacks through the day. Ark Royal's fighters and a heavy anti-aircraft barrage drove off the enemy, and although several bombs were dropped at the carrier, none hit.[42] The evacuations of Molde and Andalsnes were completed on 3 May, and the carrier was recalled to Scapa Flow to refuel and rearm. While in port, Captain Arthur Power left the ship for a promotion to the Admiralty, and was replaced by Captain Cedric Holland.[43] On return to Norway, Ark Royal was told to provide air cover for operations around Narvik, including the landing of French troops on 13 May.[44] She was joined on 18 May by the carriers Glorious and Furious.[12]
Despite these efforts, it was clear by the end of May that French forces were on the verge of collapse and Norway was a sideshow compared to the German advance to the English Channel.[44] Operation Alphabet was instigated to move Allied troops from Narvik to Britain. Ark Royal and Glorious—screened by the destroyers Highlander, Diana, Acasta, Ardent, and Acheron—sailed from Scapa Flow on 1 June to cover the evacuation, which commenced the next day. Ark Royal carried out air patrols and bombing raids from 3–6 June, before redeploying to Narvik on 7 June. The next day, Glorious, Acasta and Ardent were sunk by the German battleships Scharnhorst and Gneisenau while heading back to Britain. Ark Royal's aircraft failed to locate the German ships, which had returned to Trondheim.[45]
The last evacuation convoy left Narvik on 9 June. Before the British ships could withdraw, a raid on Trondheim located Scharnhorst. An attack by Ark Royal's Skuas took place at midnight on 13 June.[46] The attack was a disaster: the escort destroyers Antelope and Electra collided while Ark Royal was launching aircraft in fog and returned to England for repairs, eight of the fifteen attacking Skuas were shot down, while Scharnhorst escaped damage.[47] Ark Royal returned to Scapa Flow the following day, and was reassigned to the Mediterranean Fleet.[48]
Mediterranean deployment edit
Ark Royal left Scapa Flow with the battlecruiser Hood and three destroyers, arriving at Gibraltar on 23 June 1940. Here she joined Force H, under Sir James Somerville. After the capitulation of France there was concern that a French fleet at Mers-el-Kébir might fall under Axis control and tip the balance of power in the Mediterranean, affecting the whole war.[49] Ark Royal's captain, Cedric Holland, had been the British naval attaché in Paris, and was sent to negotiate the surrender or scuttling of the French fleet.[50] Force H was deployed outside the harbour, and when the French admirals refused to agree to the offered terms, opened fire on the French ships. During the attack on Mers-el-Kébir, Ark Royal's aircraft provided targeting information for the British ships.[51] The French battleship Strasbourg escaped, despite attacks by Swordfish from Ark Royal.[52] Two days after the attack, aircraft from Ark Royal incapacitated the French battleship Dunkerque, which had been beached in the initial attack.[53]

Having reduced the possibility of a French challenge in the Mediterranean, Force H prepared for attacks on Italian targets, and sailed from Gibraltar on 8 July.[54] The force was attacked by Italian bombers within eight hours of departing, and although Force H escaped damage, Somerville cancelled the raids and ordered the fleet to Gibraltar.[55] During July, the British colony of Malta came under attack from the Italian air force, with Force H ordered to deliver Hawker Hurricanes to reinforce the island's air defences. Force H was deployed from 31 July – 4 August, with the carrier Argus used to deliver the aircraft, while Ark Royal provided air cover for the fleet.[54] On 2 August, Ark Royal launched a successful air attack against the Italian air base at Cagliari.[56]
Force H remained at Gibraltar until 30 September, when it escorted reinforcements for Admiral Andrew Cunningham's fleet to Alexandria.[57] En route, diversionary attacks were planned on Italian air bases at Elmas and Cagliari to direct attention from both the reinforcement operation and a supply convoy sailing to Malta. The attacks were successfully carried out on 1 October, and the fleet reached Alexandria without significant attention from the Italian air force.[58] From Alexandria, Ark Royal was detached and sent to West Africa to support British attempts to encourage Vichy French colonies to switch allegiance to the Free French. During negotiations, several Free French aircraft flew from Ark Royal, but their aircrews were arrested at Dakar. Negotiations failed, and bombers from Ark Royal were directed against military installations during the unsuccessful British attempt to take Dakar by force.[59] Ark Royal then returned to Britain for refit, docking in Liverpool on 8 October after being escorted by Fortune, Forester and Greyhound.[60] The refit—which lasted until 3 November—included repairs to her machinery and the installation of a new flight deck barrier.[61]
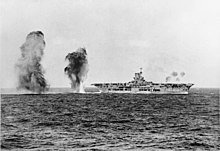
Next, Ark Royal—accompanied by Barham, Berwick and Glasgow—sailed for Gibraltar, arriving on 6 November.[61] They were deployed with the rest of Force H to escort convoys from Gibraltar to Alexandria and Malta, performing several runs before being assigned to Operation Collar, one of 35 convoys to support Malta between 1940 and 1942, on 25 November. An Italian fleet—led by the battleships Giulio Cesare and Vittorio Veneto—was dispatched to intercept the convoy.[62] The Italian fleet was detected by a reconnaissance aircraft from Ark Royal and the carrier launched Swordfish torpedo bombers while the capital ships of Force H turned to meet the enemy.[63] During the engagement, the Battle of Cape Spartivento, the Italian destroyer Lanciere was damaged, although it is uncertain if torpedoes from the bombers or British gunfire were responsible. The British mistook Lanciere for a cruiser, while the Italian commanders received incorrect reports that the cruiser Bolzano had been hit.[64] British attacks failed to damage any other Italian ships or sink the disabled destroyer, and a retaliatory attack by the Italian air force saw Ark Royal as the subject of multiple bombing runs, none of which hit.[64] The battle had no clear result, although the British convoy reached its destination unscathed.[65]
On 14 December 1940, Ark Royal and Force H were redeployed from Gibraltar to the Atlantic to search the Azores for commerce raiders. Ark Royal returned to the Mediterranean on 20 December, and escorted the battleship Malaya and merchant ships from Malta until 27 December.[66] Force H then became involved in Operation Excess, a plan to move convoys through the Mediterranean to support the Western Desert Force, which was trying to push Italian land forces from Egypt into Libya. Over the next month, British control of the Mediterranean theatre was weakened, particularly by the entry of the Luftwaffe and the near-loss of the aircraft carrier Illustrious.[67] The Mediterranean Fleet was under pressure from Axis forces in the Eastern Mediterranean, while the British port at Gibraltar was likely to be lost if the Spanish chose to ally with the Germans instead of remaining neutral. To relieve the Mediterranean Fleet, while demonstrating British strength to the Spanish, the Admiralty and Admiral Cunningham planned to use Ark Royal's Swordfish bombers in raids against Italian targets, supported by bombardment from heavy fleet units. The first bombing, on 2 January against the Tirso Dam in Sardinia, was unsuccessful but Ark Royal's Swordfish bombers were more successful on 6 January, when they bombed the port city of Genoa.[68] The carrier's aircraft also covered the battlecruiser Renown and battleship Malaya while they shelled the port in Operation Grog. On 9 January, Ark Royal launched aircraft to bomb an oil refinery at La Spezia, and to lay mines in the harbour. Both operations were successful.[69]
Searching for Scharnhorst and Gneisenau edit
In early February 1941, the battleships Scharnhorst and Gneisenau headed into the Atlantic during Operation Berlin on the orders of Grand Admiral Erich Raeder, commander of the German Navy. They were to disrupt Allied shipping and draw capital ships from other areas. On 8 March, Force H and Ark Royal were ordered to the Canary Islands to search for the battleships, and to cover convoys crossing from the United States.[70] Ark Royal used her aircraft to search for captured ships returning to Germany under the control of prize crews. Three ships were located on 19 March: two scuttled themselves, while the third—SS Polykarp— reached France.[71]
On the evening of 21 March 1941 a Fairey Fulmar from Ark Royal stumbled across Scharnhorst and Gneisenau at sea. Because of a radio malfunction, the crew had to return to Ark Royal to report, by which time the German ships had escaped under fog.[72] The next day, Ark Royal re-established air patrols in the hope of re-locating the raiders. During the day, a catapult malfunction destroyed a Fairey Swordfish; flinging the fuselage into the sea ahead of the carrier. Unable to stop, Ark Royal ran over the Swordfish and was overhead when the aircraft's depth charges detonated.[73] Scharnhorst and Gneisenau reached Brest without British harassment, while Ark Royal returned to Gibraltar for repairs, arriving on 24 March.[74]
Malta convoys and Operation Tiger edit

Ark Royal spent April alternating between covering convoys and delivering aircraft to Malta and forays into the Atlantic to hunt commerce raiders. By May 1941, Erwin Rommel's Afrika Korps were driving through North Africa towards the Suez Canal, pushing the Western Desert Force before them. With British forces close to collapse and strategic locations threatened, the British High Command risked sending a reinforcement convoy across the Mediterranean to Alexandria. The convoy consisted of five large transport ships, escorted by Ark Royal, the battlecruiser Renown, the battleship Queen Elizabeth, the cruisers Sheffield, Naiad, Fiji, and Gloucester, and screened by destroyers of the 5th Destroyer Flotilla.[75] Prior to Ark Royal's departure, Captain Holland left to recuperate from stress and poor health, and was replaced by Captain Loben Maund.[76] The convoy left Gibraltar on 6 May, and was detected by Italian aircraft. The convoy—limited to 14 knots (26 km/h; 16 mph) and escorted by so many capital ships—was such a tempting target that Italian and German aircraft were mobilised.[77]

The British convoy came under air attack on 8 May, first by the Italian air force, then the German Luftwaffe. Over the day, 12 of Ark Royal's Fairey Fulmars (the maximum number available) drove off over 50 aircraft, with the assistance of targeting information from Sheffield's radar and anti-aircraft fire from the escorts.[78][79] During the initial waves, one Fulmar was lost, killing Flight Lieutenant Rupert Tillard and Lieutenant Mark Somerville; another was destroyed with the aircrew recovered, while several others were damaged.[80] Consequently, only seven were able to face the main Luftwaffe force of 34 aircraft, while an attack just before dark was driven off by two aircraft and heavy fire from the ships.[80] The convoy survived without serious damage: the only casualties were to mines, with the Empire Song sunk and New Zealand Star damaged but able to reach port.[81] Ark Royal underwent another aerial attack on 12 May, during her return to Gibraltar. Later that month, she and fellow aircraft carrier Furious delivered Hawker Hurricanes to support Malta.[82]
Hunting the Bismarck edit
On 18 May 1941, the German battleship Bismarck and heavy cruiser Prinz Eugen began Operation Rheinübung by breaking into the Atlantic to raid shipping. After sinking the battlecruiser Hood and damaging the battleship Prince of Wales during the Battle of the Denmark Strait, Bismarck shook off her pursuers and headed for the French Atlantic coast.[83] Ark Royal, Renown, and Sheffield—accompanied by destroyers Faulknor, Foresight, Forester, Fortune, Foxhound, and Fury—were dispatched to the Atlantic on 23 May to search for the battleship.[84] On 26 May, a Swordfish from Ark Royal located Bismarck and began to shadow her, while the Home Fleet was mobilised to pursue.[85]

At the time of detection, the British ships were 130 nmi (240 km; 150 mi) away and would not catch Bismarck before she reached Saint-Nazaire, putting her safely under the air cover of the Luftwaffe once in range and while being repaired at the Normandie drydock. Fifteen Swordfish bombers were armed with torpedoes and sent to delay the ship. Sheffield, also shadowing Bismarck, was between Ark Royal and Bismarck. The aircraft mistook the British cruiser for their target and fired torpedoes. The torpedoes were fitted with unreliable magnetic detonators, which caused most to explode on contact with the water, while Sheffield evaded the rest.[86] After realising his mistake, one of the pilots signalled 'Sorry for the kipper' to Sheffield.[87]
On return to the carrier, the Swordfish were re-armed with contact-detonator warhead torpedoes, and launched at 19:15 for a second attack; locating and attacking Bismarck just before sunset. Three torpedoes hit the battleship: two detonated forward of the engine rooms, while the third struck the starboard steering compartment and jammed her rudder in a 15° port turn.[88] Bismarck was forced to sail in circles until a combination of alternating propeller speeds was found which would keep her on a reasonably steady course which, in the prevailing force 8 wind and sea state, forced her to sail towards the British warships with almost no manoeuvring capability.[89] The German battleship was harassed by British destroyers during the night of 26–27 May and suffered heavy attack the next morning, finally sinking at 10:39 hours on 27 May.[90][91]
Escorting the Malta convoys edit

Ark Royal and the ships of Force H returned to Gibraltar on 29 May 1941. Despite the boost in Allied morale from the sinking of the battleship Bismarck, the war in the Mediterranean was going against the Allies. Greece and Crete had fallen to the Axis Powers, and the Afrika Korps was preparing to launch a final push into Egypt. Malta remained an important stronghold in the Mediterranean, but was coming under increased pressure from Italian and German air attacks, and could no longer be supplied from the east since the Battle of Crete.[92]
Ark Royal was pressed into service, delivering aircraft to Malta during several supply runs throughout June and July, and escorting the convoys of Operation Substance in July and Operation Halberd in September. Despite some losses, the convoys succeeded in keeping Malta supplied and fighting.[93] The continued Allied presence in Malta was a considerable problem for Rommel in Africa, who was losing as much as ⅓ of his supplies from Italy to submarines and bombers based there.[94] Adolf Hitler decided to send a flotilla of U-boats into the Mediterranean to attack Allied shipping, against the advice of Großadmiral Raeder.[94]
Final voyage and sinking edit
On 10 November 1941, Ark Royal ferried more aircraft to Malta before returning to Gibraltar. Admiral Somerville had been warned of U-boats off the Spanish coast, and reminded Force H to be vigilant.[95] Also at sea was Friedrich Guggenberger's U-81, which had received a report that Force H was returning to Gibraltar.[94]
On 13 November, at 15:40, the sonar operator aboard the destroyer Legion detected an unidentified sound, but assumed it was the propellers of a nearby destroyer. One minute later, Ark Royal was struck amidships by a torpedo,[96] between the fuel bunkers and bomb store, and directly below the bridge island.[97] The explosion caused Ark Royal to shake, hurled loaded torpedo-bombers into the air, and killed 44 year old Able Seaman Edward Mitchell, the only man to die in the sinking.[97] The torpedo punched a 130 ft × 30 ft (40 m × 9 m) hole in the ship's bottom and starboard side below the water-line after running deep and hitting the bilge keel, inboard of the side protection system.[98] The hit caused flooding of the starboard boiler room, main switchboard, oil tanks, and over 106 feet (32 m) of the ship's starboard bilge. The explosion knocked out all internal communications and the starboard power train, causing the rear half of the ship to lose power.[99]

Immediately after the torpedo strike, Captain Maund ordered the engines to full stop, but with the communications knocked out had to send a runner to the engine room.[100] The ship's continued motion enlarged the hole in the hull, and by the time Ark Royal stopped she had taken on a great deal of water and begun to list to starboard, reaching 18° from centre within 20 minutes.[100] Considering the list of the carrier, and the fact that other carriers, including Courageous and Glorious, had sunk rapidly with heavy loss of life, Maund gave the order to abandon ship. The crew were assembled on the flight deck to determine who would remain on board to try to save the ship while Legion came alongside to take off the rest. As a result, comprehensive damage control measures were not initiated until 49 minutes after the attack. The flooding spread unchecked, exacerbated by covers and hatches left open during evacuation of the lower decks.[101]
Water spread to the centreline boiler room, which started to flood from below, and power was lost shipwide when the boiler uptakes became choked; Ark Royal had no backup diesel generators.[102] About half an hour after the explosion, the carrier appeared to stabilise. Admiral Somerville, determined to save Ark Royal, ordered damage control parties back to the carrier before taking the battleship Malaya to Gibraltar to organise salvage efforts. The damage control parties re-lit a boiler, restoring power to the bilge pumps. The destroyer Laforey came alongside to provide power and additional pumps, while Swordfish aircraft from Gibraltar flew overhead to supplement anti-submarine patrols.[103] The tug Thames arrived from Gibraltar at 20:00 and attached a tow line to Ark Royal, but the flooding had caused the ship to list more severely. Rising water reached the boiler room fan flat, an uninterrupted compartment running the width of the ship. This forced the shutdown of the restored boiler.[104]

The list reached 20° between 02:05 and 02:30, and when 'abandon ship' was declared again at 04:00, had reached 27°.[105] Ark Royal's complement had been evacuated to Legion by 04:30; with the exception of Mitchell, there were no fatalities. The 1,487 officers and crew were transported to Gibraltar.[106] The list reached 45° before Ark Royal capsized and sank at 06:19 on 14 November.[107] Witnesses reported the carrier rolling to 90°, where she remained for three minutes before inverting. Ark Royal then broke in two, the aft sinking within a couple of minutes, followed by the bow.[108]
Investigation edit
A Board of Inquiry was established to investigate the loss. Based on its findings, Captain Loben Maund was court-martialled in February 1942. He was found guilty on two counts of negligence: one of failing to ensure that properly constituted damage control parties had remained on board after the general evacuation, and one of failing to ensure the ship was in a sufficient state of readiness to deal with possible damage.[109] The board tempered their judgement with an acknowledgement that a high standard was being expected of Maund, and that he was primarily concerned with the welfare of his crew.[109]
The Bucknill Committee, which had been set up to investigate the loss of major warships, also produced a report. This report said that the lack of backup power sources was a major design failure, which contributed to the loss: Ark Royal depended on electricity for much of her operation, and once the boilers and steam-driven dynamos were knocked out, the loss of power made damage control difficult. The committee recommended the design of the bulkheads and boiler intakes be improved to decrease the risk of widespread flooding in boiler rooms and machine spaces, while the uninterrupted boiler room flat was criticised. The design flaws were rectified in the Illustrious- and Implacable-class carriers, under construction at the time.[110][111]
The Board of Inquiry closed its report with the observation that Ark Royal had sunk 22 nautical miles (25 mi; 41 km) east of Europa Point, the southernmost tip of Gibraltar. This was accepted as the wreck location for 60 years.[112]
Rediscovery edit
The location of the wreck was undetermined until mid-December 2002, when the wreck was discovered by an underwater survey company, C & C Technologies, Inc, using a sonar-equipped autonomous underwater vehicle, 30 nautical miles (35 mi; 56 km) from Gibraltar, at about 3,300 feet (1,000 m) depth.[113][114] The company had been contracted by the BBC as part of a documentary on maritime archaeology related to major battles of the Royal Navy.[114] The Ark Royal wreck lies in two main pieces with the stern section sitting upright and the bow section upside down. 66 feet (20 m) of the bow is separated from the rest of the ship's hull. A large debris field, which includes the funnel and bridge island, parts of the ship that came loose as the carrier sank, and aircraft from the hangars, lies between the two hull sections. Analysis revealed that the port side of the ship hit the seabed first.[115]
The wreck was found further east than expected. Researchers originally thought the wreck had been carried by currents farther into the Mediterranean as she sank—that the ship had travelled eastwards underwater before reaching the seabed.[116] The presence near the hull pieces of other debris, including a Swordfish bomber that was tipped off the flight deck before the ship rolled, proved this false. If the current had pushed the hull pieces any significant distance sideways as they sank, debris would have been spread over a much wider area. It seems though that eastward currents had affected her progress towards Gibraltar during the time she was under tow.[117]
Study of the wreck also showed that restarting the engines to provide power increased the stresses placed on the hull, adding to the flooding. Once power was then lost, it was impossible to prevent the ship from sinking—her fate was more the result of design flaws than of the actions of her captain.[117]
Notes edit
- ^ The Washington Naval Treaty (signed in February 1922) imposed a limit of 135,000 tons on total British aircraft carrier displacement, with no one ship allowed to exceed 33,000 tons, and only two to exceed 27,000 tons.[118] The London Naval Treaty (signed in April 1930) prevented signatories from constructing new capital ships, or converting existing capital ships into aircraft carriers, until 1937.[119]
Citations edit
- ^ David A Thomas, "Battles and Honours of the Royal Navy" Kindle edition
- ^ a b Friedman, British Carrier Aviation, Appendix A. Ark Royal entered service with four 8-barrelled mountings, but by October 1941 all six mountings were in place.
- ^ a b c d Rossiter. Ark Royal. pp. 43–44.
- ^ a b c d e f Bishop & Chant. Aircraft carriers. p. 45.
- ^ Rossiter. Ark Royal. pp. 48–51.
- ^ Friedman. When the flight deck becomes the strength deck, the aircraft hangars are then enclosed within the hull structure. The terms, 'enclosed' and 'open' hangars do not, strictly speaking, refer to a hangar that is closed or open on the sides, but rather to whether the hangar is, respectively, below or above the strength deck.
- ^ Friedman. The flight deck was designed with .75 in of Ducol steel. The enclosed hangar design required a deck of approximately this thickness to ensure adequate hull integrity, so the limited armour protection was a by-product of the enclosed hangar design. The strength deck is designed to carry structural loading in combination with the hull girder and side and bottom plating. Ship's structure above the strength deck is termed 'superstructure'. Ducol steel was an advanced type of high tensile steel which had great strength and was often used to provide armour for splinter protection.
- ^ a b Jameson. Ark Royal. p. 16.
- ^ a b Rossiter. Ark Royal. pp. 48–49.
- ^ Garzke. Allied Battleships. pp. 364–365.
- ^ Friedman. British Carrier Aviation. p. 121.
- ^ Rossiter. Ark Royal. p. 47.
- ^ Rossiter. Ark Royal. p. 45.
- ^ UK Retail Price Index inflation figures are based on data from Clark, Gregory (2017). "The Annual RPI and Average Earnings for Britain, 1209 to Present (New Series)". MeasuringWorth. Retrieved 11 June 2022.
- ^ Rossiter. Ark Royal. pp. 45–46.
- ^ Rossiter. Ark Royal. p. 46.
- ^ a b Colledge & Warlow. Ships of the Royal Navy. p. 21.
- ^ Rossiter. Ark Royal. p. 41.
- ^ Rossiter. Ark Royal. pp. 61–62.
- ^ Friedman, p. 123
- ^ a b Westwood. Fighting Ships of World War II. p. 66.
- ^ Rossiter. Ark Royal. p. 47.
- ^ Rossiter. Ark Royal. pp. 47–48.
- ^ a b Rossiter. Ark Royal. p. 112.
- ^ Brown; et al. Carrier Operations. p. 15.
- ^ a b Edwards. Dönitz and the Wolf Packs. p. 18.
- ^ a b c d Rossiter. Ark Royal. pp. 74–77.
- ^ a b c d e Rossiter. Ark Royal. pp. 75–78.
- ^ a b c Edwards. Dönitz and the wolf packs. p. 87.
- ^ Rossiter. Ark Royal. p. 81.
- ^ Rossiter. Ark Royal. p. 82.
- ^ Bekker. The Luftwaffe War Diaries. pp. 75–76.
- ^ a b c Rossiter. Ark Royal. pp. 84–85.
- ^ Balfour. Propaganda in War 1939–1945. pp. 158–159.
- ^ Rossiter. Ark Royal. pp. 88–89.
- ^ Jameson. Ark Royal. p. 53.
- ^ Mitchell. The Empire Ships. p. 431.
- ^ a b Jameson. Ark Royal. p. 42.
- ^ a b Rossiter. Ark Royal. pp. 94–96.
- ^ a b c Rossiter. Ark Royal. p. 99.
- ^ a b Jameson. Ark Royal. p. 97.
- ^ Rossiter. Ark Royal. p. 117.
- ^ a b Rossiter. Ark Royal. p. 119.
- ^ Rossiter. Ark Royal. pp. 120–121.
- ^ Jameson. Ark Royal. p. 137.
- ^ Jameson. Ark Royal. pp. 140–141.
- ^ Rossiter. Ark Royal. p. 128.
- ^ Jameson. Ark Royal. p. 154.
- ^ Rossiter. Ark Royal. p. 132.
- ^ Rossiter. Ark Royal. p. 136.
- ^ Rossiter. Ark Royal. p. 138.
- ^ Jameson. Ark Royal. p. 170.
- ^ a b Rossiter. Ark Royal. p. 179.
- ^ Rossiter. Ark Royal. p. 180.
- ^ Jameson. Ark Royal. pp. 185–187.
- ^ Jameson. Ark Royal. pp. 192–193.
- ^ Rossiter. Ark Royal. p. 190.
- ^ Jameson. Ark Royal. pp. 212–15.
- ^ Jameson. Ark Royal. pp. 222–225.
- ^ a b Rossiter. Ark Royal. p. 192.
- ^ Jameson. Ark Royal. p. 230.
- ^ Jameson. Ark Royal. pp. 236–258.
- ^ a b Jameson. Ark Royal. p. 239.
- ^ O'Hara. Struggle. pp. 72–74.
- ^ Rossiter. Ark Royal. p. 210.
- ^ Rossiter. Ark Royal. pp. 218–219.
- ^ Rossiter. Ark Royal. pp. 222–226.
- ^ Rossiter. Ark Royal. pp. 228–230.
- ^ Jameson. Ark Royal. pp. 259–260.
- ^ Jameson. Ark Royal. p. 260.
- ^ Jameson. Ark Royal. pp. 260–262.
- ^ Rossiter. Ark Royal. p. 242.
- ^ Rossiter. Ark Royal. p. 243.
- ^ Jameson. Ark Royal. pp. 268–269.
- ^ Jameson. Ark Royal. p. 266.
- ^ Jameson. Ark Royal. p. 269.
- ^ Jameson. Ark Royal. pp. 271–274.
- ^ Rossiter. Ark Royal. p. 258.
- ^ a b Rossiter. Ark Royal. p. 249.
- ^ Jameson. Ark Royal. p. 274.
- ^ Jameson. Ark Royal. pp. 276–277.
- ^ Jameson. Ark Royal. pp. 279–290.
- ^ Jameson. Ark Royal. p. 294.
- ^ Jameson. Ark Royal. p. 296.
- ^ Jameson. Ark Royal. pp. 299–300.
- ^ Stephen. Sea Battles. p. 90.
- ^ Jameson. Ark Royal. pp. 303–305.
- ^ Garzke. Axis Battleships. pp. 235–236.
- ^ Williamson. German Battleships. pp. 33–34.
- ^ Rohwer. Chronology. p. 74.
- ^ Rossiter. Ark Royal. pp. 316–317.
- ^ Jameson. Ark Royal. p. 318.
- ^ a b c Rossiter. Ark Royal. p. 327.
- ^ Jameson. Ark Royal. p. 337.
- ^ Rossiter. Ark Royal. p. 329.
- ^ a b Rossiter. Ark Royal. p. 332.
- ^ Friedman. British Carrier Aviation. p. 126.
- ^ Paterson. U-Boats. p. 38.
- ^ a b Jameson. Ark Royal. p. 338.
- ^ Jameson. Ark Royal. pp. 338–340.
- ^ Rossiter. Ark Royal. p. 345.
- ^ Jameson. Ark Royal. p. 342.
- ^ Jameson. Ark Royal. pp. 343–345.
- ^ Jameson. Ark Royal. p. 346.
- ^ Duffy. Target America. p. 136.
- ^ Jameson. Ark Royal. p. 348.
- ^ Rossiter. Ark Royal. pp. 375–376.
- ^ a b Rossiter. Ark Royal. pp. 372–437.
- ^ Papers of Admiral Sir Hugh Binney, reports of Second Bucknill Committee relating to loss of HMS Prince of Wales and HMS Ark Royal, 1941–1942, held at Liddell Hart Centre for Military Archives, King's College London
- ^ Rossiter. Ark Royal. p. 374.
- ^ Rossiter. Ark Royal. p. 30.
- ^ Warren, Daniel; Church, Robert; Davey, Rick (September 2004). "Discovering H.M.S. Ark Royal" (PDF). Hydro International. Retrieved 10 August 2016.
- ^ a b "Film team finds wreck of Ark Royal". BBC News. 19 December 2002.
- ^ Rossiter. Ark Royal. pp. 368–369.
- ^ Rossiter. Ark Royal. pp. 168–169.
- ^ a b Rossiter. Ark Royal. p. 377.
- ^ Papers Relating to the Foreign Relations of the United States. pp. 247–66.
- ^ Reproduced in Goldman. Sunken treaties. pp. 307–19.
References edit
Books edit
- Balfour, Michael (1979). Propaganda in War 1939–1945: Organisation, Policies and Publics in Britain and Germany. London: Routledge & Kegan Paul. ISBN 0-7100-0193-2. OCLC 5373844.
- Bekker, Cajus (1969). The Luftwaffe War Diaries. Zielger, Frank (trans.). London: Corgi. ISBN 0-552-08236-8. OCLC 30270475.
- Bishop, Chris; Chant, Christopher (2004). Aircraft Carriers: The World's Greatest Naval Vessels and Their Aircraft. Grand Rapids, MI: Zenith. ISBN 0-7603-2005-5. OCLC 56646560. Retrieved 22 July 2008.
- Brown, David; Brown, J. D.; Hobbs, David (2009). Carrier Operations in World War II. Annapolis, Maryland: Naval Institute Press. ISBN 978-1-59114-108-2.
- Chesneau, Roger (1984). Aircraft Carriers of the World, 1914 to the Present: An Illustrated Encyclopedia. Annapolis, Maryland: Naval Institute Press. ISBN 0-87021-902-2. OCLC 11018793.
- Colledge, J. J.; Warlow, Ben (2006) [1969]. Ships of the Royal Navy: The Complete Record of all Fighting Ships of the Royal Navy (Rev. ed.). London: Chatham Publishing. ISBN 978-1-86176-281-8.
- Duffy, James P. (2006) [2004]. Target America: Hitler's Plan to Attack the United States (3rd ed.). New York: Lyons. ISBN 1-59228-934-7. OCLC 70264388.
- Edwards, Bernard (1999) [1996]. Dönitz and the Wolf Packs: the U-boats at war (2nd ed.). London: Cassell. ISBN 0-304-35203-9. OCLC 41465151.
- Friedman, Norman (1988). British Carrier Aviation: The Evolution of the Ships and their Aircraft. Annapolis, Maryland: Naval Institute Press. ISBN 0-87021-054-8.
- Garzke, William; John Dulin (1990). Battleships: Axis and Neutral Battleships in World War II. Annapolis, Maryland: Naval Institute Press. ISBN 978-0-87021-101-0.
- Garzke, William H.; Dulin, Robert O. Jr.; Webb, Thomas G. (1980). Allied Battleships in World War II. Naval Institute Press. ISBN 0-87021-100-5.
- Goldman, Emily O. (1994). Sunken Treaties: Naval Arms Control Between the Wars. University Park, PA: Pennsylvania State University. ISBN 0-271-01034-7. OCLC 28723444.
- Jameson, William (1 April 2004) [1957]. Ark Royal: The Life of an Aircraft Carrier at War 1939–41 (2nd ed.). Periscope Publishing. ISBN 1-904381-27-8.
- Lenton, H. T. (1998). British and Empire Warships of the Second World War. London: Greenhill Books. ISBN 1-85367-277-7.
- Mitchell, William Harry; Sawyer, Leonard Arthur (1990). The Empire Ships: A Record of British-built and Acquired Merchant Ships During the Second World War. Lloyd's of London Press. ISBN 1-85044-275-4.
- O'Hara, Vincent (2009). Struggle for the Middle Sea. Vol. 1. Annapolis, MD: Naval Institute Press. ISBN 978-1-59114-648-3.
- "Conference on the Limitation of Armament". Papers Relating to the Foreign Relations of the United States. Vol. I. Washington: US G.P.O. 1922. pp. 247–66. OCLC 24045525. Retrieved 4 June 2010.
- Paterson, Lawrence (2007). U-boats in the Mediterranean, 1941–1944. Annapolis, Maryland: Naval Institute Press. ISBN 978-1-59114-893-7.
- Poolman, Kenneth (1956). Ark Royal: Wm Kimber & Co Ltd.
- Rohwer, J. (2005). Chronology of the War at Sea 1939–1945. Naval Institute Press. ISBN 978-1-59114-119-8.
- Rossiter, Mike (2007) [2006]. Ark Royal: The Life, Death and Rediscovery of the Legendary Second World War Aircraft Carrier (2nd ed.). London: Corgi Books. ISBN 978-0-552-15369-0. OCLC 81453068.
- Sullivan, David M. & Sturton, Ian (2010). "Extraordinary Views of HMS Glorious and HMS Ark Royal". Warship International. XLVII (3): 257–62. ISSN 0043-0374.
- Stephen, Martin (1988). Sea Battles in Close-Up: World War 2. Vol. 1. Annapolis, Maryland: Naval Institute Press. ISBN 0-87021-556-6.
- Westwood, J. N. (1975) [1971]. Fighting Ships of World War II. London: Sidgwick and Jackson (for Book Club Associates). ISBN 0-283-98287-X. OCLC 2090062.
- Williamson, Gordon (2003). German Battleships 1939–45. Oxford: Osprey Publishing. ISBN 978-1-84176-498-6.
Websites edit
- "Film team finds wreck of Ark Royal". BBC News. BBC. 19 December 2002. Retrieved 4 June 2010.
- Mason, Geoffrey B. (2003). "HMS Ark Royal – Fleet Aircraft Carrier". Service Histories of Royal Navy Warships in World War 2. Naval-History.Net. Archived from the original on 7 April 2010. Retrieved 4 June 2010.
External links edit
- HMS Ark Royal – Operational History and Photos
- Video of HMS Ark Royal engaging high level bombers with her AA armament
- Picture of Ark Royal sinking with Swordfish on deck.
36°3′N 4°45′W / 36.050°N 4.750°W