


Summary
| Battle of Wau | |||||||
|---|---|---|---|---|---|---|---|
| Part of the New Guinea Campaign of the Pacific Theater (World War II) | |||||||
 A 25-pounder of the 2/1st Field Regiment is unloaded from a Dakota on the airfield at Wau. The gun was assembled and fired at Japanese positions around Wau later that day. | |||||||
| |||||||
| Belligerents | |||||||
|
|
| ||||||
| Commanders and leaders | |||||||
|
|
| ||||||
| Strength | |||||||
| 3,000 | 4,000 | ||||||
| Casualties and losses | |||||||
| 349 killed, wounded or missing | 1,200 killed (estimate) | ||||||
The Battle of Wau, 29 January – 4 February 1943, was a battle in the New Guinea campaign of World War II. Forces of the Empire of Japan sailed from Rabaul and crossed the Solomon Sea and, despite Allied air attacks, successfully reached Lae, where they disembarked. Japanese troops then advanced overland on Wau, an Australian base that potentially threatened the Japanese positions at Salamaua and Lae. A race developed between the Japanese moving overland, hampered by the terrain, and the Australians, moving by air, hampered by the weather. By the time the Japanese reached the Wau area after a trek over the mountains, the Australian defenders had been greatly reinforced by air. In the battle that followed, despite achieving tactical surprise by approaching from an unexpected direction, the Japanese attackers were unable to capture Wau.
Background edit
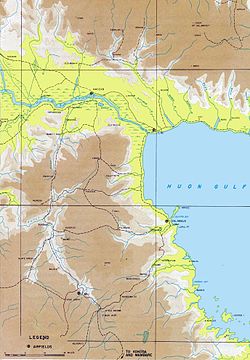
Geography edit
Wau is a town in New Guinea, in the province of Morobe situated at one end of the Wau-Bulolo Valley. It was the site of a gold rush during the 1920s and 1930s. Gold prospectors arrived at the coast at Salamaua and struggled inland along the Black Cat Track. The miners partially cleared the area and built houses and workshops, and established a water supply and an electricity grid.[1][2] They constructed the aerodromes at Wau and Bulolo which were the primary means of reaching the Wau-Bulolo Valley.[1] Wau aerodrome was a rough Kunai grass airstrip 3,100 ft (940 m) in length with a 10 per cent slope heading directly for Mount Kaindi. Aircraft could approach from the north east only, landing uphill and taking off downhill. The mountain at the end of the runway prevented second attempts at landing and precluded extension of the strip.[3] Pilots had to manoeuvre Dakotas under clouds and through dangerous passes, "dodging a peak here and cloud there", landing at high speeds.[4] This required good visibility, but the weather over Owen Stanley Range was characterised by frequent storms, vertical drafts, and mists which rose from the jungle floor.[5] The first landing at Wau was made by Ernest Mustard in his De Havilland DH.37 on 19 April 1927.[1] Osmar White, who reached Wau in June 1942, wrote:
[Wau and Bulolo] were towns built sole by virtue of man's conquest of the air. Every nail, sheet of iron, weatherboard, spot of paint, pane of glass, crock, wire or sheet of paper was carried in by air at freight rates between 4d and 1/5d per pound. The wrecked trucks that now dotted the highways, rusted out and twisted by fire, were brought in by air. The billiard tables at the hotels were brought in by air. Easy chairs, refrigerators, bathtubs, stoves, dynamos, linoleum, carpets, garden statuary, even great mining dredges, bulldozers and power shovels—all were brought in by air, and this in a decade when most people in Australia were still thinking it adventurous to take a five-minute joy ride over an airfield.[6]
Kanga Force edit

After the war with Japan began, Wau became an evacuation centre, receiving refugees from Lae and Salamaua. Non-native women and children were evacuated while men of military age were called up for service in the New Guinea Volunteer Rifles, the local militia unit. Initially, civilians were evacuated by civilian aircraft but as the Japanese drew closer—bombing Wau on 23 January 1942—it became too dangerous to fly without fighter escort, which was unavailable. This left some 250 European and Asian men stranded. These refugees made a hazardous journey over the Owen Stanley Range on foot by way of Kudjeru and Tekadu to Bulldog, a disused mining settlement where there was an aerodrome, and thence down the Lakekamu River to the sea.[7][8]
With the feasibility of the route thus demonstrated, New Guinea Force decided to establish a line of communications to Wau via the Bulldog Track. A platoon of the 1st Independent Company left Port Moresby in the schooner Royal Endeavour and traversed the route, joining the men of the New Guinea Volunteer Rifles holding the Wau area.[9] This was the beginning of what became Kanga Force on 23 April 1942.[10] On 22 May, the 21st Troop Carrier Squadron USAAF flew in commandos of the 2/5th Independent Company to join Kanga Force. The 2/7th Independent Company followed in October 1942.[11]
Supplies could be flown into Wau if fighter cover was available. On 5 September, 12 planeloads of supplies were dropped at Kudjeru.[12] To economise on scarce transport aircraft, air transport was supplemented by an overland route. Supplies were shipped to the mouth of the Lakekamu in luggers,[13] transported up the river to Bulldog in launches or powered dugout canoes,[14] and then carried over the Bulldog Track by native carriers.[13]
Strategy edit
Kanga Force achieved one notable success, in a raid on Salamaua in June 1942, but "apart from that they had done little to harass the Japanese at their Salamaua and Lae bases."[15] They had however managed to threaten the Japanese without provoking them into an offensive against Wau at a time when the Allies did not have the resources to reinforce Kanga Force, and they had provided valuable information.[15] Wau occupied an important place in the strategy of the Commander, Allied Land Forces, South West Pacific Area, General Sir Thomas Blamey, who was concurrently commanding New Guinea Force from Port Moresby. At the time, the Japanese held air superiority over the Solomon Sea, precluding airborne or seaborne operations against the Japanese base at Lae. Blamey therefore decided that he would have to capture Lae with a land campaign. The Bulldog Track would be upgraded to a highway capable of carrying trucks and tanks that could support a division that would advance overland on Lae.[16]
Lieutenant General Hitoshi Imamura, the commander of the Japanese Eighth Area Army at Rabaul, correctly deduced his opponent's intentions and the strength of Kanga Force and resolved to head off the danger to Lae. He ordered Lieutenant General Hatazō Adachi's Eighteenth Army to secure "important areas to the west of Lae and Salamaua".[17] On 29 December 1942, Adachi ordered the 102nd Infantry Regiment and other units under the command of Major General Toru Okabe, the commander of the infantry group of the 51st Division, to move from Rabaul to Lae and then immediately advance inland to capture Wau.[17] Okabe's force was known as the Okabe Detachment.
Imamura was up against a resourceful, resolute and aggressive opponent, who also had access to good intelligence. Allied Ultra codebreakers were reading the Japanese shipping codes, and, by 3 January 1943, Allied commanders knew in advance about the force that Adachi was planning to send from Rabaul to Lae,[18] although they did not know the force's ultimate destination.[19] Blamey chose not to wait for this to become clear, but immediately ordered the 17th Infantry Brigade to move from Milne Bay to Wau on 4 January 1943.[20] Its commander—Brigadier Murray Moten—was ordered to assume command of Kanga Force and defend Wau.[21]
Prelude edit
The Commander, Allied Air Forces, South West Pacific Area, Lieutenant General George Kenney, ordered his bomber commander, Brigadier General Kenneth Walker, to carry out a full-scale dawn bombing attack on the shipping in Rabaul Harbour before it could depart. Walker demurred; his bombers would have difficulty making their rendezvous if they had to leave Port Moresby at night. He recommended a noon attack instead. Kenney acknowledged Walker's concerns but was insistent; he preferred bombers out of formation to bombers shot down by the enemy fighters that were sure to intercept a daylight attack.[22] Inclement weather precluded participation by bombers from Australia, so all that was available were the aircraft on hand in Papua: six B-17s and six B-24s. In spite of Kenney's orders, Walker attacked Rabaul Harbour at noon on 5 January,[23] and encountered heavy flak and continuous fighter attacks. Forty 500 lb (230 kg) and 24 1,000 lb (450 kg) bombs were dropped from 8,500 ft (2,600 m). The formation claimed hits on nine ships, totalling 50,000 tons. Two B-17s were shot down, including the one carrying Walker,[24] who was posthumously awarded the Medal of Honor.[25] After the war, JANAC confirmed the sinking of only one Japanese merchant ship, the 5,833-ton Keifuku Maru.[26] Two other ships were damaged, as was the destroyer Tachikaze.[27]

On 6 January, the Japanese convoy carrying Okabe's force set out for Lae from Rabaul. Forewarned by Ultra, USAAF and RAAF aircraft spotted, shadowed and attacked the convoy, which was shielded by low clouds and Japanese fighters. The Allies claimed to have shot down 69 Japanese aircraft for the loss of 10 of their own. A P-38 pilot, First Lieutenant Richard Bong claimed three, becoming an ace.[28] A RAAF Catalina of No. 11 Squadron RAAF under the command of Flight Lieutenant David Vernon made a night bombing attack on the convoy which sank the transport Nichiryu Maru.[29] Destroyers rescued 739 of the 1,100 troops on board, but the ship took with it all of Okabe's medical supplies. Another transport, Myoko Maru, was so badly damaged at Lae by USAAF B-25s that it had to be beached. Nonetheless, the convoy succeeded in reaching Lae on 7 January and landing about 4,000 troops.[30] In all, the Allied Air Forces flew 416 sorties.

Between 10 and 16 January, the Okabe Detachment moved down the coast in barges to Salamaua,[30] where it assembled and completed its preparations for the attack on Wau.[31] On 16 January, the Japanese encountered a platoon of the 2/7th Independent Company under Captain Geoffrey Bowen. A brief action followed in which Bowen was killed, and the Australians retreated back to Skindewai.[32] However, instead of pursuing them, Okabe chose to advance on Wau down an old and seldom used track running through difficult country parallel to the Black Cat Track, and the two sides lost contact. Okabe thereby disguised the strength and objective of his force, and took the Australians by surprise.[30] It was necessary to cross Komiatum Hill, advance to Mubo, and then take the track westward. This route was chosen so as to avoid observation from Allied aircraft in the daytime as they cut their way into the jungle. The mountain range east of Wau was about 1,500 ft (460 m) high and not particularly difficult to cross, but in parts there were no tracks. These had to be prepared without being spotted by the Allied aircraft. As the troops had to carry their food, ammunition and equipment on their backs, the advance was difficult and took longer than anticipated. Eventually they reached a peak from which they were able to look down on the Wau-Bulolo Valley. By this time, food was running short. The commander of the Okabe Detachment, pointing at the Wau village, gave the order to attack: "We are short of food—let us quickly capture Wau and get food from the enemy!" However, the movement through such dense jungle caused his units to lose touch with each other. The resulting attack was delivered piecemeal, without sufficient preparation.[31]

Meanwhile, the first group of the 17th Infantry Brigade—the 2/6th Infantry Battalion—had embarked for Port Moresby on 9 January 1943. The rest of the battalion followed over the next two nights. The 2/7th Infantry Battalion departed Milne Bay on the Army transport Taroona on 13 January and the 2/5th on Duntroon the next day.[33] The prospects of beating the Japanese to Wau did not look good. At this time, there were only 28 Dakotas in New Guinea, in three understrength squadrons, the 6th, 21st and 33rd Troop Carrier Squadrons of the US 374th Troop Carrier Group. These had to be shared with the Buna-Gona front, so each combat area had 14 planes allocated to it, which worked out to 10 aircraft available per day for each.[34] A Dakota could carry 27 passengers or 10,000 lb (4,500 kg) of freight.[35] Moving an infantry battalion required 60 plane loads; moving a brigade group required 361 plane loads.[36] Between 10 and 19 January, the 2/6th Infantry Battalion was flown in from Port Moresby to reinforce Kanga Force. In the process, there were three crashes. Poor flying weather forced many aircraft to return without landing. Brigadier Moten was twice forced to return to Port Moresby before reaching Wau on the third attempt. Bad weather continued over the following week, limiting air operations and sometimes precluding them entirely. Part of the 2/5th Infantry Battalion arrived on 27 January.[37]
Battle edit
Standing in the way of Okabe's advance was A Company of the 2/6th Infantry Battalion under Captain W. H. Sherlock. Okabe ordered an all-out attack on Sherlock's position on 28 January. Sherlock was forced from his position and retreated onto a nearby spur. For much of the afternoon, frontal Japanese attacks were repelled by Australian mortar and machine gun fire, and efforts to infiltrate Sherlock's positions were defeated by a bayonet attack led by Sherlock in person. By 18:00, Sherlock's mortar ammunition had run out and his small arms ammunition was running short, while his position was being plastered with mortar rounds and swept by machine gun fire. Sherlock held on through the night and was killed the next day trying to break through the Japanese lines.[38] For his actions, Sherlock was posthumously mentioned in despatches.[39]
The fighting at Buna ended on 23 January, freeing up aircraft to support Wau, and 52 brand-new Dakotas of the US 317th Troop Carrier Group had arrived in Australia, their movement from the United States having been expedited in response to urgent requests from General Douglas MacArthur arising from the Buna fighting. After a quick maintenance check, they were flown up to Port Moresby to help the 374th Troop Carrier Group fly the 17th Infantry Brigade into Wau. This meant that up to 40 aircraft were now available daily.[40]
On 29 January, 57 planeloads arrived, bringing most of the 2/7th Infantry Battalion and the remainder of the 2/5th. Although subjected to small arms fire as they came in and unloaded, 40 aircraft made 66 trips the next day. Their cargo included two dismantled 25 pounder guns of the 2/1st Field Regiment with 688 rounds of ammunition, under the command of Captain R. J. Wise. These were landed in the morning and in action before noon, shelling a concentration of 300 enemy troops between the villages of Wandumi and Kaisenik. The Japanese were also engaged by Beaufighters of No. 30 Squadron RAAF flying close air support.[37] Three Dakotas were damaged when one overshot the runway on landing and crashed into two others. One was repaired, but the other two were a total loss. One of the 46th Troop Carrier Squadron's pilots, Staff Sergeant William B. Teague was injured, losing a leg.[41] Japanese attacks that day succeeded in reaching the corner of the airstrip but were forced to fall back under enormous pressure.[30]
On 31 January, 35 aircraft made 71 trips, and 40 aircraft made 53 trips on 1 February, bringing reinforcements including the 2/3rd Independent Company that brought the strength of Kanga Force to over 3,000 men. This included a company of machine guns from the 7th Machine Gun Battalion that had been flown in to defend the airfield.[37] By 4 February, Okabe was threatened with encirclement and was forced to order a withdrawal. With all hope of capturing Wau gone, Okabe was ordered to abandon the attempt.[30] For his "high order of leadership and control" at Wau,[42] Moten was awarded a bar to his Distinguished Service Order.[43]

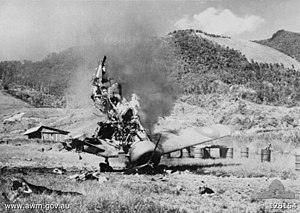
The Japanese attempted to cut off the stream of Allied transports by bombing the Wau airstrip, but it was the rainy season and they were confronted by the same weather conditions which hampered the Allies. Aircraft which did set off from Rabaul were not able to sight the Wau airstrip and returned without accomplishing anything.[31] Not until 6 February was there an aerial engagement. Eight P-39s of the 40th Fighter Squadron were patrolling at 12,000 feet (3,700 m) over Wau, having provided escort for a flight of five Dakotas, when they sighted 24 Japanese planes. Captain Thomas H. Winburn led his P-39s in an attack, claiming 11 Mitsubishi A6M Zeroes and Mitsubishi Ki-21 "Sallys" shot down. Meanwhile, eight P-40s of the 7th Fighter Squadron also on an escort mission sighted 12 aircraft bombing the airstrip at Wau. The transports they were escorting turned back while the fighters engaged the Japanese, claiming seven aircraft shot down.[44] At this time, there were four Dakotas on the ground at Wau and another five were circling, waiting to land. One Dakota, commanded by Second Lieutenant Robert M. Schwensen, was shot down. All five crewmen on board were killed.[41] A Dakota on the ground was damaged, and a CAC Wirraway was destroyed by a bomb blast. Its two-man crew had hurriedly left the aircraft seconds before and thrown themselves flat on the ground. The pilot, Flight Sergeant A. Rodburn, was unharmed, but the observer, Sergeant A. E. Cole, was hit in the shoulder by shrapnel. The Air Cooperation Signals hut took a direct hit and three men were killed.[45][46]
Major General Ennis Whitehead's Advanced Echelon (ADVON) headquarters in Port Moresby ordered three squadrons based there to join the battle. P-38s of the 39th Fighter Squadron engaged a dozen Japanese fighters over Wau, shooting one down. A few minutes later, the 9th Fighter Squadron—which had only recently converted to the P-38—downed another Japanese fighter, while P-40s of the 41st Fighter Squadron surprised six Japanese fighters, shooting down three.[44] The airmen claimed to have shot down 23 Japanese fighters and a bomber.[45] Australian gunners of the 156th Light Anti Aircraft Battery claimed another bomber and two fighters.[46] For its part in the battle, the 374th Troop Carrier Group was awarded a Distinguished Unit Citation.[47]
Aftermath edit
From its creation in May 1942 until 15 February 1943, Kanga Force lost 30 officers and 319 men, including 4 officers and 48 men of the 2/6th Infantry Battalion. The Australians counted 753 Japanese dead. Adding 361 lost on Nichiryu Maru and numerous airmen puts the number of Japanese deaths at around 1,200.[37]
While New Guinea Force wished to pursue the Japanese, logistical difficulties precluded this. The Japanese prepared to make another attempt to capture Wau. This time, the plan was to approach from the north, building a road from Markham Point to the Snake River Valley. From there the advance would have headed down the valley to Wau. The 51st Division was earmarked for the mission, but it suffered heavy losses en route to New Guinea in the Battle of the Bismarck Sea. This impressed the Japanese command with the dangers from Allied air power. A new plan was therefore devised under which a land line of communication was to be established running down the Ramu and Markham Valleys.[48] In June, Adachi was ordered to prepare to capture Wau.[49] Road construction was carried out at great hardship to the troops involved, but the road was still incomplete when the Allied landings at Nadzab and Lae caused work to be suspended.[50] For the Allies, Wau became an important jumping off point for the Salamaua–Lae campaign.[51]
Notes edit
- ^ a b c Bradley 2008, p. 1
- ^ McCarthy 1959, p. 53
- ^ Kelly 2006, p. 24
- ^ Watson 1946, p. 71
- ^ Watson 1948, pp. 416–417
- ^ White 1945, p. 144
- ^ McCarthy 1959, pp. 56–58
- ^ Reinhold 1946, pp. 1–2
- ^ Reinhold 1946, p. 3
- ^ New Guinea Force Operation Instruction No. 7, 23 April 1942, Australian War Memorial: AWM54 578/6/1.
- ^ Watson 1948, pp. 477–478
- ^ Kelly 2006, p. 418
- ^ a b Bradley 2008, p. 14
- ^ White 1945, pp. 114
- ^ a b McCarthy 1959, p. 544
- ^ Dexter 1961, pp. 269–271
- ^ a b Willoughby 1966, pp. 189–190
- ^ Kreis 1996, p. 265
- ^ Drea 1992, pp. 63–66
- ^ "War Diary, 17th Infantry Brigade, 4 January 1943" (PDF). Australian War Memorial. AWM52 8/2/17. Retrieved 4 February 2016.
- ^ McCarthy 1959, p. 545
- ^ Kenney 1949, pp. 175–176
- ^ Byrd 1997, p. 118
- ^ Watson 1950, pp. 138–139
- ^ "Medal of Honor Recipients World War II (T–Z)". United States Army. Archived from the original on 12 February 2009. Retrieved 20 February 2009.
- ^ Watson 1950, p. 716
- ^ Gamble 2010, p. 283
- ^ Watson 1950, p. 136
- ^ Gillison 1962, pp. 674–675
- ^ a b c d e Willoughby 1966, p. 190
- ^ a b c Yoshihara 1955
- ^ Bradley 2008, p. 108
- ^ "War Diary, 17th Infantry Brigade, 4–12 January 1943". Australian War Memorial. AWM52 8/2/17. Retrieved 4 February 2016.
- ^ Kelly 2006, p. 420
- ^ Kelly 2003, p. 57
- ^ "Notes for C-in-C Discussion with Gen MacArthur", 15 July 1943, Australian War Memorial: AWM54 213/3/20
- ^ a b c d McCarthy 1959, pp. 545–558
- ^ Australian Army 1943, pp. 18–23
- ^ "No. 36297". The London Gazette (Supplement). 23 December 1943. p. 5577.
- ^ Kelly 2006, pp. 420–421
- ^ a b Kelly 2006, p. 425
- ^ "Recommendation for Murray John Moten to be awarded a Bar to Distinguished Service Order" (PDF). Australian War Memorial. Retrieved 16 February 2009.
- ^ "No. 36018". The London Gazette (Supplement). 23 May 1943. p. 2208.
- ^ a b Watson 1946, pp. 78–79
- ^ a b Gillison 1962, pp. 611, 685
- ^ a b Kelly 2006, pp. 27, 420
- ^ Imparato 1998, p. 21
- ^ Report of I Aust Corps on the Operations in New Guinea from 22 January 1943 to 8 October 1943, Australian War Memorial: AWM54 519/6/32
- ^ Dexter 1961, p. 231
- ^ Kazuhara 2004, pp. 121–123
- ^ Bradley 2008, pp. 244–245
References edit
- Australian Army (1943). Jungle Victory: An Official Story of the Australian Soldier in the Wau-Salamaua Campaign January 1943 – September 1943. Australian Army. OCLC 220456019.
- Bradley, Phillip (2008). The Battle for Wau: New Guinea's Frontline 1942–1943. Melbourne: Cambridge University Press. ISBN 978-0-521-89681-8. OCLC 180989632.
- Byrd, Martha (1997). Kenneth N. Walker: Airpower's Untempered Crusader (PDF). Maxwell Air Force Base, Alabama: Air University Press. OCLC 39709748. Archived from the original (PDF) on 7 October 2012. Retrieved 24 December 2010.
- Dexter, David (1961). The New Guinea Offensives. Australia in the War of 1939–1945. Canberra: Australian War Memorial. OCLC 2028994.
- Drea, Edward J. (1992). MacArthur's ULTRA: Codebreaking and the War Against Japan, 1942–1945. Lawrence, Kansas: University Press of Kansas. ISBN 0-7006-0504-5. OCLC 23651196.
- Gamble, Bruce (2010). Fortress Rabaul: The Battle for the Southwest Pacific, January 1941 – April 1943. Minneapolis, Minnesota: Zenith Press. ISBN 978-0-7603-2350-2. OCLC 437298983.
- Gillison, Douglas (1962). Royal Australian Air Force, 1939–1942. Australia in the War of 1939–1945. Canberra: Australian War Memorial. OCLC 2000369.
- Imparato, Edward T. (1998). 374th Troop Carrier Group 1942–1945. Paducah, Kentucky: Turner Publishing. ISBN 1-56311-435-6. OCLC 46887211.
- Kazuhara, Kazumi (2004). Dennis, Peter; Grey, Jeffrey (eds.). The Foundations of Victory: The Pacific War 1943–1944. Canberra: Army History Unit. OCLC 222945525.
- Kelly, Robert H. (2003). Allied Air Transport Operations South West Pacific Area in WWII, Volume 1: Development of Air Transport 1903–1943. Buderim, Queensland: Robert H. Kelly. ISBN 0-646-42637-0. OCLC 62546830.
- Kelly, Robert H. (2006). Allied Air Transport Operations South West Pacific Area in WWII, Volume 2: 1943 – Year of Expansion and Consolidation. Buderim, Queensland: Robert H. Kelly. ISBN 0-646-45837-X. OCLC 224699549.
- Kenney, George C. (1949). General Kenney Reports: A Personal History of the Pacific War (PDF). New York City: Duell, Sloan and Pearce. ISBN 0-912799-44-7. OCLC 1227801. Archived from the original (PDF) on 26 February 2009. Retrieved 20 February 2009.
- Kreis, John F., ed. (1996). Piercing the Fog: Intelligence and Army Air Forces Operations in World War II. Bolling Air Force Base: Air Force History and Museums Program. ISBN 0-16-048187-2. OCLC 32396801.
- McCarthy, Dudley (1959). South-West Pacific Area—First Year. Australia in the War of 1939–1945. Canberra: Australian War Memorial. OCLC 6152102.
- Reinhold, W. J. (1946). The Bulldog-Wau Road. Brisbane: University of Queensland. OCLC 221614508.
- Watson, Richard L. (1946). "US Air Force Historical Study No. 113 – The Fifth Air Force in the Huon Peninsula Campaign" (PDF). OCLC 19047950. Archived from the original (PDF) on 20 May 2006. Retrieved 15 February 2009.
- Watson, Richard L. (1948). "The Defense of Australia". In Craven, Wesley Frank; Cate, James Lea (eds.). Plans and Early Operations (January 1939 to August 1942) Vol. I. The Army Air Forces in World War II. Chicago: University of Chicago Press. pp. 403–426. OCLC 222565036.
- Watson, Richard L. (1950). "The Battle of the Bismarck Sea". In Craven, Wesley Frank; Cate, James Lea (eds.). Vol. IV, The Pacific: Guadalcanal to Saipan, August 1942 to July 1944. The Army Air Forces in World War II. Chicago: University of Chicago Press. pp. 129–162. Archived from the original on 15 November 2006. Retrieved 20 October 2006.
- White, Osmar (1945). Green Armour. Australian War Classics. Camberwell, Victoria: Penguin. ISBN 0-14-014706-3. OCLC 27487867.
- Willoughby, Charles A., ed. (1966). Japanese Operations in the Southwest Pacific Area Volume II – Part I. Reports of General MacArthur. Washington DC: United States Army Center of Military History. OCLC 643562232. Archived from the original on 8 February 2009. Retrieved 10 February 2009.
- Yoshihara, Kane (1955). "Southern Cross: Account of the Eastern New Guinea Campaign". Australian War Memorial. Retrieved 15 January 2011.
7°20′20″S 146°43′00″E / 7.33889°S 146.71667°E