


Summary
| Battle of Ratsua | |||||||
|---|---|---|---|---|---|---|---|
| Part of the Bougainville Campaign of the Pacific Theater (World War II) | |||||||
 Australian troops withdraw from Ratsua on to the Soraken Peninsula following the end of hostilities, August 1945 | |||||||
| |||||||
| Belligerents | |||||||
|
|
| ||||||
| Commanders and leaders | |||||||
|
|
| ||||||
| Units involved | |||||||
| 87th Naval Garrison Force | |||||||
| Strength | |||||||
| ~1,600 men |
1,400 military personnel 600 armed civilians 1,400 non-combatants | ||||||
The Battle of Ratsua occurred during the Second World War and involved Australian and Japanese forces. Part of the wider Bougainville Campaign of the Pacific theatre, the battle took place in the northern sector of Bougainville between June and August 1945. The main forces that took part in the fighting were the Australian 23rd Brigade and the Japanese 87th Naval Garrison Force.
The fighting occurred following a failed landing by Australian forces at Porton Plantation in early June, which was part of an attempt to outflank a series of strong points that the Japanese had built across the base of the Bonis Peninsula. After this, the fighting in the northern sector around Ratsua essentially became a containment action for the Australians as they concentrated their efforts and resources upon driving south towards Buin, which was the main centre of Japanese resistance on the island at the time. As a result, the situation around Ratsua remained largely static until the end of hostilities in mid-August 1945.
Background edit
Strategic situation edit
Japanese forces had landed on Bougainville in early 1942, capturing it from the small force of Australians garrisoning the island. They had subsequently developed several airbases on the island, using it to conduct operations in the northern Solomon Islands and to attack the Allied lines of communication between the United States, Australia and the Southwest Pacific Area.[1] These bases also helped protect Rabaul, the major Japanese garrison and naval base in Papua New Guinea, and throughout 1943, Allied planners determined that Bougainville was vital for neutralising the Japanese base around Rabaul.[2] US Marines conducted an amphibious landing at Cape Torokina, on the western coast of the island, north of Empress Augusta Bay, in November 1943. After an initial counter-attack, the US Marines had been replaced by a garrison of US Army troops who began consolidating their position around Torokina, establishing a strong perimeter. In March 1944, the Japanese launched a heavy counter-attack, which was turned back with heavy casualties. After this, the situation on Bougainville became largely static, as the Japanese focused primarily on subsistence, and the US forces chose to adopt a mainly defensive posture focused on maintaining the perimeter around Torokina.[3][4]
In late 1944, the Australian Army had assumed responsibility for Allied operations on Bougainville, replacing US troops who were subsequently redeployed to the Philippines. At the time, the Australians believed that there were only 17,500 Japanese on the island,[5] although in reality it was actually more than 40,000.[6] Against this, the Australians deployed Lieutenant General Stanley Savige's II Corps, consisting of the 3rd Division and the 11th Brigade in November 1944. The troops were Militiamen, part of Australia's reserve military, consisting of volunteers and conscripts. Although their ranks included some Second Australian Imperial Force soldiers and officers who were veterans of earlier campaigns in the Middle East and New Guinea, they were largely inexperienced having served primarily in a garrison role in Australia and New Guinea prior to their commitment to Bougainville.[7] In December, after a period of reconnaissance and information gathering, it was decided that the Australians would pursue an aggressive campaign to clear the Japanese from Bougainville.[8]
The campaign subsequently developed into three separate drives by the Australians, who fanned out from the main Allied base at Torokina: in the north, centre and southern parts of the island. The first actions were fought around the seizure of Pearl Ridge in late December 1944 to secure control of the east–west avenues of approach across the island, and to prevent any possible Japanese counter-attacks against Torokina. This was followed by actions in the north, where it was planned that Japanese forces would be forced into the narrow Bonis Peninsula and contained, while the main drive took place in the south, where the main Japanese forces were concentrated, with an initial drive towards Mosigetta, followed by an advance towards Buin on the coast. The drive south subsequently resulted in several actions around Slater's Knoll and around the Hongorai River.[9]
Preliminary moves edit
In the northern sector of the island, in February 1945, Major General Kesao Kijima—commander of the Japanese 38th Independent Mixed Brigade—[10] had ordered a withdrawal to Numa Numa, following the fighting around Tsimba Ridge.[Note 1] He subsequently left a force of 1,400 sailors drawn from the 87th Naval Garrison Force and 2,000 civilians to hold the Bonis Peninsula. Of these civilians, about 600 were armed, although only half were trained to undertake a combat role. As their supplies dwindled, in May–June the Japanese sailors—under the command of Captain Eikichi Kato, the senior naval officer in Buka—began to raid the Australian supply lines between Ruri Bay and Ratsua as they attempted to hold a position between Porton Plantation and Tarbut.[12]
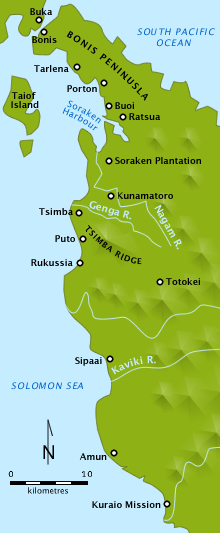
Meanwhile, Australian troops from the 11th Brigade had continued their advance north from Tsimba Ridge in April–May, clearing up to the Soraken Peninsula,[13] which was captured by the middle of the month by the 26th Infantry Battalion. Throughout May, the 26th had also carried out an amphibious landing on Torokori Island. Meanwhile, throughout the same time the 55th/53rd Infantry Battalion had advanced north-east "through mangrove swamps...and rugged foothills"[14] from the Soraken Plantation towards Pora Pora; this was occupied by early May and from there the Australians ranged north to Ruri Bay, establishing a line across the Bonis Peninsula over a distance of 5.0 miles (8 km).[15] By the end of May, the Japanese fell back behind a series of fortified positions along the base of the Bonis Peninsula. The 26th Infantry Battalion subsequently replaced the 55th/53rd, but the Australian advance came to a halt.[16][17]
In an effort to break this resistance and allow the northwards advance to continue, the Australians attempted to outflank the Japanese defensive line by launching an amphibious landing at Porton Plantation on 8 June.[Note 2] The plan called for a reinforced company from the 31st/51st Infantry Battalion to land behind the Japanese positions and attack from the west, while the main force consisting of the remainder of the 31st/51st Infantry Battalion and the 26th Infantry Battalion attempted to break through from the south.[18] Due to poor planning, inadequate resources and strong Japanese defence, the landing failed at considerable cost to Australians,[19] and as their efforts turned towards effecting a withdrawal from the beachhead and rescuing the stranded men, the attempt by the main force to break through from Ratsua also failed as tired troops came up against strong Japanese defensive positions.[20]
Battle edit
Following the failed landing by the Australians at Porton Plantation, the commander of the Australian II Corps, Savige, decided to focus the main effort of the Australian campaign upon driving south towards the Japanese garrison at Buin, where the bulk of the Japanese forces were holding out.[21][Note 3] In order to concentrate enough forces for the next phase of the operation, Savige decided that the 11th Brigade, which had been carrying the advance north, should be relieved so that it could be transferred to the south following a period of rest and reorganisation.[22]
Nevertheless, there was still a need to maintain the pressure upon the Japanese in the north, and so the 23rd Brigade—which had been previously operating in the central sector after being transferred from garrison duty in the Outer Islands—was also given responsibility for the northern sector as well, relieving the 11th Brigade on 20 June. The brigade's commander—Brigadier Arnold Potts—was charged with keeping the Japanese force bottled up on the Bonis Peninsula and to send out patrols towards the Buka Passage.[23] Initially, Potts was only allowed to allocate one of his three battalions—the 27th, under Lieutenant Colonel Alex Pope—for the task, as the other two—Lieutenant Colonel Harry Dunkley's 7th Infantry Battalion and Lieutenant Colonel Lew Loughran's 8th Infantry Battalion—were to remain in the central sector; however, after intelligence reports indicated that the Japanese forces in the northern sector were stronger than the Australians initially thought, he requested permission to transfer the 8th Infantry Battalion, along with a battery of artillery from the 4th Field Regiment that was to be based on the Soraken Peninsula.[23] Due to the requirements of the advance to the south, however, no engineer or armoured support was initially available.[24]
This request was approved, and by 28 June the two battalions and their supporting artillery—approximately 1,600 troops—were assembled, with the 8th on the left, or western side of the peninsula, the 27th on the right, and the artillery based on the Soraken Peninsula.[23] The two battalions sent fighting patrols forward, but because of the dense terrain, the Australian line of communication was quite long and the infantry spread out over a very wide area. With each battalion occupying a 4,000-yard (3,700 m) front, which was twice the normal standard, security of their rear areas became difficult as the Japanese took the opportunity to disrupt the Australian logistic efforts, conducting ambushes, cutting communications and planting mines along the tracks.[25] As the ambushes increased and casualties mounted, forward movement came to a halt, and by 21 July, the 27th Infantry Battalion reported having lost 10 men killed and 36 wounded without having gained any ground.[24]

In light of this failure, the Australian brigade commander requested further resources to undertake a full-scale offensive aimed at clearing the Japanese from the peninsula. This request was passed up to corps-level, but it was denied as Savige could not afford to release assets that were being used in the drive south.[24] Under pressure to keep casualties to a minimum following criticism in the Australian media and in Parliament regarding the necessity of the campaign,[22] Potts formulated a plan to withdraw the 27th Infantry Battalion from the right flank around Ruri Bay,[26] and concentrate his forces on the left flank along a 3,000-yard (2,700 m) front around the plantation at Buoi, to the north of Ratsua.[24][27] Savige agreed to this on 22 July and the following day the 8th Infantry Battalion launched an attack against a feature known to the Australians as "Como Ridge", which ran roughly northwest to southwest in the centre of the peninsula between Ruri Bay and Buoi Plantation.[28] There it was believed that the Japanese were attempting to set up a forward position. The attack went in after a preliminary attack from the air, with one company attacking with two Matilda tanks from the 2/4th Armoured Regiment in support. Although the airstrike had been largely ineffective and both of the tanks struggled to cross the "swampy ground", the direct fire support provided by the tanks proved decisive and the Australians took the position within 20 minutes, killing 12 Japanese.[24]
On 24 July, the 8th Infantry Battalion launched another attack with two platoons assaulting the Japanese position known as "Base 5". Prior to the assault, over 900 artillery shells and mortar bombs were brought down on the Japanese positions to prepare the position for the attack, but this proved ineffective against well-entrenched positions.[29] The Australians reached their first objective, which was a small ridge in front of the main Japanese position; however, shortly after they began receiving effective fire from concealed positions, which killed two men and wounded another in the forward section, pinning it in place.[29]
Attempts to outflank the bunkers were answered with heavy fire from a Japanese medium machine gun and another man was killed and three more wounded. As the attack began to falter, one of the wounded, 20-year-old Private Frank Partridge, who had been injured in the arm and thigh,[30] braved the heavy fire that was being put down towards him and gathered the Bren light machine gun from the gunner who had been killed. After pouring suppressing fire onto the bunker, he discarded the Bren and regathered his rifle, before rushing towards the bunker with a grenade and killing its occupants.[13][29] Partridge's actions reinvigorated the attack and allowed the Australians to temporarily take the second Japanese position. After the wounded were recovered, the Australians withdrew having lost three men killed and five wounded. Against this eight Japanese were confirmed to have been killed.[31] For his actions during the attack on 24 July, Partridge was awarded the Victoria Cross, the British Commonwealth's highest military decoration. He was the last Australian to be awarded the medal during the Second World War, and was also the youngest.[13][32]
Elsewhere, the Australians continued to mount patrols and ambushes. On 29 July, a platoon from the Papuan Infantry Battalion (PIB) clashed with a similar sized force of Japanese around the junction of the Ratsua Road–Umum Track. Two days later, after the PIB had assumed a flank security role on the eastern side of the peninsula, another patrol clashed with a party of Japanese who had been attempting to set up an ambush near Ruri Bay. In the ensuing fight, 14 Japanese were killed; a further 20 were killed in a firefight around the same area on 7 August.[33] Meanwhile, on 2 August, a patrol from the 27th Infantry Battalion was sent out along the Ruri Bay Road in company with two tanks that were to act as their direct fire support. The Japanese were still active in the area, and had mined the road with a 500 lb (230 kg) bomb that they had rigged to be detonated remotely. The Australian patrol accidentally triggered the device and the resulting explosion killed three men in one of the tanks and wounded eight infantrymen following behind.[24] On 5 August, the Australians reoccupied the position at Base 5 after encountering only slight resistance and subsequently named it "Part Ridge". After exploiting the position, it was discovered that the Japanese had built between 43 and 60 bunkers in the area. The majority of these had been destroyed by artillery, though, and after the area had been thoroughly searched for Japanese stragglers, the Australian patrol was withdrawn from the ridge.[34][35]
Aftermath edit

The fighting around Base 5 was the final action of the fighting in the northern sector of the island, which essentially ended in stalemate. The Australians, under pressure to limit casualties to their largely inexperienced troops, had pursued a cautious campaign and had been slow to regain the initiative in the area following the defeat at Porton Plantation. In contrast, the Japanese commander—Kato—had been skillful and aggressive.[35] On 11 August, in anticipation of the capitulation of Japan following the dropping of two atomic bombs on Japanese cities, the order to cease offensive combat operations on Bougainville was passed to all Australian units by their commanders.[34]
Three days later, on 15 August, the Japanese Emperor Hirohito publicly announced Japan's unconditional surrender,[36] effectively bringing about an end to the war. On 18 August, in the southern sector of the island the Japanese commander, General Masatane Kanda, dispatched an envoy across the flood swollen Mivo River to begin negotiations with the Australians for the surrender of the over 23,000 Japanese soldiers left on the island, bringing about an end to the campaign.[13] Throughout the course of the fighting on Bougainville from November 1944 to August 1945, 526 Australians were killed, while a further 1,572 were wounded. Approximately 8,500 Japanese were killed in action and a further 9,800 died from disease during this same period.[34]
Notes edit
- Footnotes
- Citations
- ^ Keogh 1965, p. 414.
- ^ Rentz 1946, p. 1.
- ^ James 2012, pp. 29–30.
- ^ Shindo 2016, pp. 61–63.
- ^ Long 1963, p. 102
- ^ Grey 2008, p. 191
- ^ James 2012, pp. 12–17
- ^ Johnston 2007, p. 30
- ^ Johnston 2007, pp. 30–31
- ^ Tanaka 1980, p. 292
- ^ a b Tanaka 1980, p. 296
- ^ Long 1963, p. 215
- ^ a b c d Odgers 1988, p. 178
- ^ James 2016, p. 241
- ^ James 2012, p. 123
- ^ Keogh 1965, p. 421
- ^ Maitland 1999, pp. 120–121
- ^ Long 1963, p. 211
- ^ Davidson 2005, pp. 140–146
- ^ Long 1963, p. 216
- ^ a b Long 1963, p. 217
- ^ a b Long 1963, p. 218
- ^ a b c Long 1963, p. 234
- ^ a b c d e f Long 1963, p. 235
- ^ Long 1963, pp. 234–235
- ^ James 2016, p. 242
- ^ Edgar 1999, p. 273
- ^ James 2012, p. 124
- ^ a b c Long 1963, p. 236
- ^ Maitland 1999, p. 124
- ^ Long 1963, pp. 236–237
- ^ Jones 2000, pp. 572–573
- ^ Long 1963, pp. 235–236
- ^ a b c Long 1963, p. 237
- ^ a b James 2012, p. 152
- ^ Harries & Harries 1991, p. 458
References edit
- Davidson, Audrey (2005). Porton: A Deadly Trap. Brisbane, Queensland: Boolarong Press. ISBN 0-646-44766-1.
- Edgar, Bill (1999). Warrior of Kokoda: A Biography of Brigadier Arnold Potts. St Leonards, New South Wales: Allen & Unwin. ISBN 1-86448-908-1.
- Grey, Jeffrey (2008). A Military History of Australia (3rd ed.). Melbourne, Victoria: Cambridge University Press. ISBN 978-0-521-69791-0.
- Harries, Meirion; Harries, Susie (1991). Soldiers of the Sun: The Rise and Fall of the Imperial Japanese Army. New York: Random House. ISBN 0-679-75303-6.
- James, Karl (2016). "More Than Mopping Up: Bougainville". In Dean, Peter J. (ed.). Australia 1944–45: Victory in the Pacific. Port Melbourne, Victoria: Cambridge University Press. pp. 232–251. ISBN 978-1-107-08346-2.
- James, Karl (2012). The Hard Slog: Australians in the Bougainville Campaign, 1944–45. Port Melbourne, Victoria: Cambridge University Press. ISBN 978-1-107-01732-0.
- Johnston, Mark (2007). The Australian Army in World War II. Botley, Oxford: Osprey Publishing. ISBN 978-1-84603-123-6.
- Jones, Barry (2000). "Partridge, Frank John (1924–1964)". In Ritchie, John; Langmore, Dianne (eds.). Australian Dictionary of Biography. Vol. 15. Carlton, Victoria: Melbourne University Press. pp. 572–573. ISBN 978-0-522-84236-4.
- Keogh, Eustace (1965). The South West Pacific 1941–45. Melbourne, Victoria: Grayflower Productions. OCLC 7185705.
- Long, Gavin (1963). The Final Campaigns. Australia in the War of 1939–1945, Series 1—Army. Volume VII (1st ed.). Canberra, Australian Capital Territory: Australian War Memorial. OCLC 1297619.
- Maitland, Gordon (1999). The Second World War and its Australian Army Battle Honours. East Roseville, New South Wales: Kangaroo Press. ISBN 0-86417-975-8.
- Odgers, George (1988). Army Australia: An Illustrated History. Frenchs Forest, New South Wales: Child & Associates. ISBN 0-86777-061-9.
- Rentz, John N. (1946). Bougainville and the Northern Solomons. Historical Branch, Headquarters, U.S. Marine Corps. OCLC 1313812.
{{cite book}}:|work=ignored (help) - Shindo, Hiroyuki (2016). "Holding on to the Finish: The Japanese Army in the South and Southwest Pacific, 1944–45". In Dean, Peter J. (ed.). Australia 1944–45: Victory in the Pacific. Port Melbourne, Victoria: Cambridge University Press. pp. 51–76. ISBN 978-1-107-08346-2.
- Tanaka, Kengoro (1980). Operations of the Imperial Japanese Armed Forces in the Papua New Guinea Theater During World War II. Tokyo: Japan Papua New Guinea Goodwill Society. OCLC 9206229.