


Summary
8°59′10″S 147°44′08″E / 8.986222°S 147.735556°E
| Battle of Isurava | |||||||
|---|---|---|---|---|---|---|---|
| Part of the Second World War, Pacific War | |||||||
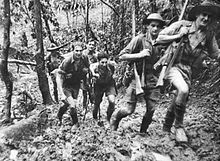 Members of the 39th Battalion withdrawing after the Battle of Isurava | |||||||
| |||||||
| Belligerents | |||||||
|
|
| ||||||
| Commanders and leaders | |||||||
|
|
| ||||||
| Units involved | |||||||
| Strength | |||||||
| 2,290 | 2,130 | ||||||
| Casualties and losses | |||||||
|
99 killed 111 wounded |
140 killed 231 wounded | ||||||
The Battle of Isurava (also sometimes referred to as the Battle of Isurava – Abuari[1] or the Battle of Isuraba[2]) took place over the period 26 to 31 August 1942. Forming part of the Kokoda Track campaign of the Second World War, the battle involved military forces from Australia, supported by the United States, fighting against Japanese troops from Major General Tomitaro Horii's South Seas Detachment who had landed around Buna and Gona in Papua mid-July 1942, with the intent of capturing Port Moresby to the south via the overland route.
Several small engagements were fought north of Kokoda, before the village itself became the scene of heavy fighting as the Australian Maroubra Force fought to delay the Japanese advance throughout late July and into early August. After further fighting around Deniki, the Australians withdrew to Isurava, where the Militia soldiers of Maroubra Force were reinforced by two Second Australian Imperial Force battalions of the veteran 21st Infantry Brigade under Brigadier Arnold Potts.
In what became the first major battle of the campaign, the two sides fought a heavy engagement around Isurava in late August, as four Australian infantry battalions attempted to fend off attacks by a similarly sized Japanese force. On the other side of Eora Creek, clashes were fought around Abuari, as a Japanese battalion attempted to outflank the Australians at Isurava from the west, and cut the track around Alola, while another Japanese battalion attempted to flank Isurava to the west. Subjected to a heavy Japanese artillery bombardment, and lacking their own with which to counter this indirect fire, the Australians defended for four days, before conducting a withdrawal in contact, falling back towards Templeton's Crossing, which was the scene of further fighting in early September 1942.
In the years following the battle, the fighting around Isurava has come to form a key part of the Australian narrative of the campaign. The Japanese were victorious in capturing Isurava, but Australian accounts in the early years after the war characterised the battle as a successful delaying action by a heavily outnumbered force that inflicted more casualties than it sustained, highlighting the bravery of Australian troops in an epic and desperate action of national survival. In this regard, the Battle of Isurava has come to form a key part of the Anzac legend, although recent accounts have re-examined the battle. As the size of the Japanese force committed to the fighting has been re-evaluated, the magnitude of the Australian defensive feat has also been reinterpreted. Recent analysis, while acknowledging the individual bravery of both Australian and Japanese soldiers, highlights tactical deficiencies on both sides, and now characterises the battle as one in which Australian forces were able to withdraw largely due to tactical errors from the Japanese commanders.
Background edit
Geography edit

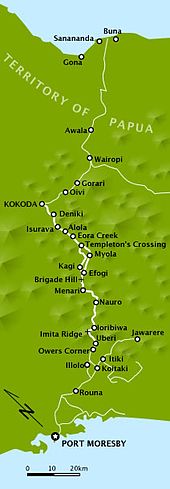
The Kokoda Track stretches for a distance of 96 kilometres (60 mi) north from Owers' Corner on the southern coastal plain to the east of Port Moresby to the village of Kokoda, passing through what was referred to during the early war years as "the Gap".[3] Kokoda sits in the northern foothills of the steep and formidable Owen Stanley Range that dominates the central land mass, separating the northern coast from the southern. In 1942, the steep terrain offered considerable challenges to military operations, and both the Japanese and Allies misunderstood its nature at the time of the early fighting in New Guinea. To the Japanese, who had learned of the Gap through vague explorer's accounts,[4] it potentially offered a corridor from Buna through the Owen Stanleys along which they could launch a quick advance on Port Moresby. Conversely, the Allies believed it was a narrow and largely impassable path that could be blocked and held with only limited resources.[5][Note 1] The terrain rises and falls with regularity, up to 5,000 metres (16,000 ft) up and down over the full length of the track, markedly increasing the distance to be traversed, although there are several flat areas, particularly around Myola. The vegetation is largely dense jungle and the climate mostly hot and humid, although the higher parts are cold. Around Kokoda and the northern beaches, as the terrain lowers towards sea level, it consists mainly of thick kunai grass and swamps.[8] Warm and wet, the coastal area is highly malarial.[9]
Isurava sits in a clearing on the first main peak of the Owen Stanleys on the southern route from Kokoda as the track rises towards its highest peak at Mount Bellamy. It is positioned to the south of Deniki and the north of Alola on a north–south ridgeline. A rest house was positioned about 1 kilometre (0.6 mi) to the south, with a view of the Eora Valley.[10] To its east, the high ground falls steeply towards the fast-flowing Eora Creek which sits at the bottom of a deep ravine. Isurava lay on a spur that jagged west from the Isurava ridgeline towards Eora Creek, and was bounded to the north and south by two small tributaries that cut the track. To the west of Eora Creek on the other side of the steep ravine, opposite Isurava, was the village of Missima. It lay on the slope that rose towards the Abuari ridgeline, sitting astride a smaller parallel track that joined the main Kokoda Track after passing through Abuari and crossing Eora Creek via a log bridge near Alola.[11][12] Overlooked by a ridge to the north, Isurava was ultimately unsuited to defensive operations. The ridge to its north offered the Japanese artillery, of which at that stage of the campaign they had a significant advantage, the ability to range their fire down on the Australian position. The track to the east of Eora Creek and the track junction around Alola offered the Japanese an easy avenue of advance around the flank towards the Australian rear. Nevertheless, it was chosen over the Isurava rest house position further south when the area was reconnoitred in mid-August by Major Allan Cameron, the brigade major of the 30th Infantry Brigade and temporary commander of the 39th Infantry Battalion.[13]
Strategic situation edit
For both sides, Port Moresby was strategically important, offering a forward base from which to project further operations.[14] Following the failure of a seaborne assault by the Japanese on Port Moresby resulting from the Battle of the Coral Sea in May 1942 and further losses during the Battle of Midway, it was planned to capture the town via an overland advance across the Owen Stanley Range along the Kokoda Track. On 21 July 1942, Japanese forces landed on the northern Papuan coast at Basbua, between Buna and Gona.[15] The advanced landing forces, consisting primarily of the Colonel Yosuke Yokoyama's 15th Independent Engineer Regiment, sailed from Rabaul and came ashore unchallenged as there were only a small number of Australians stationed in the area. Shortly afterwards a small advanced element, supported by part of the 1st Battalion, 144th Infantry Regiment, began moving south-west towards Oivi, mounted in motor vehicles and on bicycles.[16] These troops were initially tasked with proving the route over the Owen Stanleys before the main body of the landing force, Major General Tomitaro Horii's South Seas Detachment, arrived.[15]
Following the landing, several minor skirmishes took place around Awala and Giruwa between the forward elements of the Japanese landing force – Yokoyama Force – and small groups of Australian and Papuan forces primarily from the Papuan Infantry Battalion (PIB). Brushing these aside, the Japanese began advancing steadily towards their objective on the southern coast. Meanwhile, the Australians, who had deployed only limited forces north of Port Moresby, attempted to delay the Japanese along the track long enough to bring reinforcements forward.[17] The Australian reinforcement effort was hampered initially due to a shortage of essential combat supplies of food and ammunition in the forward areas, as well as limited port facilities, which slowed the transfer of the experienced Second Australian Imperial Force (2nd AIF) troops that had been withdrawn from the Middle East to Australia earlier in the year. As shipping and logistics resources became available in mid-August, the initial 2nd AIF troops moved to Port Moresby and Milne Bay, while US engineer and service units began arriving to conduct vital airfield and port development work, to help improve the effectiveness of Allied supply system.[18] Nevertheless, a lack of supplies forward of Port Moresby continued to limit the ability of the Allies to concentrate troops along the Kokoda Track throughout much of the campaign, as the native carrier system was stretched and aerial resupply – a technique that was still developing – was less effective than initially envisaged.[19]
Shortly afterwards, a bridge at Wairopi was destroyed by the withdrawing PIB troops who had been reinforced by a platoon of Australians from the 39th Infantry Battalion. There was a brief fire-fight on 24 July, before the Japanese began forcing a crossing of the Kumusi River in rubber assault boats supported by mortars and machine gun fire.[20] In the days that followed, skirmishes were fought around Gorari and at Oivi, before the Australians and Papuans were forced back to Deniki.[21] From there, a small force was sent north to Kokoda, with the intent of holding the village and its logistically important airfield.[22] Over the course of a fortnight, two important engagements were fought around Kokoda in late July and early August. This was followed by a short but sharp engagement around Deniki before the Australians withdrew towards Isurava on 14 August.[23] In the short lull that followed, the Japanese began landing the main body of Horii's South Seas Detachment on the northern coast,[24] while minor patrol actions resulted in several skirmishes north of Isurava.[25]
Elsewhere, on 7 August 1942, US forces carried out an amphibious landing on Guadalcanal in the Solomon Islands, which caught the Japanese by surprise. To counter this, a large naval force was dispatched, as well as part of the 41st Infantry Regiment, which had been intended to join Horii's force but was diverted, as Japanese attention and resources turned towards the fighting against US forces in the Solomons.[18] The engagements around Kokoda and the US landing at Guadalcanal caused General Harukichi Hyakutake, 17th Army commander in Rabaul, to re-consider the drive on Port Moresby. It was realised that more supplies would be needed and an amphibious landing around Milne Bay was planned for late August. By 16 August, the decision to capture Port Moresby was postponed until Milne Bay was captured and the situation on Guadalcanal was resolved.[26] Consequently, on 28 August Horii's South Sea Detachment was ordered to position itself at a suitable location south of the Owen Stanleys to capture Port Moresby once the strategic situation elsewhere had been resolved in Japan's favour.[27][28]
Opposing forces edit
On 17 August, at Isurava, Lieutenant Colonel Ralph Honner took command of the 39th Infantry Battalion, replacing its previous commander, Lieutenant Colonel William Owen, who had been killed in the fighting around Kokoda. The Militia soldiers of Maroubra Force were later reinforced by two 2nd AIF battalions from the 21st Infantry Brigade – the 2/14th and 2/16th Infantry Battalions – under Brigadier Arnold Potts.[29] The 21st Infantry Brigade was a veteran formation, having fought in the Middle East earlier in the war, but was yet to be tested in jungle conditions.[30] Despite the urgency of the situation, the two 2nd AIF battalions did not deploy forward of Myola immediately due to the supply situation, and would not reach Isurava until after the battle had commenced. Upon arrival at the forward Australian positions on 20 August, Potts was ordered to retake Kokoda. However, as the size of the Japanese force – roughly equal to that of the Australians – and the extent of their own supply problems became apparent to the Australian high command, an attack was ruled out. Potts' orders were therefore changed on 29 August to mounting a stand around Isurava, in an effort to block the Japanese advance into the Owen Stanleys on their way towards Port Moresby.[11][31]
In total, the Australians had about 2,292 personnel including those from the 53rd Infantry Battalion, positioned further back from Isurava, as well as support units including the 14th and 2/6th Field Ambulances, the Australian New Guinea Administrative Unit, the Royal Papuan Constabulary and the PIB.[11][32] These troops were beginning to experience the strain of the jungle warfare: limited rations, inadequate personal equipment, harsh conditions and physical exertion were all beginning to sap their strength and instances of disease were beginning to decrease their effectiveness in the harsh terrain they were being asked to defend.[33] At this stage the Australians' limited artillery resources were concentrated around Port Moresby, and due to difficulties in moving the guns forward along the track, the Australian defenders were without artillery support.[34] Instead, the Australians had one 3-inch mortar, which was brought up to Isurava by the 2/14th Battalion part way through the battle after it was airdropped at Myola on 27 August.[35]
Against this, the Japanese force, commanded personally by Horii, was built around a core of four infantry battalions. Three of these were drawn from the 144th Infantry Regiment, which had been fighting since the start of the campaign, and one was part of the 41st Infantry Regiment, which had arrived to reinforce the 144th. These troops were supported by an engineer regiment and a mountain artillery battalion, with a total of six artillery pieces: two 75 mm guns, two 37 mm pieces and two mountain guns, although these were not all available at the start of the battle.[36] According to Dudley McCarthy, author of the Australian official history, the Japanese force in the Isurava area was around 5,000 strong.[37] More conservative estimates, however, place this figure at around 3,000,[11] or 3,500.[38] Of these, only 2,130 were ultimately directly engaged in the battle.[39]
The main body of this force had landed at Giruawa between 19 and 21 August, and had been forced to make a 120-kilometre (75 mi) trek south on foot, carrying heavier than normal loads to alleviate the supply problems that the Japanese were beginning to experience as their line of communication was pushed further south. As a result of the heat, heavy loads and distance, a large number of troops, and several artillery pieces,[11] failed to reach Isurava in time for the battle, reducing the size of the Japanese force available for the attack. Horii's plan involved a double envelopment. For the assault, Horii planned to use the three battalions of the 144th while the single battalion from the 41st Infantry Regiment remained in reserve. The reserve was intended to be used later to follow up the withdrawing Australians but it was ultimately committed to an unsuccessful flanking manoeuvre during the final stages of the battle.[40]
The Australians were also experiencing their own supply problems. To enable them to mount a counter-attack, it was vital that they build up a stockpile of supplies in the forward areas. To reduce the burden placed on the native carrier system the Allies turned to aerial resupply, a technique that was still in its infancy. The loss of Kokoda had deprived them of a forward airfield, but to an extent this had been alleviated by the creation of a supply drop zone for US transport aircraft around the dry lake at Myola. These efforts, though, were hamstrung by deficiencies in the aerial resupply process and inexperience in its application. Only a few supplies were dropped by parachute, while the rest were just free-dropped. Inevitably some supplies fell away from their intended drop zones, while others were damaged due to inadequate packaging. Additionally, poor staff work and inattention resulted in fewer supplies being collected in the drop zone than Potts had been promised. This had the effect of slowing the arrival of the Australian reinforcements as they had to be held up and then committed piecemeal company by company,[41] as adequate supplies could be brought forward to sustain them.[42]
Battle edit
Japanese assault edit

The initial Australian dispositions around Isurava saw the depleted 39th spread out in five entrenched company areas astride the track in between the northern and southern creeks that flowed into Eora Creek.[43] Having left most of their entrenching equipment behind during the withdrawal from Deniki, the troops from the 39th had to dig-in with whatever they had at hand including steel helmets and bayonets.[44] Their positions were constructed amidst an area of long grass, behind an abandoned garden, which offered good observation of the track heading towards Deniki.[10] The 53rd Infantry Battalion was positioned further back at Alola, co-located with Potts' headquarters. A forward observation post had also been established on the Isurava ridgeline.[45] The Australians maintained a patrol presence forward of their occupied areas. Throughout 24 and 25 August, as the Japanese force began pressing forward, patrols from the 53rd Infantry Battalion clashed with groups of Japanese in front of Isurava, and on the other side of Eora Creek around Missima.[46] Potts, realising that Horii had launched a major attack, decided to deploy the 2/14th under Lieutenant Colonel Arthur Key to Isurava, using the 39th to screen their movement. The 2/16th, under Lieutenant Colonel Albert Caro, was brought forward to Alola, where it would be held in reserve.[47] By the time the 2/14th Battalion had deployed, the Japanese were able to field a force of between 3,000 and 5,000.[11][37]
On 26 August, Horii moved the first of his disembarking troops forward, a body of some 3,500 soldiers, against the 39th Infantry Battalion, some 400-strong.[32] Around midday, the attack began in earnest, with Australian positions around Isurava being subjected to a heavy artillery bombardment.[48] The Japanese tactics were to pin the Australians in place with frontal attacks while feeling for the flanks, with a view to cutting them off with forces from the rear.[49] Lieutenant Colonel Hatsuo Tsukamoto's 1/144th was given the task of leading the assault, even though they had been in combat almost continuously since the initial Japanese landing in mid-July. Meanwhile, Major Tadashi Horie's 2/144th was allocated to the eastern side of Eora Creek where Japanese reconnaissance had revealed the parallel track bypassing Isurava. The battalion was tasked with seizing Missima and Abuari and threatening the Australian rear around Alola. The 3/144th, under Lieutenant Colonel Genichiro Kuwada, was to conduct a flanking move to the west against the Australian left.[11]
The Japanese force made contact with the outer positions of Maroubra Force, focusing upon the observation posts that had been laid down either side of the Eora Creek gorge. Along the Isurava ridgeline, these attacks were held off by the 39th. However, around Missima along the alternate route, which had been held by the 53rd, the Australian position was destroyed and the village taken, opening the route to the Australian rear. In response, the 53rd's commanding officer, Lieutenant Colonel Kenneth Ward, dispatched a company from Alola forward to Abuari, to shore up the position there. Potts also requested reinforcements in the form of the 2/27th Infantry Battalion, which was being held in reserve around Port Moresby. The request was denied, though, due to concerns about the position around Milne Bay. Although some measure of defence was mounted by the 53rd,[50] which dispatched another company after the first failed to report in, the situation grew worse for the Australians. Conflicting information was sent back from the 53rd's forward positions, confusing Potts' headquarters and rendering co-ordinated action impossible. To make matters worse for them, the Japanese ambushed and killed several of the 53rd's senior officers, including Ward. As the 53rd's position disintegrated the Japanese also faltered, failing to exploit the opportunity to roll up the Australian position all the way to Alola. Horie's 2/144th was stalled into inaction by fatigue,[51] and hesitation, caused by the defence previously mounted by the 53rd. The Japanese battalion commander was convinced that the route was more heavily defended than it actually was.[50] While the Japanese failed to exploit the situation, the 2/16th was tasked with restoring the position around Abuari, reinforcing the 53rd as the Japanese began threatening the Eora Creek crossing.[52]
Meanwhile, the outpost on the left around the Isurava ridgeline held on throughout 27 August, but as the Japanese began bypassing the position, the order was given to withdraw across the ridgeline to the west.[53] After this, frontal attacks against the dug-in defenders in the main defensive position began, representing the start of what would be four days of violent attacks.[49] The attack was supported by a mountain gun and mortars that had been manhandled up the track. As the first wave fell on the position, the Australians sought to conceal their positions as best they could, firing as late as possible. Humidity and physical exertion sapped the strength of the attacking Japanese and the initial assault was held. That night, as heavy rain fell, the assault on the 39th around Isurava resumed, with a force penetrating the Australian positions around the abandoned garden.[54]
The 2/14th Battalion had been dispatched from Myola on foot on 25 August, with orders to relieve the 39th. A company reached their position at Isurava in the middle of the afternoon on 26 August, while others deployed to Alola and Templeton's Crossing. However, the 39th was forced to remain in location while the 2/14th's companies moved into position one by one, as several times the Japanese threatened to break through the perimeter. It was not until last light on 27 August that the 39th moved into a reserve location to the rear of Isurava.[53] Throughout the day, heavy close quarters fighting had taken place around Isurava, while on the right flank hand-to-hand fighting had seen both the Australians and Japanese assume cautious defensive postures. Probing attacks continued around Isurava that night as the Japanese sought to test the Australian defences for weaknesses amidst a heavy torrential downpour.[55]
Private Kingsbury, who was one of the few survivors of a platoon which had been overrun ... immediately volunteered to join a different platoon which had been ordered to counterattack. He rushed forward, firing the Bren gun from his hip through terrific machine-gun fire, and succeeded in clearing a path through the enemy. Continuing to sweep enemy positions with his fire, and inflicting an extremely high number of casualties upon them, Private Kingsbury was then seen to fall to the ground, shot dead by the bullet from a sniper hiding in the wood.
– London Gazette, 5 February 1943.[56]
On 28 August, the fighting continued along the front of the Australian position and on both flanks. Starting as a probing attack around dawn, there was a brief breakthrough in the afternoon, but the Japanese gains were negated by a swift counter-attack.[55] The Japanese commander – realising that the Australians had brought up reinforcements – decided to commit his reserves to the battle. The slowness with which the 1/144th attacked caused Horii concern, and a company from the 3/144th was sent to re-invigorate its attack. The remainder was ordered to proceed to the west to attempt to outflank the main defensive position around Isurava.[57] As the 1/144th enveloped the front of the Australian position, the 3/144th attempted an attack from the west, but it became lost. Frustrated by the lack of progress, Horii decided to commit the 2/41st, under Major Mitsuo Koiwai,[58] with the aim of conducting a wide arc to the west and emerging on the track to the south of Alola. They too eventually became lost, and in fact did not regain contact with the main Japanese force until after the battle, without firing a single shot.[11]
The following day, 29 August, the Japanese renewed their attack. In possession of the ridges that dominated the Australian position from both sides of the valley in which it sat, the Japanese were able to lay down considerable volumes of mortar and machine gun fire in support of their assaults.[59] Unable to respond with similar firepower, the Australian perimeter began to shrink. It was during this stage of the fighting that Private Bruce Kingsbury of the 2/14th made a unique individual contribution to the campaign and was posthumously awarded the Victoria Cross as a result.[60] Kingsbury's was the first Victoria Cross awarded for actions on Australian soil.[61]
Australian withdrawal edit
Although the Australian positions on the eastern track held, the position around Isurava grew untenable and the 2/14th's commanding officer, Key, requested permission to withdraw to the Isurava rest house, about 1 kilometre (0.6 mi) back along the track. This request was granted and the withdrawal was completed by early morning of 30 August. The defenders then dug in around the new location.[62] As the Japanese brought up more artillery and began a heavy bombardment of the Isurava rest house, the 1/144th established itself around Isurava and began firing on the new Australian position. Meanwhile, the 3/144th emerged from the thick scrub and stumbled upon the Australian flank and rear. Hand-to-hand and close quarters fighting ensued. As Australian casualties mounted and ammunition ran low, the Japanese also came close to making a breakthrough on the alternative track. Horii had now deployed several companies on the flanks and near the rear of the 2/14th and 39th Battalions, threatening the Australian positions with encirclement. Consequently, late on 30 August, Potts decided that if he remained in location his command would be destroyed, and so he ordered a withdrawal south of Alola towards Eora village.[11][63]
The 39th and 2/14th Infantry Battalions withdrew south along the track on the western side of Eora Creek, passing through the 53rd which was holding Alola. The 2/16th withdrew south from Abuari along the eastern side of Eora Creek. Withdrawing in contact, several groups of Australians – including the 2/14th's headquarters company – found themselves isolated from the main body of Maroubra Force. In the confusion, an Australian counter-attack against the 3/144th caught a group of their own troops in a fierce crossfire.[64] Although the counter-attack was ultimately successful in breaking through the Japanese blocking force, it also forced a large group of Australians off the track. Over several days large numbers trekked through the jungle in an effort to rejoin their units. Several were captured by the Japanese in the days that followed, including Key, who was executed by the Japanese after interrogation.[11][63]
Aftermath edit
Subsequent operations edit
In aftermath of the battle, as the Australians withdrew towards Eora Creek the Japanese pushed over the crest of the ridge south of the Isurava rest house and then occupied Alola. There they secured a large amount of small arms ammunition and grenades, as well as rations which were eagerly consumed by the troops who were now beginning to feel the effects of hunger as a result of an already strained supply line.[65] On 28 August, Horii had received orders to secure an advanced position south of the Owen Stanleys, but to keep the majority of his force to the north while the situation around Guadalcanal was resolved.[28] After the fighting around Isurava he pushed only part of his force – about 3,500 men[28] – forward, and tasked the 41st Infantry Regiment with the pursuit of the Australians.[2] In the days that followed the Australian withdrawal from Isurava, a "week-long fighting withdrawal"[30] took place. Further actions were fought around Templeton's Crossing and Efogi in the early days of September,[66] as the Australian resistance along the track began to stiffen and become more organised. In the aftermath, Potts relieved the exhausted 39th and 53rd Battalions; they were ordered to make their way back to Myola and then later to Port Moresby, while the 2/27th was deployed forward. It joined up with the rest of the 21st Infantry Brigade in time for the fighting around Efogi.[67] The 53rd, whose performance was widely derided by Allied commanders, was amalgamated with the 55th and together with the 39th would later see heavy fighting around Gona and Sanananda.[68]

Elsewhere, while the Japanese and Australians were fighting around Isurava, the Japanese launched an amphibious landing around Milne Bay as part of a further seaborne attempt to support the overland drive on Port Moresby. Over the course of a fortnight, the Japanese landing was repulsed in an action that came to be seen as first "full-scale defeat [of the Japanese] on land".[69] The effect of the defeat around Milne Bay and fighting at Guadalcanal was felt by the Japanese on the Kokoda Track. An order to assume defensive operations and to withdraw towards Kokoda was sent to Horii on 8 September. The situation on Guadalcanal worsened for the Japanese and further resources and manpower were diverted to that effort instead.[70][Note 2] The Japanese supply line along the Kokoda Track was stretched thin by this time. Rations were running low, and the Japanese troops in the forward areas were tired and hungry. Nevertheless, in early September Horii continued his advance south with a further action being fought around Ioribaiwa, around 40 kilometres (25 mi) from Port Moresby. From there the Australians withdrew to their final defensive line around Imita Ridge.[72] But there was no climactic battle at Imita Ridge, as Horii finally cancelled his offensive on 14 September and began withdrawing north to shorten his line of communication and bring supplies forward for his troops to regain their strength.[73] On 23 September, the Japanese 17th Army ordered the withdrawal of part of Horii's force back to the beachheads around Buna.[74] Five days later, the Australians began tentative moves forward of Imita Ridge. Finding Ioribaiwa abandoned, they began their pursuit of the Japanese that were withdrawing north. Further actions were fought at Templeton's Crossing and around Oivi and Gorari throughout October, with the latter concluding on 11 November. The Japanese withdrew across the Kumusi River to their beachheads around Buna and Gona, which was the scene of heavy fighting in late 1942 and early 1943. In crossing the Kumusi, they were to lose most of their artillery.[75]
Analysis edit
Casualties during the fighting around Isurava have been variously reported. In the immediate post war era, Australian sources tended to report a ratio of around five Japanese killed for every one Australian, with the Australians estimating that they had killed around 700 Japanese; however, in recent times this has been revised.[76] The Japanese also initially over-estimated the casualties they inflicted on the Australians, claiming 1,000 killed, before reducing this to 300.[77] It is now thought that the casualties were more even, although still favouring the Australians. For the Australians, casualties are now reported as 99 killed and 111 wounded while the Japanese are thought to have lost 140 killed and 231 wounded.[11]
For the Australians, the Battle of Isurava has sometimes been described as "Australia's Thermopylae".[78] The battle has come to form a key part of the Anzac legend with Kingsbury's actions, as well as numerous other acts of bravery from both Japanese and Australian troops,[79] being highlighted in various accounts of the fighting which have been characterised as part of an epic battle of national survival.[80] In the early post-war years, the efforts of the Australian force in holding up the Japanese for a period of four days were seen as representing a significant feat of arms, fought against a greatly superior force on which the Australians inflicted heavy casualties in a tactically successfully action which delayed the Japanese and allowed the Australians time with which to bring up further reinforcements. While elements of this narrative continue to resonate, recently the magnitude of Japanese losses has been re-evaluated and this analysis has been called into question. As wider strategic goals of the Japanese have been re-cast,[80] and the number of Japanese engaged in the battle has been found to be significantly less than the Australians had thought at the time, the performance of the Australian defenders, and the decisions of their commanders, have also been re-evaluated. Indeed, author Peter Williams, as part of his thesis about the myths of the Kokoda Track campaign, has described the battle as a "defeat with few redeeming features", going on to state that "Horii defeated Maroubra Force but failed to destroy it".[81]
While the Australians were able to successfully withdraw from their position in contact, the action was tarnished by a degree of disorganisation and disarray which characterised their withdrawal to Eora Creek.[82] This ultimately led to several groups being captured and eventually executed by the Japanese.[11] A large amount of materiel was also lost in the withdrawal, with 26,500 rounds and 500 grenades being abandoned around Alola.[82] Despite this, Potts' handling of the withdrawal has tended to be viewed relatively uncritically in the narrative of the battle provided in most postwar accounts. Williams, however, argues that rather than skilful handling by Potts, the vital factor in allowing the Australians to live to fight another day was in fact Horii's own mistakes, as well as tactical errors by the Japanese battalion commanders on the ground.[83] On the other hand, Japanese author Kengoro Tanaka draws the opposite conclusion, highlighting the stubborn defence put up by the Australian troops on the ground, and the heavy casualties inflicted on the attackers, as being key factors. He goes on to state that against this the Japanese force only "narrowly captured" Isurava.[2] The Japanese commander had hoped to decisively engage the Australians in order to open the way to Port Moresby. The withdrawal of Maroubra Force thus dented Japanese hopes of a quick advance and the consequent delays caused by the stiffening Australian resistance increasingly damaged Japanese chances of securing the port before significant numbers of Australian reinforcements began arriving and events on Guadalcanal and elsewhere impacted upon the campaign.[84]
After the war, a battle honour was awarded to Australian units for their involvement in the fighting around Isurava during late August. This was awarded to the 39th, 2/14th and 2/16th Infantry Battalions. The 53rd did not receive this, or any battle honour for the fighting during the Kokoda Track campaign.[85][86]
References edit
Notes edit
- ^ "The (Kokoda) Gap" is a dip in the Owen Stanley Range about 11 kilometres (7 mi) wide, convenient for aircraft crossing the range to pass through.[6] Such was the ignorance of the terrain by Allied planners, that it was perceived to be a narrow defile that could easily be blocked by explosives or held against a determined enemy by only a small force.[7]
- ^ Bullard reports that this order was for the 41st Infantry Regiment to be deployed back to Kokoda. He also notes that the order was not acted upon and may not have been received by Horii.[71]
Citations edit
- ^ Anderson 2014, p. 51.
- ^ a b c Tanaka 1980, p. 21.
- ^ Keogh 1965, p. 171.
- ^ Collie & Marutani 2009, p. 55.
- ^ Keogh 1965, p. 17.
- ^ Kienzle 2011, p. 110.
- ^ Fitzsimons 2004, pp. 154–155; McCarthy 1959, p. 141; Brune 2004, p. 89.
- ^ Anderson 2014, pp. 15–17.
- ^ Keogh 1965, p. 172.
- ^ a b Collie & Marutani 2009, p. 85.
- ^ a b c d e f g h i j k l "Into the Mountains: The stand at Isurava: 26–31 August 1942". The Kokoda Track: Exploring the Site of the Battle Fought by Australians in World War II. Commonwealth of Australia. Retrieved 22 September 2016.
- ^ Anderson 2014, pp. 54–55.
- ^ Williams 2012, pp. 69–70.
- ^ "The War in Papua: The Strategic Context. Why was Port Moresby important?". The Kokoda Track: Exploring the Site of the Battle Fought by Australians in World War II. Commonwealth of Australia. Retrieved 26 November 2016.
- ^ a b Keogh 1965, p. 168.
- ^ Williams 2012, pp. 49–51.
- ^ Coulthard-Clark 1998, pp. 222–223.
- ^ a b Keogh 1965, p. 183.
- ^ Maitland 1999, pp. 57–58; Keogh 1965, p. 239.
- ^ Williams 2012, pp. 50–52.
- ^ Thompson 2008, p. 322.
- ^ Williams 2012, pp. 50–52; Keogh 1965, pp. 175–176.
- ^ Williams 2012, pp. 52–59.
- ^ Brune 2004, p. 131.
- ^ Collie & Marutani 2009, p. 80.
- ^ "A Fighting Retreat: Second engagement at Kokoda 8 August 1942". The Kokoda Track: Exploring the Site of the Battle Fought by Australians in World War II. Commonwealth of Australia. Retrieved 11 September 2016.
- ^ "The War in Papua: The Strategic Context: Guadalcanal August 1942 – February 1943". The Kokoda Track: Exploring the Site of the Battle Fought by Australians in World War II. Commonwealth of Australia. Retrieved 13 November 2016.
- ^ a b c Williams 2012, p. 85.
- ^ Anderson 2014, p. 52.
- ^ a b Maitland 1999, p. 57.
- ^ Williams 2012, p. 70.
- ^ a b Williams 2012, p. 64.
- ^ Maitland 1999, p. 57; Coulthard-Clark 1998, p. 222.
- ^ Horner 1995, pp. 336–337.
- ^ McAulay 1991, p. 135; Keogh 1965, p. 207.
- ^ Williams 2012, pp. 65 & 70.
- ^ a b McCarthy 1959, p. 228.
- ^ Williams 2012, p. 65.
- ^ Williams 2012, p. 69.
- ^ Williams 2012, pp. 65–68.
- ^ Brune 2004, p. 158.
- ^ Anderson 2014, pp. 53–54; Keogh 1965, pp. 203–205.
- ^ Anderson 2014, p. 58.
- ^ Keogh 1965, p. 180.
- ^ Anderson 2014, pp. 54–56.
- ^ Keogh 1965, p. 205.
- ^ Keogh 1965, p. 206.
- ^ Anderson 2014, p. 54.
- ^ a b McCarthy 1959, pp. 200–211.
- ^ a b Williams 2012, p. 71.
- ^ Anderson 2014, pp. 57–59.
- ^ Keogh 1965, p. 206; Anderson 2014, pp. 56–59.
- ^ a b Anderson 2014, p. 60.
- ^ Collie & Marutani 2009, pp. 86–87.
- ^ a b Collie & Marutani 2009, p. 89.
- ^ "No. 35893". The London Gazette (Supplement). 5 February 1943. p. 695.
- ^ Anderson 2014, p. 61.
- ^ Collie & Marutani 2009, p. 83.
- ^ Keogh 1965, p. 207.
- ^ Anderson 2014, p. 65.
- ^ Ham 2004, p. 176.
- ^ Keogh 1965, p. 207; Collie & Marutani 2009, p. 90.
- ^ a b Williams 2012, p. 74 & 112.
- ^ Anderson 2014, p. 69.
- ^ Collie & Marutani 2009, p. 91.
- ^ Coulthard-Clark 1998, p. 222.
- ^ Keogh 1965, pp. 207–208.
- ^ Brune 2004, pp. 167–168.
- ^ Harries & Harries 1991, p. 404.
- ^ Bullard 2007, p. 142; James 2013, pp. 211–212; Williams 2012, p. 85.
- ^ Bullard 2007, p. 142.
- ^ McAulay 1991, pp. 227–228.
- ^ Keogh 1965, p. 215.
- ^ Bullard 2007, p. 159.
- ^ James 2013, pp. 209–212.
- ^ Williams 2012, pp. 5 & 78.
- ^ Williams 2012, p. 76.
- ^ Stephens, Tony (2 August 2002). "Why Milne Bay is part of Kokoda's Legend". The Age. Melbourne, Victoria. Retrieved 30 January 2010.
- ^ Maitland 1999, p. 57; Anderson 2014, pp. 68–69.
- ^ a b "Historians Professor David Horner and Ashley Ekins question World War II Kokoda campaign's iconic status". News.com.au. 6 September 2012. Archived from the original on 29 October 2016. Retrieved 24 October 2016.
- ^ Williams 2012, p. 62.
- ^ a b Ham 2004, p. 179.
- ^ Williams 2012, pp. 82–83.
- ^ Anderson 2014, p. 70.
- ^ Maitland 1999, p. 142.
- ^ "Battle Honours of the Australian Army: World War Two: South West Pacific" (PDF). Australian Army. Archived from the original (PDF) on 25 April 2018. Retrieved 5 June 2017.
Bibliography edit
- Anderson, Nicholas (2014). To Kokoda. Australian Army Campaigns Series – 14. Sydney, New South Wales: Big Sky Publishing. ISBN 978-1-922132-95-6.
- Brune, Peter (2004). A Bastard of a Place. Crows Nest, New South Wales: Allen & Unwin. ISBN 1-74114-403-5.
- Bullard, Steven, ed. (2007). Japanese Army Operations in the South Pacific Area New Britain and Papua Campaigns, 1942–43. Canberra, Australian Capital Territory: Australian War Memorial. ISBN 978-0-9751904-8-7.
- Collie, Craig; Marutani, Hajime (2009). The Path of Infinite Sorrow: The Japanese on the Kokoda Track. Crows Nest, New South Wales: Allen & Unwin. ISBN 978-1-74175-839-9.
- Coulthard-Clark, Chris (1998). The Encyclopaedia of Australia's Battles. Sydney, New South Wales: Allen & Unwin. ISBN 1-86448-611-2.
- Fitzsimons, Peter (2004). Kokoda. Sydney, New South Wales: Hachette. ISBN 978-0-7336-1962-5.
- Ham, Paul (2004). Kokoda. Sydney, New South Wales: HarperCollins. ISBN 978-0-7322-9836-4.
- Harries, Meirion; Harries, Susie (1991). Soldiers of the Sun: The Rise and Fall of the Imperial Japanese Army. New York: Random House. ISBN 978-0-679-75303-2.
- Horner, David (1995). The Gunners: A History of Australian Artillery. St Leonards, New South Wales: Allen & Unwin. ISBN 1-86373-917-3.
- James, Karl (2013). "On Australia's Doorstep: Kokoda and Milne Bay". In Dean, Peter (ed.). Australia 1942: In the Shadow of War. Port Melbourne, Victoria: Cambridge University Press. pp. 199–215. ISBN 978-1-107-03227-9.
- Kienzle, Robyn (2011). The Architect of Kokoda. Sydney, New South Wales: Hachette. ISBN 978-0-7336-2763-7.
- Keogh, Eustace (1965). South West Pacific 1941–45. Melbourne, Victoria: Grayflower Publications. OCLC 7185705.
- Maitland, Gordon (1999). The Second World War and its Australian Army Battle Honours. East Roseville, New South Wales: Kangaroo Press. ISBN 0-86417-975-8.
- McAulay, Lex (1991). Blood and Iron: The Battle for Kokoda 1942. Sydney, New South Wales: Arrow Books. ISBN 0-09-182628-4.
- McCarthy, Dudley (1959). South-West Pacific Area – First Year. Australia in the War of 1939–1945. Series 1 – Army. Vol. 5. Canberra, Australian Capital Territory: Australian War Memorial. OCLC 3134247.
- Tanaka, Kengoro (1980). Operations of the Imperial Japanese Armed Forces in the Papua New Guinea Theater During World War II. Tokyo, Japan: Japan Papua New Guinea Goodwill Society. OCLC 9206229.
- Thompson, Peter (2008). Pacific Fury: How Australia and Her Allies Defeated the Japanese Scourge. North Sydney, New South Wales: William Heinemann. ISBN 978-1-74166-708-0.
- Williams, Peter (2012). The Kokoda Campaign 1942: Myth and Reality. Melbourne, Victoria: Cambridge University Press. ISBN 978-1-107-01594-4.